825 lines
30 KiB
Markdown
825 lines
30 KiB
Markdown
Platypush
|
|
=========
|
|
|
|
[](https://ci-cd.platypush.tech/platypush/platypush)
|
|
[](https://pypi.python.org/pypi/platypush/)
|
|
[](https://git.platypush.tech/platypush/platypush/src/branch/master/LICENSE.txt)
|
|
[](https://git.platypush.tech/platypush/platypush/commits/branch/master)
|
|
[](https://matrix.to/#/#platypush:matrix.platypush.tech)
|
|
[](https://git.platypush.tech/platypush/platypush/src/branch/master/CONTRIBUTING.md)
|
|
|
|
<!-- toc -->
|
|
|
|
- [Introduction](#introduction)
|
|
+ [What it can do](#what-it-can-do)
|
|
- [Installation](#installation)
|
|
* [Prerequisites](#prerequisites)
|
|
+ [Docker installation](#docker-installation)
|
|
+ [Use an external service](#use-an-external-service)
|
|
+ [Manual installation](#manual-installation)
|
|
* [Install through `pip`](#install-through-pip)
|
|
* [Install through a system package manager](#install-through-a-system-package-manager)
|
|
* [Install from sources](#install-from-sources)
|
|
* [Installing the dependencies for your extensions](#installing-the-dependencies-for-your-extensions)
|
|
+ [Install via `extras` name](#install-via-extras-name)
|
|
+ [Install via `manifest.yaml`](#install-via-manifestyaml)
|
|
+ [Check the instructions reported in the documentation](#check-the-instructions-reported-in-the-documentation)
|
|
* [Virtual environment installation](#virtual-environment-installation)
|
|
* [Docker installation](#docker-installation-1)
|
|
- [Architecture](#architecture)
|
|
* [Plugins](#plugins)
|
|
* [Actions](#actions)
|
|
* [Backends](#backends)
|
|
* [Events](#events)
|
|
* [Hooks](#hooks)
|
|
+ [More complex filters](#more-complex-filters)
|
|
* [Procedures](#procedures)
|
|
* [Cronjobs](#cronjobs)
|
|
* [Entities](#entities)
|
|
* [The web interface](#the-web-interface)
|
|
+ [The main web panel](#the-main-web-panel)
|
|
+ [The execution panel](#the-execution-panel)
|
|
+ [Other web panels](#other-web-panels)
|
|
+ [Dashboards](#dashboards)
|
|
* [Running in production mode](#running-in-production-mode)
|
|
+ [PWA support](#pwa-support)
|
|
- [Mobile app](#mobile-app)
|
|
- [Tests](#tests)
|
|
- [Useful links](#useful-links)
|
|
- [Funding](#funding)
|
|
|
|
<!-- tocstop -->
|
|
|
|
## Introduction
|
|
|
|
Platypush is a general-purpose extensible platform for automation across
|
|
multiple services and devices.
|
|
|
|
It enables users to create their own self-hosted pieces of automation based on
|
|
events (*if this happens then do that*)
|
|
and it provides a comprehensive and customizable user interface that collects
|
|
everything you need to visualize and control under one roof.
|
|
|
|
It takes some concepts from [IFTTT](https://ifttt.com),
|
|
[Tasker](https://tasker.joaoapps.com/), [Microsoft
|
|
Flow](https://flow.microsoft.com) and [Home
|
|
Assistant](https://www.home-assistant.io/) to provide an environment where the
|
|
user can easily connect things together.
|
|
|
|
It's built with compatibility and flexibility in mind, and it can easily run on
|
|
any device that can run a Python interpreter - from a Raspberry Pi zero, to an
|
|
old smartphone, to a beefy server.
|
|
|
|
#### What it can do
|
|
|
|
You can use Platypush to do things like:
|
|
|
|
- [Control your smart home lights](https://blog.platypush.tech/article/Ultimate-self-hosted-automation-with-Platypush)
|
|
- [Control your music and synchronize it to multiple devices](https://blog.platypush.tech/article/Build-your-open-source-multi-room-and-multi-provider-sound-server-with-Platypush-Mopidy-and-Snapcast)
|
|
- [Create custom and privacy-secure voice assistants that run custom hooks on your phrases](https://blog.platypush.tech/article/Build-custom-voice-assistants)
|
|
- Build integrations between [sensors](https://docs.platypush.tech/en/latest/platypush/backend/sensor.html),
|
|
[cameras](https://docs.platypush.tech/en/latest/platypush/plugins/camera.pi.html),
|
|
[microphones](https://docs.platypush.tech/en/latest/platypush/plugins/sound.html)
|
|
and [machine learning
|
|
models](https://docs.platypush.tech/en/latest/platypush/plugins/tensorflow.html)
|
|
to create smart
|
|
pieces of automation for e.g.
|
|
[people detection](https://blog.platypush.tech/article/Detect-people-with-a-RaspberryPi-a-thermal-camera-Platypush-and-a-pinch-of-machine-learning)
|
|
or [sound detection](https://blog.platypush.tech/article/Create-your-smart-baby-monitor-with-Platypush-and-Tensorflow)
|
|
- [Get events from your Google or Facebook calendars](https://docs.platypush.tech/en/latest/platypush/plugins/calendar.html)
|
|
- [Read data from your sensors and trigger custom events whenever they go above or below some custom thresholds](https://blog.platypush.tech/article/How-to-build-your-personal-infrastructure-for-data-collection-and-visualization)
|
|
- [Control and automate a self-built robot](https://docs.platypush.tech/en/latest/platypush/plugins/gpio.zeroborg.html)
|
|
- [Deliver automated newsletters from custom RSS digests](https://blog.platypush.tech/article/Deliver-customized-newsletters-from-RSS-feeds-with-Platypush)
|
|
- [Synchronize the clipboards on your devices](https://docs.platypush.tech/en/latest/platypush/plugins/clipboard.html)
|
|
- [Control your smart switches](https://docs.platypush.tech/en/latest/platypush/plugins/switch.html)
|
|
- [Implement automated custom text-to-speech routines](https://docs.platypush.tech/en/latest/platypush/plugins/tts.html)
|
|
- [Build any kind of interactions and automation routines with your Android device using Tasker](https://blog.platypush.tech/article/How-to-build-your-personal-infrastructure-for-data-collection-and-visualization)
|
|
- Play [local
|
|
videos](https://docs.platypush.tech/en/latest/platypush/plugins/media.mpv.html),
|
|
YouTube videos and torrent media from any device and service, to any device
|
|
- [Get weather forecast events for your location and build automation routines on them](https://docs.platypush.tech/en/latest/platypush/plugins/weather.darksky.html)
|
|
- [Create a custom single hub for Zigbee and Z-Wave smart devices](https://blog.platypush.tech/article/Transform-a-RaspberryPi-into-a-universal-Zigbee-and-Z-Wave-bridge)
|
|
- Build your own web dashboard with calendar, weather, news and music controls
|
|
(basically, anything that has a Platypush web widget)
|
|
- ...and much more (basically, anything that comes with a [Platypush plugin](https://docs.platypush.tech))
|
|
|
|
## Installation
|
|
|
|
### Prerequisites
|
|
|
|
Platypush uses [Redis](https://redis.io/) to dispatch requests, responses,
|
|
events and custom messages across several processes and integrations.
|
|
|
|
#### Docker installation
|
|
|
|
You can run Redis on the fly on your local machine using a Docker image:
|
|
|
|
```bash
|
|
# Expose a Redis server on port 6379 (default)
|
|
docker run --rm -p 6379:6379 --name redis redis
|
|
```
|
|
|
|
#### Use an external service
|
|
|
|
You can let Platypush use an external Redis service, if you wish to avoid
|
|
running one on the same machine.
|
|
|
|
In such scenario, simply start the application by passing custom values for
|
|
`--redis-host` and `--redis-port`, or configure these values in its
|
|
configuration file:
|
|
|
|
```yaml
|
|
redis:
|
|
host: some-ip
|
|
port: some-port
|
|
```
|
|
|
|
If you wish to run multiple instances that use the same Redis server, you may
|
|
also want to customize the name of the default queue that they use
|
|
(`--redis-queue` command-line option) in order to avoid conflicts.
|
|
|
|
#### Manual installation
|
|
|
|
Unless you are running Platypush in a Docker container, or you are running
|
|
Redis in a Docker container, or you want to use a remote Redis service, the
|
|
Redis server should be installed on the same machine where Platypush runs:
|
|
|
|
```bash
|
|
# On Debian-based distributions
|
|
sudo apt install redis-server
|
|
|
|
# On Arch-based distributions
|
|
# The hiredis package is also advised
|
|
sudo pacman -S redis
|
|
|
|
# On MacOS
|
|
brew install redis
|
|
```
|
|
|
|
Once Redis is installed, you have two options:
|
|
|
|
1. Run it a separate service. This depends on your operating system and
|
|
supervisor/service controller. For example, on systemd:
|
|
|
|
```bash
|
|
# Enable and start the service
|
|
sudo systemctl enable redis
|
|
sudo systemctl start redis
|
|
```
|
|
|
|
2. Let Platypush run and control the Redis service. This is a good option if
|
|
you want Platypush to run its own service, separate from any other one
|
|
running on the same machine, and terminate it as soon as the application
|
|
ends. In this case, simply launch the application with the `--start-redis`
|
|
option (and optionally `--redis-port <any-num>` to customize the listen
|
|
port).
|
|
|
|
### Install through `pip`
|
|
|
|
```bash
|
|
[sudo] pip install platypush
|
|
```
|
|
|
|
### Install through a system package manager
|
|
|
|
Note: currently only Arch Linux and derived distributions are supported.
|
|
|
|
You can either install the
|
|
[`platypush`](https://aur.archlinux.org/packages/platypush) package (for the
|
|
latest stable version) or the
|
|
[`platypush-git`](https://aur.archlinux.org/packages/platypush-git) package
|
|
(for the latest git version) through your favourite AUR package manager. For
|
|
example, using `yay`:
|
|
|
|
```bash
|
|
yay platypush
|
|
# Or
|
|
yay platypush-git
|
|
```
|
|
|
|
The Arch Linux packages on AUR are automatically updated upon new git commits
|
|
or tags.
|
|
|
|
### Install from sources
|
|
|
|
```shell
|
|
git clone https://git.platypush.tech/platypush/platypush.git
|
|
cd platypush
|
|
[sudo] pip install .
|
|
```
|
|
|
|
### Installing the dependencies for your extensions
|
|
|
|
After installing the base platform, you may want to check the dependencies and
|
|
configuration required by the extensions that you wish to use. There are a few
|
|
ways to check the dependencies required by an extension:
|
|
|
|
#### Install via `extras` name
|
|
|
|
All the extensions that require extra dependencies are listed in the
|
|
[`extras_require` section under
|
|
`setup.py`](https://git.platypush.tech/platypush/platypush/src/branch/master/setup.py#L84).
|
|
|
|
#### Install via `manifest.yaml`
|
|
|
|
All the plugins and backends have a `manifest.yaml` file in their source folder.
|
|
Any extra dependencies are listed there
|
|
|
|
If you followed the `extras` or `manifest.yaml` way to discover the
|
|
dependencies, then you can install them in two ways:
|
|
|
|
1. `pip` installation:
|
|
|
|
```shell
|
|
[sudo] pip3 install 'platypush[extra1,extra2,extra3]'
|
|
```
|
|
|
|
2. Sources installation:
|
|
|
|
```shell
|
|
cd $DIR_TO_PLATYPUSH
|
|
[sudo] pip3 install '.[extra1,extra2,extra3]'
|
|
```
|
|
|
|
#### Check the instructions reported in the documentation
|
|
|
|
If you follow this route then simply run the commands listed in the
|
|
[plugin/backend documentation](https://docs.platypush.tech) to get the
|
|
dependencies installed.
|
|
|
|
After installing the dependencies, create a configuration file under
|
|
`~/.config/platypush/config.yaml` (the application can load the configuration
|
|
from another location through the `-c` option) containing the configuration of
|
|
the backend and plugins that you want to use, and add any hooks and procedures
|
|
for your use case.
|
|
|
|
You can then start the service by simply running:
|
|
|
|
```shell
|
|
platypush
|
|
```
|
|
|
|
See `platypush --help` for a full list of options.
|
|
|
|
It's advised to run it as a systemd service though - simply copy the provided
|
|
[`.service`
|
|
file](https://git.platypush.tech/platypush/platypush/src/branch/master/examples/systemd/platypush.service)
|
|
to `~/.config/systemd/user`, check if the path of `platypush` matches the path
|
|
where it's installed on your system, and start the service via `systemctl`:
|
|
|
|
```shell
|
|
systemctl --user start platypush
|
|
```
|
|
|
|
### Virtual environment installation
|
|
|
|
Platypush provides a script named `platyvenv` that can parse a `config.yaml`
|
|
and automatically create a virtual environment (under
|
|
`~/.local/share/platypush/venv/<device_id>`) with all the dependencies required
|
|
by the configured integrations.
|
|
|
|
1. Create the environment from a configuration file:
|
|
|
|
```shell
|
|
platyvenv build -c /path/to/config.yaml
|
|
```
|
|
|
|
2. Start the service from the virtual environment:
|
|
|
|
```shell
|
|
# device_id matches either the hostname or the device_id in config.yaml
|
|
platyvenv start device_id
|
|
```
|
|
|
|
3. Stop the instance:
|
|
|
|
```shell
|
|
platyvenv stop device_id
|
|
```
|
|
|
|
4. Remove the instance:
|
|
|
|
```shell
|
|
platyvenv rm device_id
|
|
```
|
|
|
|
[Wiki instructions](https://git.platypush.tech/platypush/platypush/wiki/Run-platypush-in-a-virtual-environment)
|
|
|
|
### Docker installation
|
|
|
|
You can also install Platypush in a container - the application provides a
|
|
script named `platydock` that automatically creates a container instance from a
|
|
`config.yaml`:
|
|
|
|
1. Create the container from a configuration file:
|
|
|
|
```shell
|
|
platydock build -c /path/to/config.yaml
|
|
```
|
|
|
|
2. Start the container:
|
|
|
|
```shell
|
|
# device_id matches either the hostname or the device_id in config.yaml
|
|
platydock start device_id
|
|
```
|
|
|
|
3. Stop the instance:
|
|
|
|
```shell
|
|
platydock stop device_id
|
|
```
|
|
|
|
4. Remove the instance:
|
|
|
|
```shell
|
|
platydock rm device_id
|
|
```
|
|
|
|
Note that both the virtual environment and Docker container option offer the
|
|
possibility to include extra YAML configuration files in the main `config.yaml`
|
|
through the `include` directive (as long as they are in the same folder as the
|
|
main `config.yaml`), as well as external Python scripts in a `scripts`
|
|
directory in the same folder as the `config.yaml`.
|
|
|
|
[Wiki instructions](https://git.platypush.tech/platypush/platypush/wiki/Run-platypush-in-a-container)
|
|
|
|
## Architecture
|
|
|
|
The architecture of Platypush consists of a few simple pieces, orchestrated by
|
|
a configuration file stored by default under
|
|
[`~/.config/platypush/config.yaml`](https://git.platypush.tech/platypush/platypush/src/branch/master/examples/conf/config.yaml):
|
|
|
|
### Plugins
|
|
|
|
[Full list](https://docs.platypush.tech/en/latest/plugins.html)
|
|
|
|
Plugins are integrations that do things - like [modify
|
|
files](https://docs.platypush.tech/en/latest/platypush/plugins/file.html),
|
|
[train and evaluate machine learning
|
|
models](https://docs.platypush.tech/en/latest/platypush/plugins/tensorflow.html),
|
|
[control
|
|
cameras](https://docs.platypush.tech/en/latest/platypush/plugins/camera.pi.html),
|
|
[read
|
|
sensors](https://docs.platypush.tech/en/latest/platypush/plugins/gpio.sensor.dht.html),
|
|
[parse a web
|
|
page](https://docs.platypush.tech/en/latest/platypush/plugins/http.webpage.html),
|
|
[control
|
|
lights](https://docs.platypush.tech/en/latest/platypush/plugins/light.hue.html),
|
|
[send
|
|
emails](https://docs.platypush.tech/en/latest/platypush/plugins/mail.smtp.html),
|
|
[control
|
|
Chromecasts](https://docs.platypush.tech/en/latest/platypush/plugins/media.chromecast.html),
|
|
[run voice
|
|
queries](https://docs.platypush.tech/en/latest/platypush/plugins/assistant.google.html),
|
|
[handle torrent
|
|
transfers](https://docs.platypush.tech/en/latest/platypush/plugins/torrent.html)
|
|
or control
|
|
[Zigbee](https://docs.platypush.tech/en/latest/platypush/plugins/zigbee.mqtt.html)
|
|
or [Z-Wave](https://docs.platypush.tech/en/latest/platypush/plugins/zwave.html)
|
|
devices.
|
|
|
|
The configuration of a plugin matches one-on-one that of its documented class
|
|
constructor, so it's very straightforward to write a configuration for a plugin
|
|
by reading its documentation:
|
|
|
|
```yaml
|
|
light.hue:
|
|
# Groups that will be controlled by default
|
|
groups:
|
|
- Living Room
|
|
- Hall
|
|
```
|
|
|
|
### Actions
|
|
|
|
Plugins expose *actions*, that match one-on-one the plugin class methods
|
|
denoted by `@action`, so it's very straightforward to invoke plugin actions by
|
|
just reading the plugin documentation. They can be invoked directly from your
|
|
own scripts or they can be sent to the platform through any supported channel
|
|
as simple JSON messages:
|
|
|
|
```json
|
|
{
|
|
"type": "request",
|
|
"action": "light.hue.on",
|
|
"args": {
|
|
"lights": ["Entrance Bulb"]
|
|
}
|
|
}
|
|
```
|
|
|
|
### Backends
|
|
|
|
[Full list](https://docs.platypush.tech/en/latest/backends.html)
|
|
|
|
They are background services that listen for messages on channels (like
|
|
an [HTTP
|
|
backend](https://docs.platypush.tech/en/latest/platypush/backend/http.html), an
|
|
[MQTT
|
|
instance](https://docs.platypush.tech/en/latest/platypush/backend/mqtt.html), a
|
|
[Kafka
|
|
instance](https://docs.platypush.tech/en/latest/platypush/backend/kafka.html).
|
|
|
|
If a backend supports the execution of requests (e.g. HTTP, MQTT, Kafka,
|
|
Websocket and TCP) then you can send requests to these services in JSON format.
|
|
For example, in the case of the HTTP backend:
|
|
|
|
```shell
|
|
# Get a token
|
|
curl -XPOST -H 'Content-Type: application/json' -d '
|
|
{
|
|
"username": "$YOUR_USER",
|
|
"password": "$YOUR_PASSWORD"
|
|
}' http://host:8008/auth
|
|
|
|
# Execute a request
|
|
curl -XPOST -H 'Content-Type: application/json' \
|
|
-H "Authorization: Bearer $YOUR_TOKEN" -d '
|
|
{
|
|
"type": "request",
|
|
"action": "tts.say",
|
|
"args": {
|
|
"text": "This is a test"
|
|
}
|
|
}' http://host:8008/execute
|
|
```
|
|
|
|
### Events
|
|
|
|
[Full list](https://docs.platypush.tech/en/latest/events.html)
|
|
|
|
When a certain event occurs (e.g. a JSON request is received, or a [Bluetooth
|
|
device is
|
|
connected](https://docs.platypush.tech/en/latest/platypush/events/bluetooth.html#platypush.message.event.bluetooth.BluetoothDeviceConnectedEvent),
|
|
or a [Flic button is
|
|
pressed](https://docs.platypush.tech/en/latest/platypush/events/button.flic.html#platypush.message.event.button.flic.FlicButtonEvent),
|
|
or some [speech is detected on the voice assistant
|
|
service](https://docs.platypush.tech/en/latest/platypush/events/assistant.html#platypush.message.event.assistant.SpeechRecognizedEvent),
|
|
or an [RSS feed has new
|
|
items](https://docs.platypush.tech/en/latest/platypush/events/http.rss.html#platypush.message.event.http.rss.NewFeedEvent),
|
|
or a [new email is
|
|
received](https://docs.platypush.tech/en/latest/platypush/events/mail.html#platypush.message.event.mail.MailReceivedEvent),
|
|
or a [new track is
|
|
played](https://docs.platypush.tech/en/latest/platypush/events/music.html#platypush.message.event.music.NewPlayingTrackEvent),
|
|
or an [NFC tag is
|
|
detected](https://docs.platypush.tech/en/latest/platypush/events/nfc.html#platypush.message.event.nfc.NFCTagDetectedEvent),
|
|
or [new sensor data is
|
|
available](https://docs.platypush.tech/en/latest/platypush/events/sensor.html#platypush.message.event.sensor.SensorDataChangeEvent),
|
|
or [a value of a Zigbee device
|
|
changes](https://docs.platypush.tech/en/latest/platypush/events/zigbee.mqtt.html#platypush.message.event.zigbee.mqtt.ZigbeeMqttDevicePropertySetEvent),
|
|
etc.), the associated backend will trigger an
|
|
[event](https://docs.platypush.tech/en/latest/events.html).
|
|
|
|
### Hooks
|
|
|
|
Event hooks are custom pieces of logic that will be run when a certain event is
|
|
triggered. Hooks are the glue that connects events to actions, exposing a
|
|
paradigm similar to IFTTT (_if a certain event happens then run these
|
|
actions_). They can declared as:
|
|
|
|
- Sections of the [`config.yaml`](https://git.platypush.tech/platypush/platypush/src/branch/master/examples/conf/config.yaml).
|
|
Example:
|
|
|
|
```yaml
|
|
event.hook.SearchSongVoiceCommand:
|
|
if:
|
|
type: platypush.message.event.assistant.SpeechRecognizedEvent
|
|
phrase: "play ${title} by ${artist}"
|
|
then:
|
|
- action: music.mpd.clear
|
|
- action: music.mpd.search
|
|
args:
|
|
filter:
|
|
artist: ${artist}
|
|
title: ${title}
|
|
|
|
- if ${len(output)}:
|
|
- action: music.mpd.play
|
|
args:
|
|
resource: ${output[0]['file']}
|
|
```
|
|
|
|
- Stand-alone Python scripts stored under `~/.config/platypush/scripts` and
|
|
will be dynamically imported at start time.
|
|
[Example](https://git.platypush.tech/platypush/platypush/src/branch/master/examples/conf/hook.py):
|
|
|
|
```python
|
|
from platypush.event.hook import hook
|
|
from platypush.utils import run
|
|
from platypush.message.event.assistant import SpeechRecognizedEvent
|
|
|
|
@hook(SpeechRecognizedEvent, phrase='play ${title} by ${artist}')
|
|
def on_music_play_command(event, title=None, artist=None, **context):
|
|
results = run('music.mpd.search', filter={
|
|
'artist': artist,
|
|
'title': title,
|
|
})
|
|
|
|
if results:
|
|
run('music.mpd.play', results[0]['file'])
|
|
```
|
|
|
|
#### More complex filters
|
|
|
|
Your event hooks can include more complex filters too. Structured filters
|
|
against partial event arguments are also possible, and relational operators are
|
|
supported as well. For example:
|
|
|
|
```python
|
|
from platypush.event.hook import hook
|
|
from platypush.message.event.sensor import SensorDataChangeEvent
|
|
|
|
@hook(SensorDataChangeEvent, data=1):
|
|
def hook_1(event):
|
|
"""
|
|
Triggered when event.data == 1
|
|
"""
|
|
|
|
@hook(SensorDataChangeEvent, data={'state': 1}):
|
|
def hook_2(event):
|
|
"""
|
|
Triggered when event.data['state'] == 1
|
|
"""
|
|
|
|
@hook(SensorDataChangeEvent, data={
|
|
'temperature': {'$gt': 25},
|
|
'humidity': {'$le': 15}
|
|
}):
|
|
def hook_3(event):
|
|
"""
|
|
Triggered when event.data['temperature'] > 25 and
|
|
event.data['humidity'] <= 15.
|
|
"""
|
|
```
|
|
|
|
The supported relational fields are the same supported by ElasticSearch - `$gt`
|
|
for greater than, `$lt` for lesser than, `$ge` for greater or equal, `$ne` for
|
|
not equal, etc.
|
|
|
|
### Procedures
|
|
|
|
Procedures are pieces of custom logic that can be executed as atomic actions
|
|
using `procedure.<name>` as an action name.
|
|
|
|
They can be defined either in the `config.yaml` or as Python scripts stored
|
|
under `~/.config/platypush/scripts` - provided that the procedure is also
|
|
imported in `~/.config/platypush/scripts/__init__.py` so it can be discovered
|
|
by the service.
|
|
|
|
YAML example for a procedure that can be executed when we arrive home and turns
|
|
on the lights if the luminosity is lower that a certain thresholds, says a
|
|
welcome home message using the TTS engine and starts playing the music:
|
|
|
|
```yaml
|
|
procedure.at_home:
|
|
# Get luminosity data from a sensor - e.g. LTR559
|
|
- action: gpio.sensor.ltr559.get_data
|
|
|
|
# If it's lower than a certain threshold, turn on the lights
|
|
- if ${int(light or 0) < 110}:
|
|
- action: light.hue.on
|
|
|
|
# Say a welcome home message
|
|
- action: tts.google.say
|
|
args:
|
|
text: Welcome home
|
|
|
|
# Play the music
|
|
- action: music.mpd.play
|
|
```
|
|
|
|
Python example:
|
|
|
|
```python
|
|
# Content of ~/.config/platypush/scripts/home.py
|
|
from platypush.procedure import procedure
|
|
from platypush.utils import run
|
|
|
|
@procedure
|
|
def at_home(**context):
|
|
sensor_data = run('gpio.sensor.ltr559.get_data')
|
|
if sensor_data['light'] < 110:
|
|
run('light.hue.on')
|
|
|
|
run('tts.google.say', text='Welcome home')
|
|
run('music.mpd.play')
|
|
```
|
|
|
|
In either case, you can easily trigger the at-home procedure by sending an
|
|
action request message to a backend - for example, over the HTTP backend:
|
|
|
|
```shell
|
|
curl -XPOST -H 'Content-Type: application/json' \
|
|
-H "Authorization: Bearer $YOUR_TOKEN" -d '
|
|
{
|
|
"type": "request",
|
|
"action": "procedure.at_home"
|
|
}' http://host:8008/execute
|
|
```
|
|
|
|
### Cronjobs
|
|
|
|
Cronjobs are pieces of logic that will be run at regular intervals, expressed
|
|
in crontab-compatible syntax. They can be defined either in the `config.yaml`
|
|
or as Python scripts stored under `~/.config/platypush/scripts` as functions
|
|
labelled by the `@cron` decorator.
|
|
|
|
Note that seconds are also supported (unlike the standard crontab definition),
|
|
but, for back-compatibility with the standard crontab format, they are at the
|
|
end of the cron expression, so the expression is actually in the format
|
|
`<minute> <hour> <day_of_month> <month> <day_of_week> <second>`.
|
|
|
|
YAML example for a cronjob that is executed every 30 seconds and checks if a
|
|
Bluetooth device is nearby:
|
|
|
|
```yaml
|
|
cron.check_bt_device:
|
|
cron_expression: '* * * * * */30'
|
|
actions:
|
|
- action: bluetooth.lookup_name
|
|
args:
|
|
addr: XX:XX:XX:XX:XX:XX
|
|
|
|
- if ${name}:
|
|
- action: procedure.on_device_on
|
|
- else:
|
|
- action: procedure.on_device_off
|
|
```
|
|
|
|
Python example:
|
|
|
|
```python
|
|
# Content of ~/.config/platypush/scripts/bt_cron.py
|
|
from platypush.cron import cron
|
|
from platypush.utils import run
|
|
|
|
@cron('* * * * * */30')
|
|
def check_bt_device(**context):
|
|
name = run('bluetooth.lookup_name').get('name')
|
|
if name:
|
|
# on_device_on logic here
|
|
else:
|
|
# on_device_off logic here
|
|
```
|
|
|
|
### Entities
|
|
|
|
Entities are a fundamental building block of Platypush. Most of the
|
|
integrations will store their state or connected devices in the form of
|
|
entities - e.g. the sensors detected by the Z-Wave/Zigbee/Bluetooth
|
|
integration, or the lights connected to a Hue bridge, or your cloud nodes, or
|
|
your custom Arduino/ESP machinery, and so on.
|
|
|
|
Entities provide a consistent interface to interact with your integrations
|
|
regardless of their type and the plugin that handles them. For instance, all
|
|
temperature sensors will expose the same interface, regardless if they are
|
|
Bluetooth or Zigbee sensors, and all the media plugins will expose the same
|
|
interface, regardless if they manage Chromecasts, Kodi, Plex, Jellyfin or a
|
|
local VLC player.
|
|
|
|
Once you enable the HTTP backend and a few integrations that export entities
|
|
and register a user, you can query the detected entities via:
|
|
|
|
```shell
|
|
curl -XPOST -H 'Content-Type: application/json' \
|
|
-H "Authorization: Bearer $YOUR_TOKEN" \
|
|
-d '{"type":"request", "action":"entities.get"}' \
|
|
http://localhost:8008/execute
|
|
```
|
|
|
|
All the entities expose the same interface and can be manipulated through the
|
|
same API. Also, when an entity is updated it always emits an
|
|
[`EntityUpdateEvent`](https://docs.platypush.tech/platypush/events/entities.html#platypush.message.event.entities.EntityUpdateEvent),
|
|
so you can easily create hooks that react to these events and act on multiple
|
|
types of entities.
|
|
|
|
### The web interface
|
|
|
|
If
|
|
[`backend.http`](https://docs.platypush.tech/en/latest/platypush/backend/http.html)
|
|
is enabled then a web interface will be provided by default on
|
|
`http://host:8008/`. Besides using the `/execute` endpoint for running
|
|
requests, the built-in web server also provides a full-featured interface that
|
|
groups together the controls for most of the plugins - e.g. sensors, switches,
|
|
music controls and search, media library and torrent management, lights,
|
|
Zigbee/Z-Wave devices and so on. The UI is responsive and mobile-friendly.
|
|
|
|
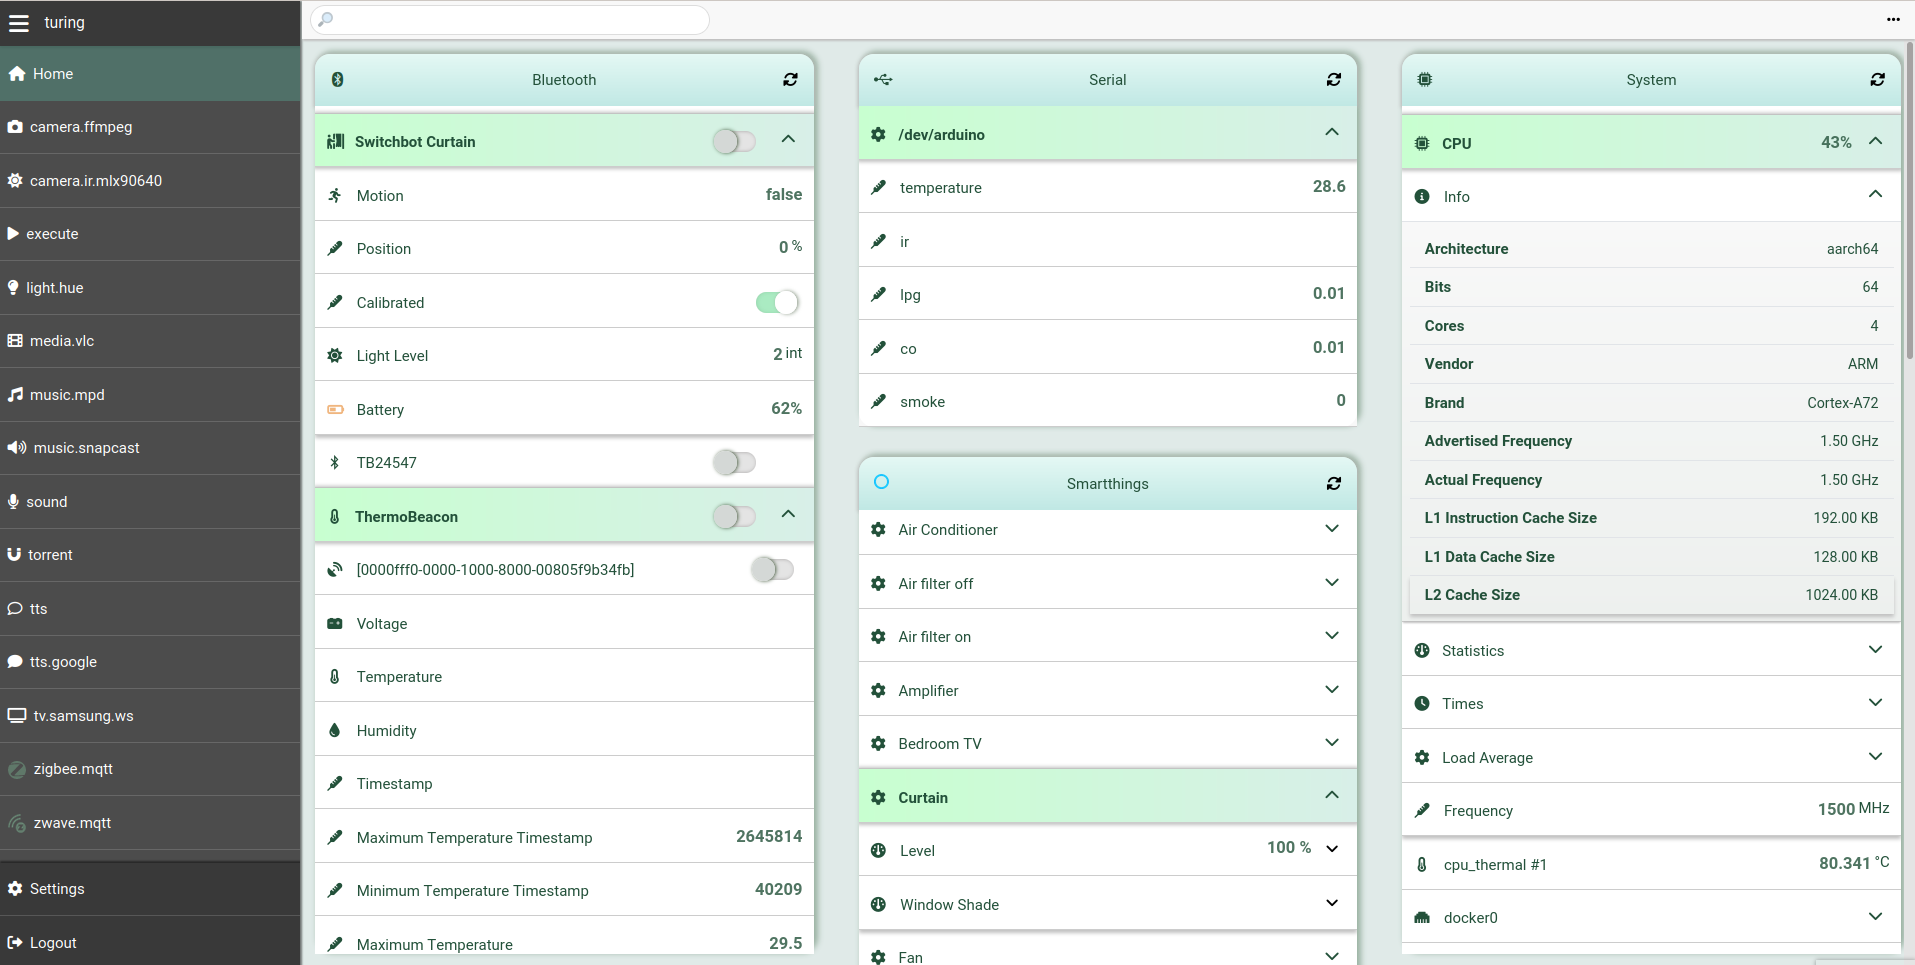
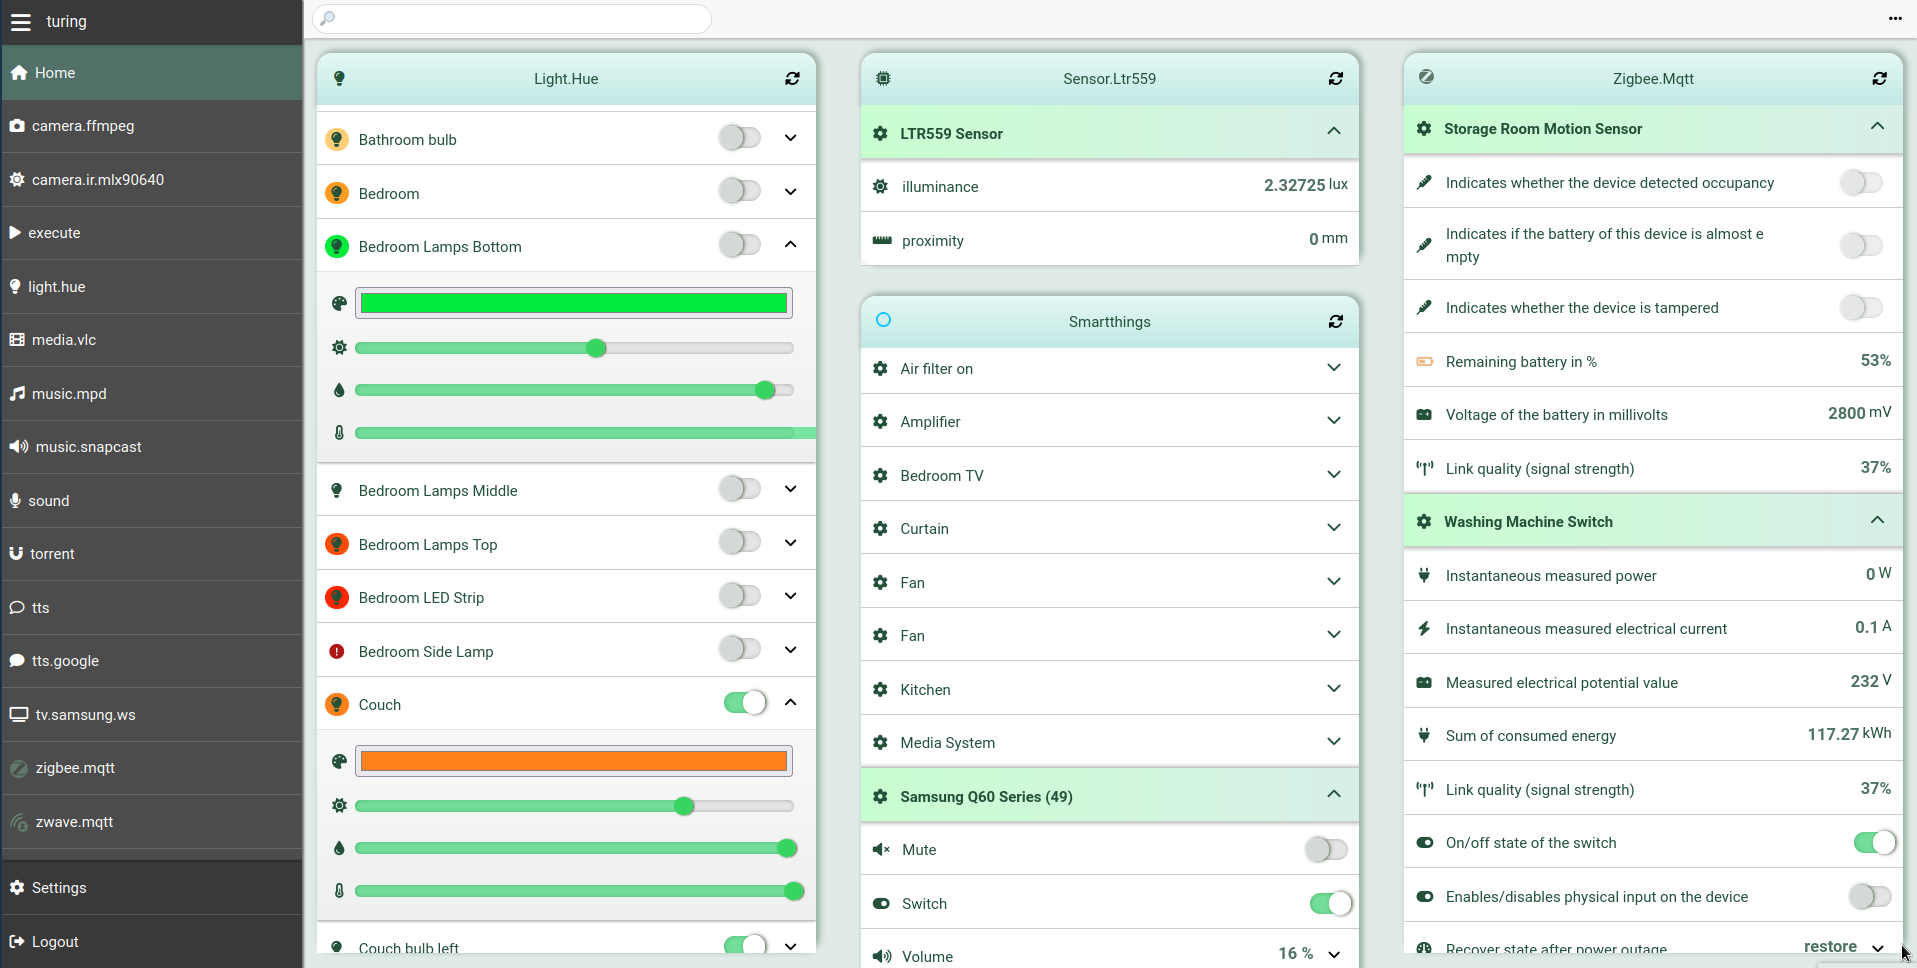
#### The main web panel
|
|
|
|
This is the default panel available at `http://<host>:<port>` after
|
|
registration/login. It provides all the entities published by the integrations
|
|
under one view, with custom grouping and filtering options.
|
|
|
|
|
|
|
|
|
|
|
|
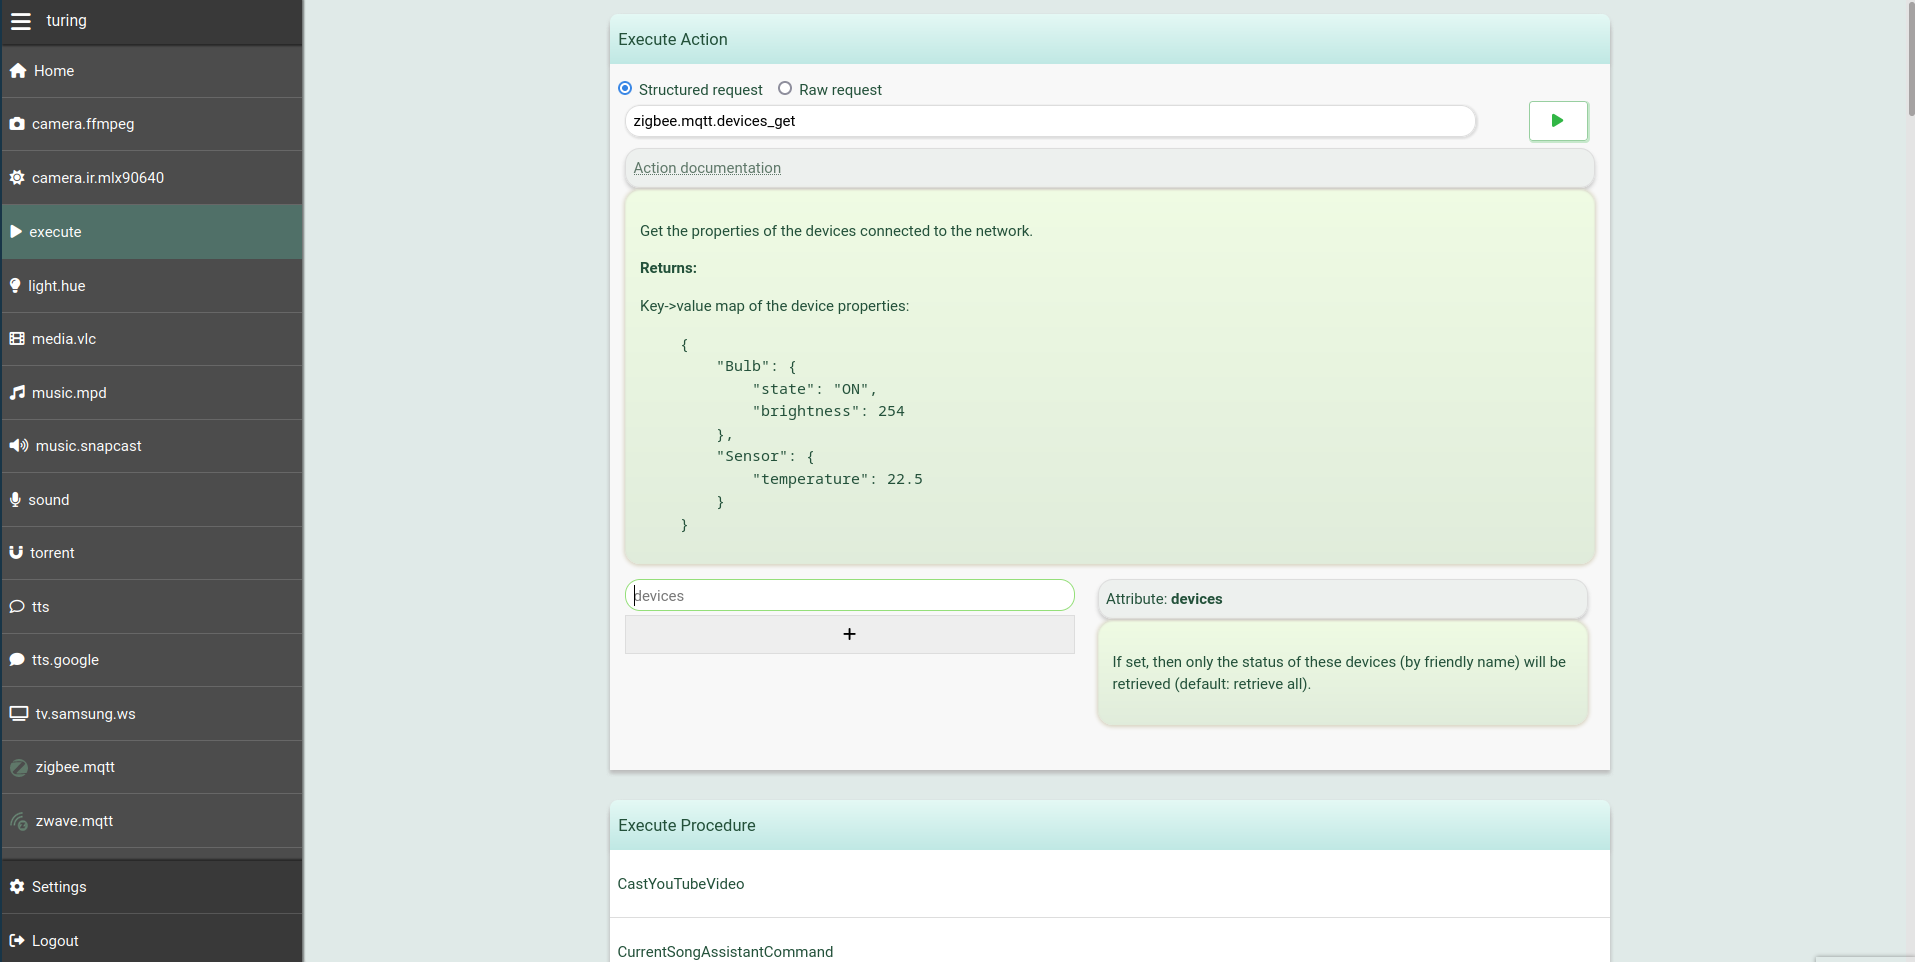
#### The execution panel
|
|
|
|
The web interface provides an `execute` panel as well. You can use this panel to
|
|
interactively inspect the available integrations and their actions, together
|
|
with their documentation and parameters, run requests directly from the web
|
|
interface, and inspect the JSON responses.
|
|
|
|

|
|
|
|
|
|
|
|
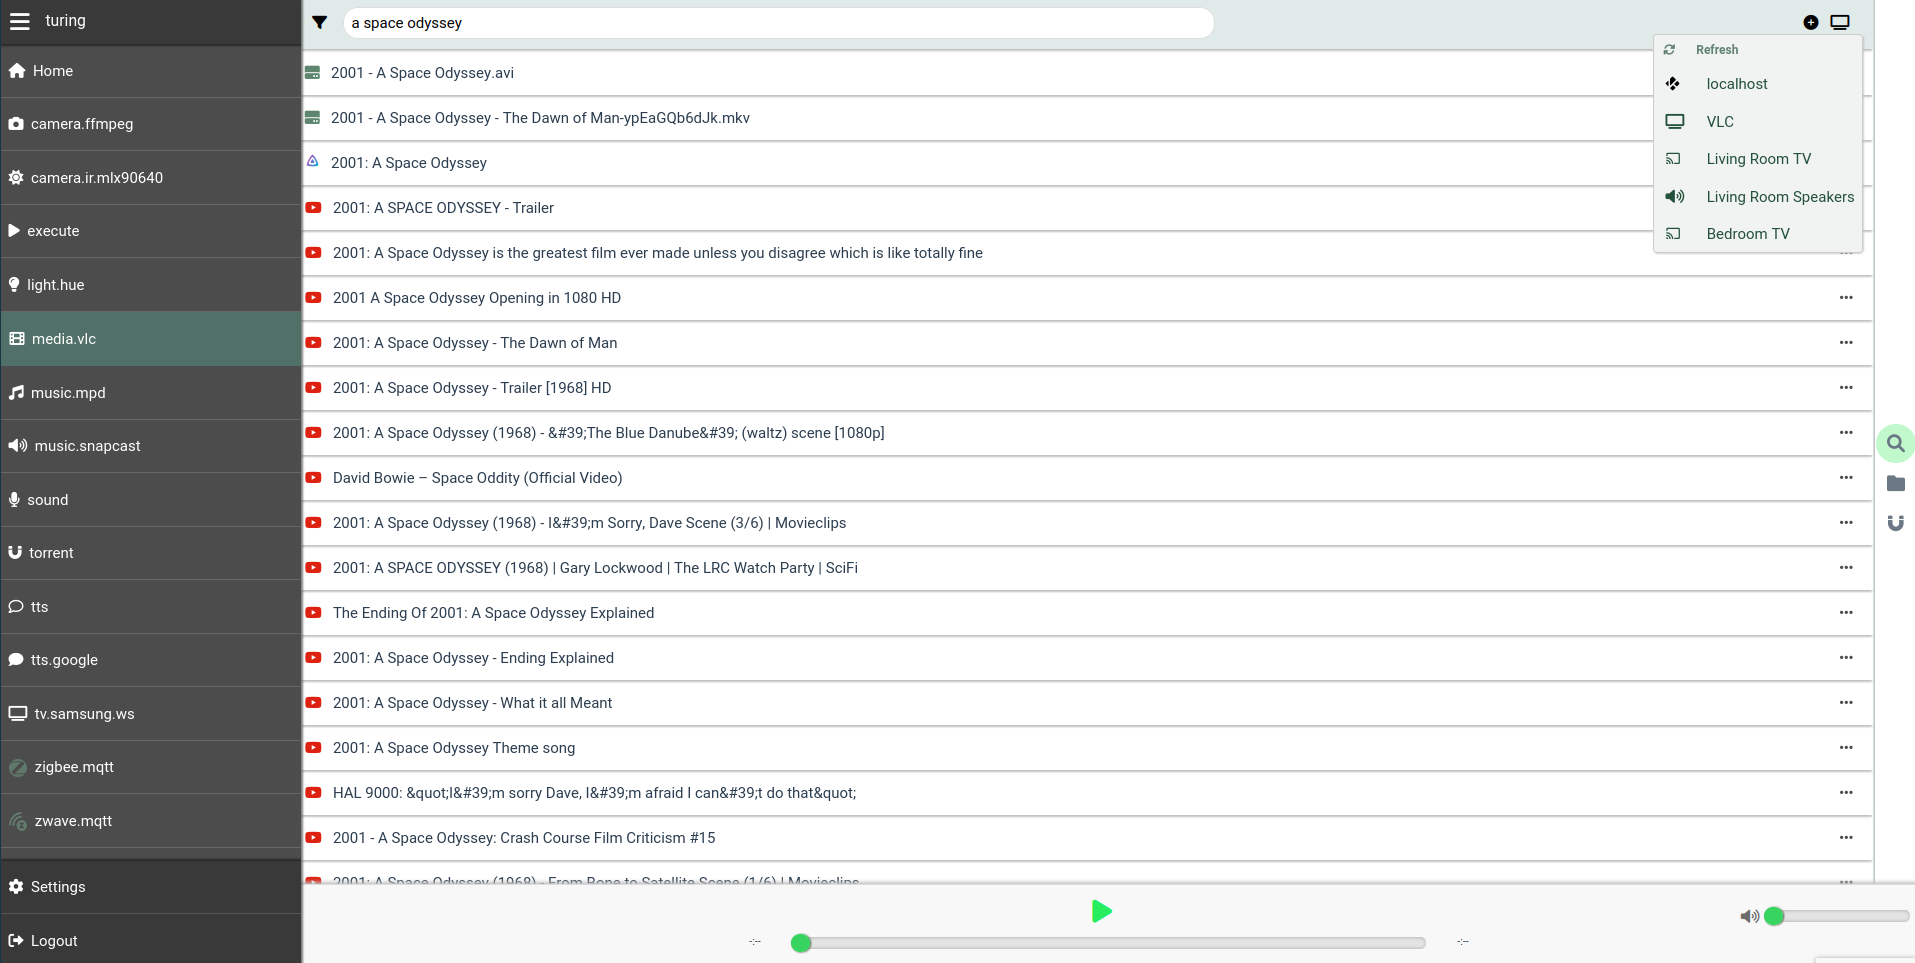
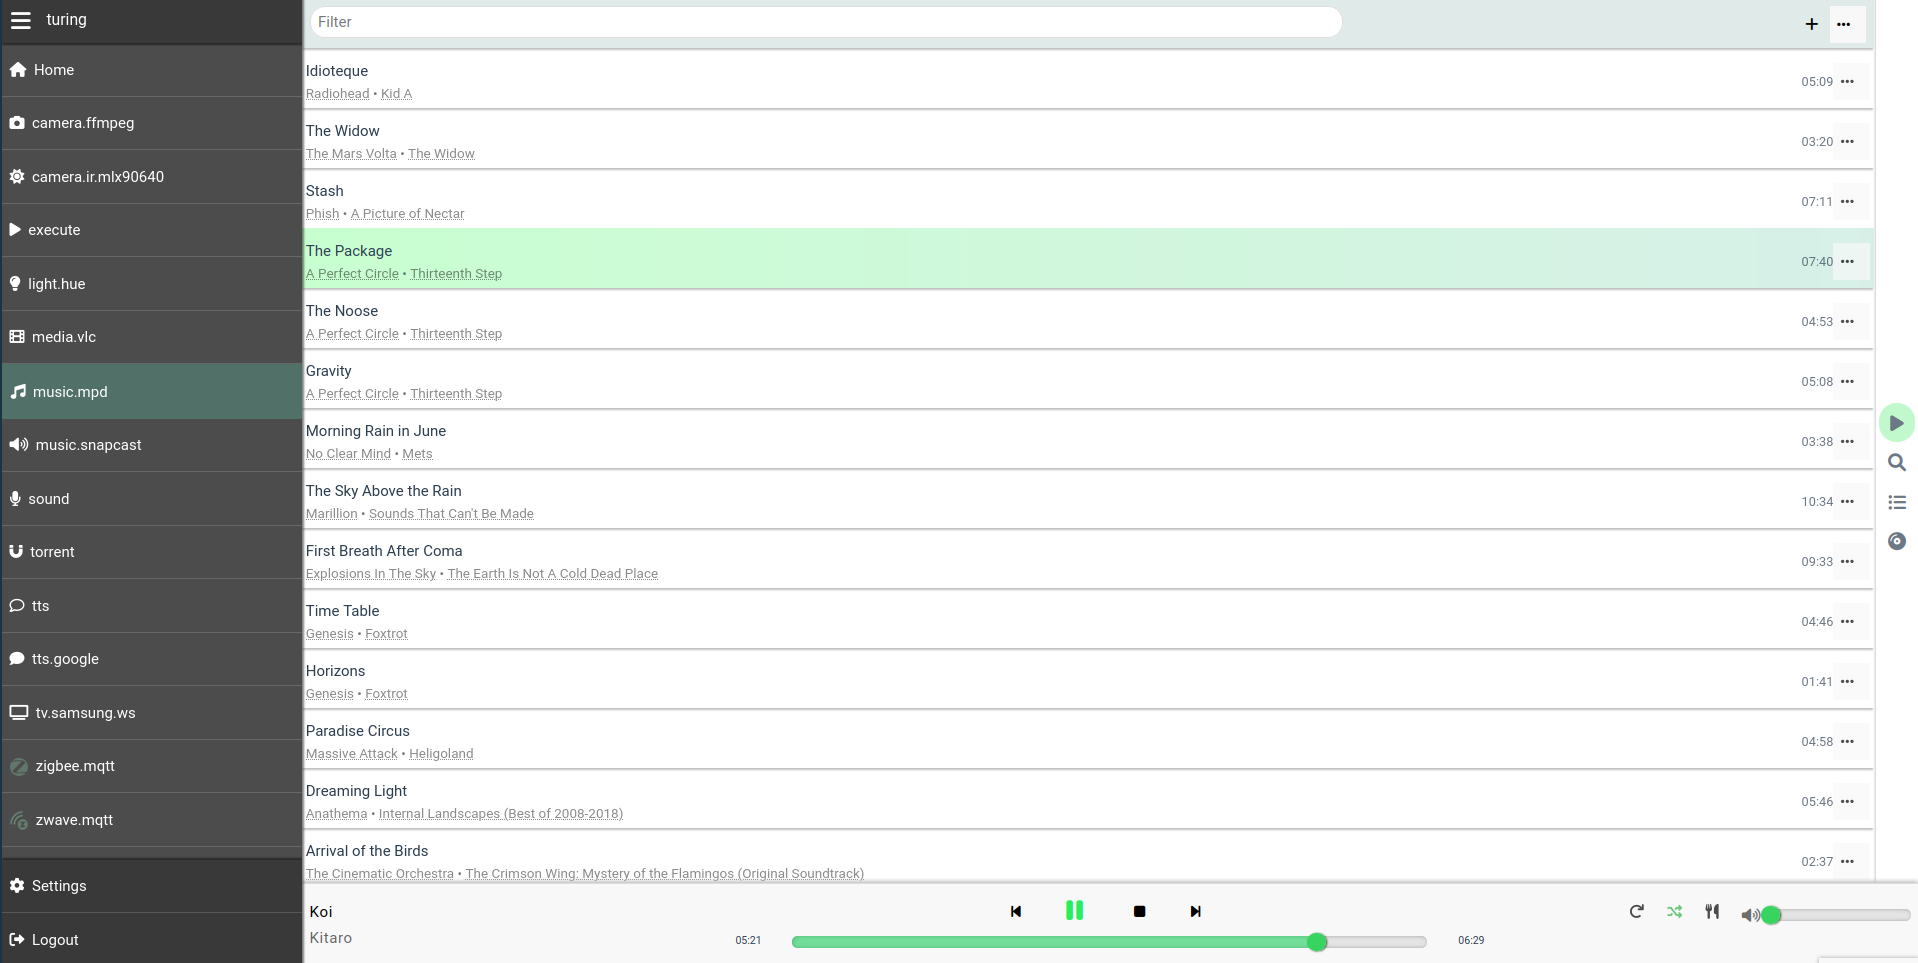
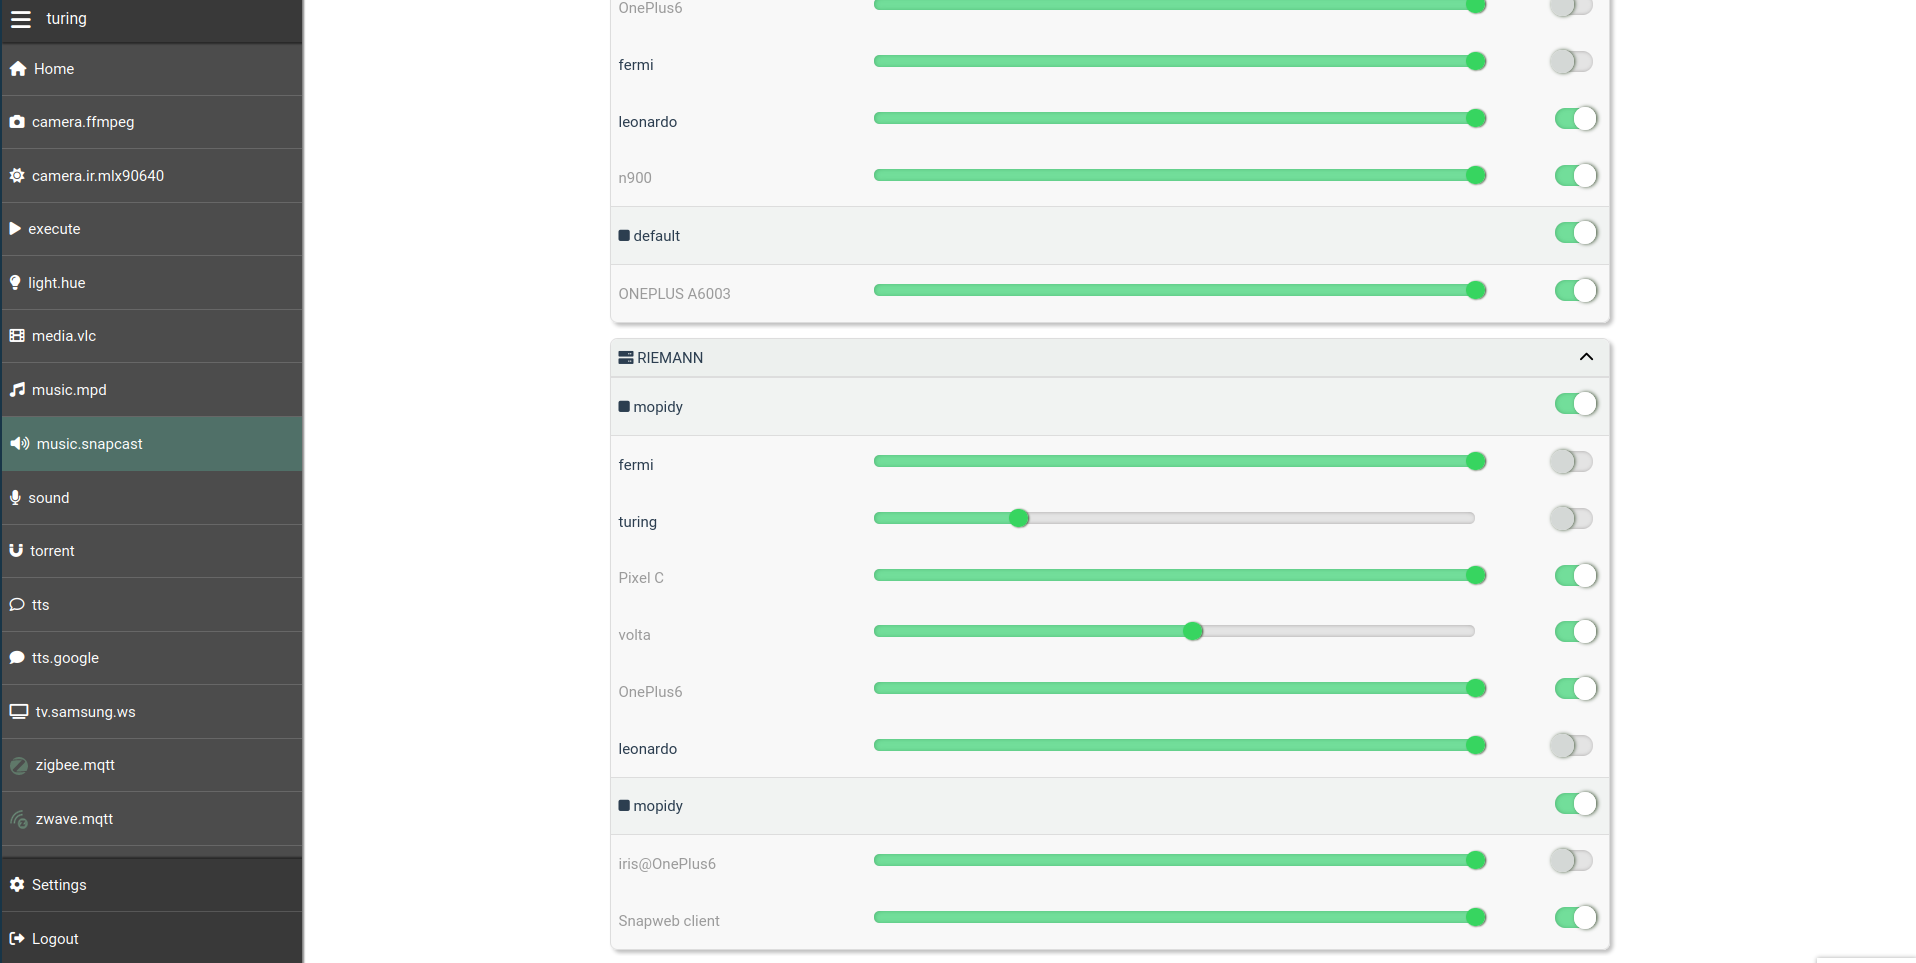
#### Other web panels
|
|
|
|
Several integrations add their own feature-rich panels to the web view, turning
|
|
Platypush into a gateway to all of your services - from Zigbee sensors, to media
|
|
players and services, to your music cloud, and more.
|
|
|
|
|
|
|
|
|
|
|
|
|
|
|
|
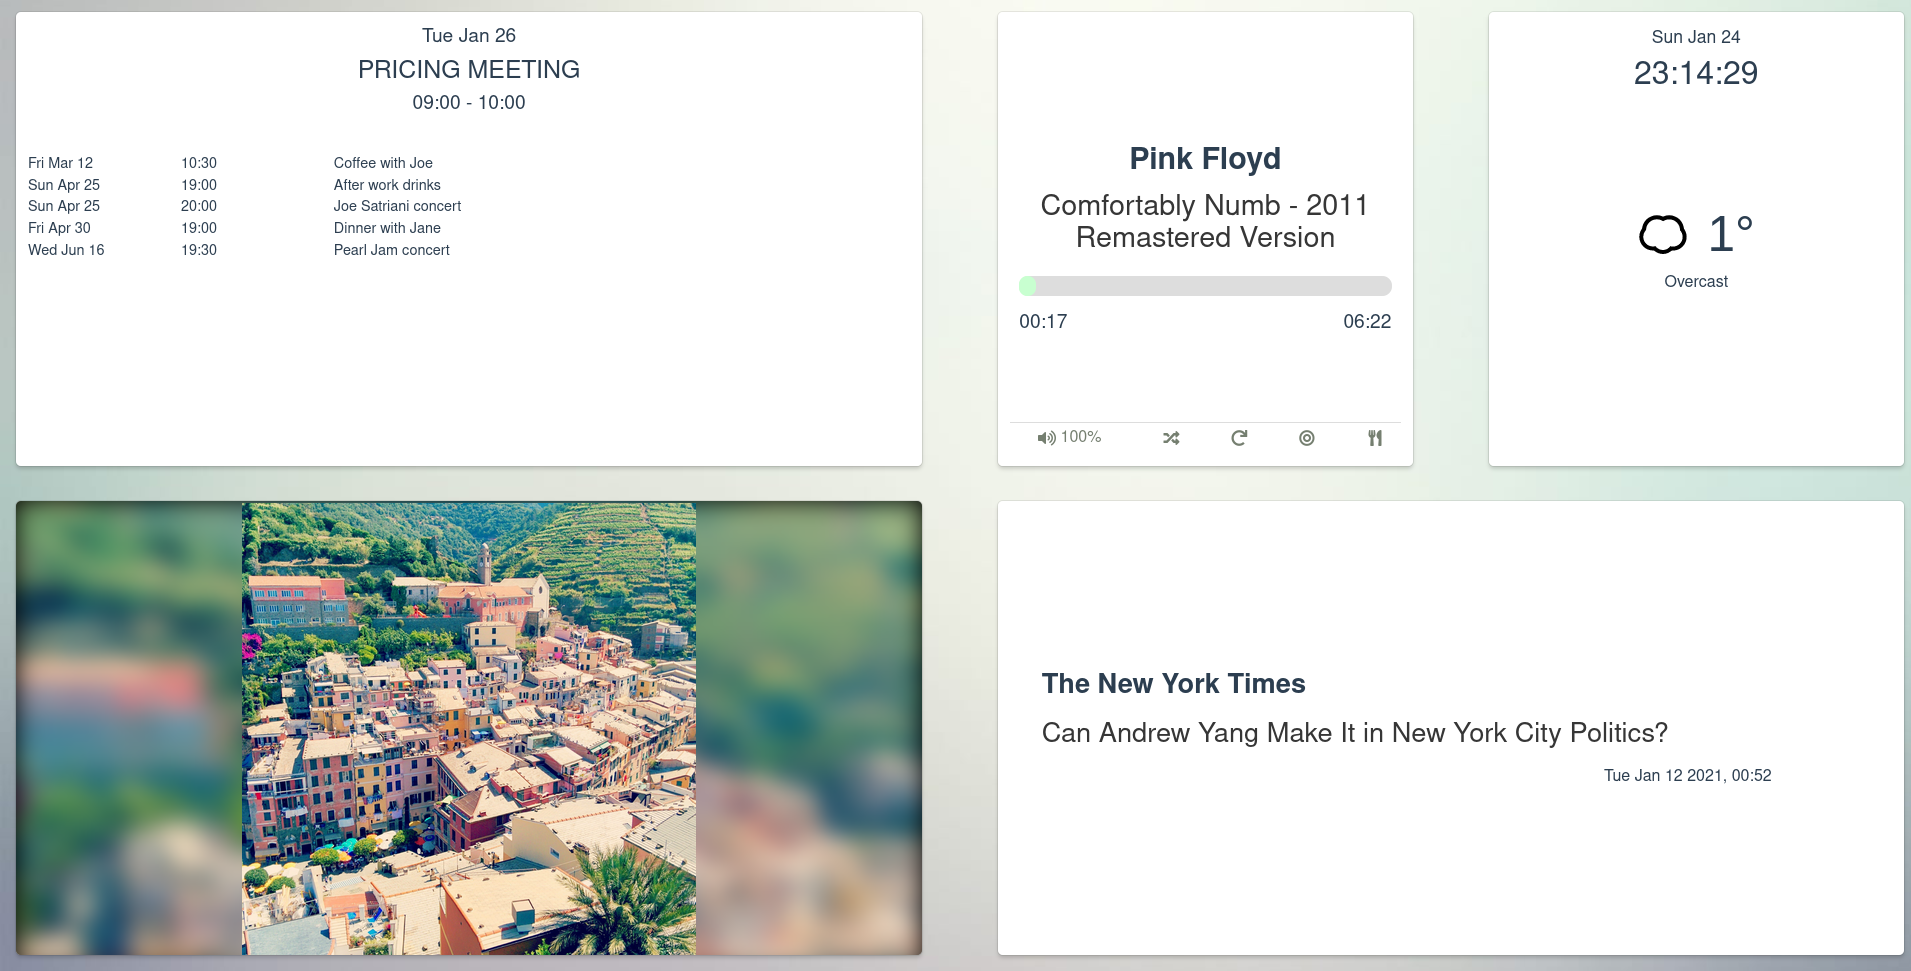
#### Dashboards
|
|
|
|
The web service also provides means for the user to create [custom
|
|
dashboards](https://git.platypush.tech/platypush/platypush/src/branch/master/examples/conf/dashboard.xml)
|
|
that can be used to show information from multiple sources on a large screen.
|
|
|
|
|
|
|
|
### Running in production mode
|
|
|
|
If you want to access your Platypush web panel outside your home network, it may
|
|
be a good idea to use an nginx/Apache reverse proxy with a valid SSL certificate
|
|
(e.g. managed by certbot). A [sample an nginx
|
|
configuration](https://git.platypush.tech/platypush/platypush/src/branch/master/examples/nginx/nginx.sample.conf)
|
|
is provided in the repository.
|
|
|
|
#### PWA support
|
|
|
|
Note that having the web application served over SSL is a requirement for the
|
|
PWA (progressive web app) to work. The Platypush PWA allows you to install a
|
|
Platypush native-like client on your mobile devices if you don't want to use the
|
|
full Android app.
|
|
|
|
## Mobile app
|
|
|
|
An [official Android
|
|
app](https://f-droid.org/en/packages/tech.platypush.platypush/) is provided on
|
|
the F-Droid store. It allows to easily discover and manage multiple Platypush
|
|
services on a network through the web interface, and it easily brings the power
|
|
of Platypush to your fingertips.
|
|
|
|
## Tests
|
|
|
|
To run the tests simply run `pytest` either from the project root folder or the
|
|
`tests/` folder.
|
|
|
|
## Useful links
|
|
- Recommended read: [**Getting started with Platypush**](https://blog.platypush.tech/article/Ultimate-self-hosted-automation-with-Platypush).
|
|
|
|
- The [blog](https://blog.platypush.tech) is a good place to get more insights
|
|
and inspiration on what you can build.
|
|
|
|
- The [wiki](https://git.platypush.tech/platypush/platypush/wiki) also
|
|
contains many resources on getting started.
|
|
|
|
- Extensive documentation for all the available integrations and messages [is
|
|
available](https://docs.platypush.tech/).
|
|
|
|
- If you have issues/feature requests/enhancements please [create an
|
|
issue](https://git.platypush.tech/platypush/platypush/issues).
|
|
|
|
- A [Matrix instance](https://matrix.to/#/#platypush:matrix.platypush.tech) is
|
|
available if you are looking for interactive support.
|
|
|
|
- An IRC channel is also available at `#platypush@irc.platypush.tech:6697` (SSL
|
|
only).
|
|
|
|
- A [Lemmy instance](https://lemmy.platypush.tech/c/platypush) is available for
|
|
general questions.
|
|
|
|
---
|
|
|
|
## Funding
|
|
|
|
If you use and love Platypush, please consider [buying me a coffee/beer](https://paypal.me/fabiomanganiello).
|
|
|
|
I've been working on Platypush all by myself in my spare time for the past few
|
|
years, and I've made sure that it remains open and free.
|
|
|
|
If you like this product, please consider supporting - I'm definitely not
|
|
planning to get rich with this project, but I'd love to have at least the costs
|
|
for the server covered by users.
|
|
|
|
Issues and requests opened by donors will also be given priority over others.
|