- HTTP server
- RSS feeds backend
- Assistant backend
- Redis backend
- MQTT backend
- Websocket backend
- TCP backend
- Pushbullet backend
- Kafka backend
- MPD/Mopidy backend
- MIDI backend
- Flic buttons backend
- Camera backend
- Sensor backends
- inotify backend
- Smart cards backend
- Weather forecast backend
Platypush backends are components that can listen for events on any source that generates events or messages. Platypush can support through backends things like message queues, HTTP requests, voice assistant interactions, music player events, MIDI events, button events, measurements from sensors, events from smart cards and more. You can see a backend as a component that runs in its own thread or process and posts messages, action requests or events to the main bus when something happens.
HTTP server
The HTTP server is a powerful feature of Platypush and one of the main ways to interact with the application and its components. If configured, the HTTP backend will run a Flask server (default port: 8008) that you can use to interact with Platypush in several ways:
- To send action requests as JSON messages through the web API
- To control the configured plugins (lights, switches, music, sensors etc.) through the web panel
- As a dashboard to show on a monitor or a tv with your favourite widgets (calendar, music player, weather, sensors state, news etc.)
Configuration
Configuring the HTTP backend is quite easy. Add these lines to your ~/.config/platypush/config.yaml to get the web server running:
backend.http:
    port: 8008            # Default HTTP port
    websocket_port: 8009  # Default port for the websockets
Websockets are used both in the web panel and dashboard interfaces to deliver real-time messages to the plugins and widgets.
Authentication
The HTTP backend acts also as a user registration and authentication gateway. After configuring it in your
config.yaml, start Platypush and head to http://host:8008/. If no users have yet been created, you should see a
user registration panel, otherwise a login interface will be prompted.
Upon registration, you can generate an API token that can be used in your calls either:
-
Through the web panel. Create a user/login to the web panel, head to the Settings (gear icon in the menu), select Generate Token, enter your username and password and its expiry date, and a new JWT token will be generated.
-
Through the API, using the
/authendpoint:
$ curl -XPOST -H "Content-Type: application/json" --data '{
  "username":"user",
  "password":"pass"
}' http://host:8008/auth

{
    "token": "..."
}
Once you have a JWT token, you can use it on your API calls either:
- On the
Authorizationheader (format:Authorization: Bearer <TOKEN>) [advised]. - On the
X-Tokenheader. - On the query string (
?token=...). - At the top level of the JSON request (
{"type":"request", ..., "token":"..."}).
cURL commands
Once you've got your web server running, you can easily send action requests to the Platypush plugins through cURL, Postman etc.
Example 1: play music through the MPD plugin:
curl -XPOST -H 'Content-Type: application/json' \
    -H "Authorization: Bearer $TOKEN" \
    -d '{"type":"request", "action":"music.mpd.play"}' \
    http://hostname:8008/execute
Example 2: turn on your lights through the Philips Hue plugin:
curl -XPOST -H 'Content-Type: application/json' \
    -H "Authorization: Bearer $TOKEN" \
    -d '{"type":"request", "action":"lights.hue.on", "args": {"groups": ["Living Room"]}}' \
    http://hostname:8008/execute
Example 3: run a configured procedure:
curl -XPOST -H 'Content-Type: application/json' \
    -H "Authorization: Bearer $TOKEN" \
    -d '{"type":"request", "action":"procedure.at_home"}' \
    http://hostname:8008/execute
Web panel
The HTTP backend provides you with a web panel that you can use to control your configured plugins. Just point your browser to http://hostname:8008 after enabling the HTTP backend to test it out.
You should see an interface that looks like this. The tabs will are linked to the plugins you have configured in your main config file, for those that provide a web panel tab. If a plugin doesn't require any configuration, you can still entry an explicit configuration line to enable it to notify the web panel to include it in the interface:
tts:
    # I'm fine with the default configuration but I want to make sure
    # that the tab is enabled in the web panel
    disabled: False
You can use the web panel to control your lights, music, video, sensors, motors, switches, and whatever is provided by the plugins.
Dashboards
You can use Platypush to power a fullscreen dashboard with your calendar, music state, photos, weather forecast, news, sensors state etc. to show on a computer, tv or laptop screen.
The configuration for dashboards has changed since Platypush 0.20.0 - while only one dashboard per service was
previously supported, and configured directly inside of the backend.http configuration, it's now possible to configure
multiple dashboards and do it directly in an HTML-like format that allows much more flexibility.
Dashboards consist of widgets, which are customizable components that can be freely arranged on the dashboard canvas.
Widgets are Vue components stored under
backend/http/webapp/src/components/widgets.
Widgets are available for most of a common dashboard's components - such as calendar, music status, time and weather,
image and news carousels. You can easily grab the configuration of each widget by looking at the props defined on the
associated Vue component (TODO: manage self-generated documentation for widgets), and some widgets may require some
other plugin or backend to be enabled in order to work - for example, Calendar requires the calendar plugin,
Weather requires the weather.openweathermap plugin, and so on.
Dashboard configurations are stored by default under the ~/.config/platypush/dashboards folder. Each dashboard should
be an XML file.
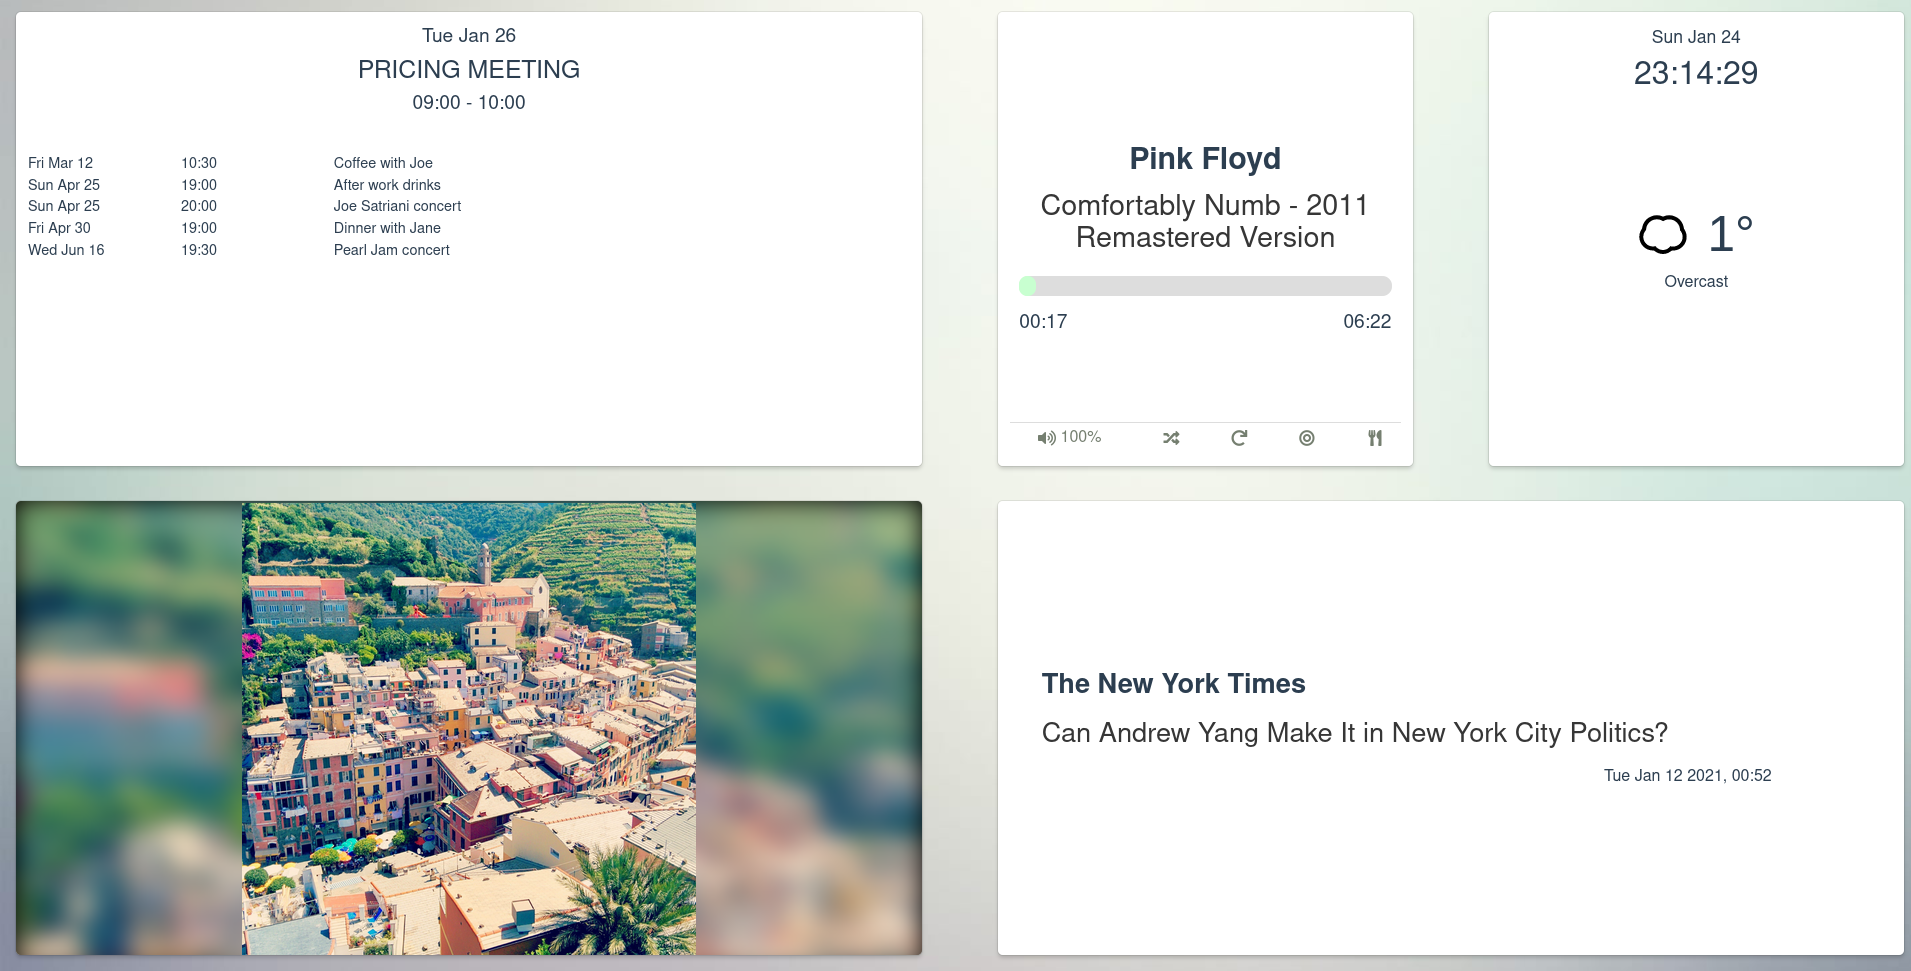
Let's take a look at a simple dashboard configuration that includes the following widgets:
- A calendar
- A music status widget
- A date/time/weather widget
- An image carousel
- A news carousel
Calendar
- Dependencies installation:
# Support for Google Calendar and ICal calendar URLs
$ [sudo] pip install 'platypush[ical,google]'
- Grant app access to the calendar API, if you are using a Google Calendar:
python -m platypush.plugins.google.credentials \
  "https://www.googleapis.com/auth/calendar.readonly" \
  /path/to/your/google/api/client_secret.json
config.yamlconfiguration:
calendar:
    # Monitor your Google Calendar and an ICal calendar (e.g. your Facebook events calendar)
    calendars:
        - type: platypush.plugins.google.calendar.GoogleCalendarPlugin
        - type: platypush.plugins.calendar.ical.CalendarIcalPlugin
          url: https://www.facebook.com/events/ical/upcoming/?uid=YOUR_UID&key=YOUR_KEY
Music state and current track
This is currently only supported for MPD/Mopidy integrations - but, given the amount of music service plugins available for Mopidy, this should easily cover most of the use cases out there.
Also, note that since the version 3.0 Mopidy no longer exposes the MPD interface by default - you'll have to install the
mopidy-mpd package separately.
- Install the MPD dependencies:
$ [sudo] pip install 'platypush[mpd]'
- Configure the MPD plugin and, if you are using Mopidy, the Mopidy backend (for real-time monitoring):
music.mpd:
  host: localhost
  port: 6600

backend.music.mopidy:
  enabled: True
Date/time/weather widget
Get an OpenWeatherMap API token and configure the associated Platypush plugin:
weather.openweathermap:
    token: YOUR_TOKEN
    lat: YOUR_LAT
    long: YOUR_LONG
    # Otherwise, you can also configure the default location by
    # city ID or free search
Image carousel
You can configure one or more directories on the system to be exposed over the web server as resources. This enables you to easily expose images stored on your drive as HTTP URLs. For example:
backend.http:
  # ...
  resource_dirs:
    photos: /mnt/hd/Photos
You can now access your photos over http://host:8008/resources/photos/PHOTO.jpg - we'll see soon how to import this
folder into a carousel widget.
News carousel
- Install the dependencies:
$ [sudo] pip install 'platypush[rss]'
- Configure the RSS feeds you want to scan:
backend.http.poll:
    requests:
        - type: platypush.backend.http.request.rss.RssUpdates
          url: http://site1.com/rss
          title: Site 1
          poll_seconds: 600
          max_entries: 10

        - type: platypush.backend.http.request.rss.RssUpdates
          url: http://site2.com/rss
          title: Site 2
          poll_seconds: 600
          max_entries: 10
Feed updates by default will be stored in ~/.local/share/platypush/feeds/rss.db - we'll use that in a moment.
Adding the widgets
Once all the dependencies are installed and configured, you can add the widgets to the dashboard.
Dashboard templates are stored as XML files under ~/.config/platypush/dashboards. Create a new file under this folder
(e.g. main.xml) with the following content:
<Dashboard>
    <Row>
        <Calendar class="col-6" />
        <Music class="col-3" />
        <DateTimeWeather class="col-3" />
    </Row>

    <Row>
        <!-- Note: the folder must have been exposed through the resource_dirs attribute of backend.http -->
        <ImageCarousel class="col-6" img-dir="/mnt/hd/Photos" />
        <RssNews class="col-6" db="sqlite:////home/user/.local/share/platypush/feeds/rss.db" />
    </Row>
</Dashboard>
A few observations:
-
<Dashboard>is the root element of a dashboard template. -
A dashboard is organized in rows, so all the widgets belonging to the same
<Row>element will be displayed on the same row. -
Each row is divided into 12 columns, and you can specify the width of a widget through the
col-nclass, wherenis the width of the widget in column - for example,col-6means that the widget takes half of the row. -
Column width can be made reactive through the
-s-,-m-,-l-and-xl-modifiers. The following statement, for example, means that the width of the<Music>widget will be 100% of the row on a small screen, 50% on a medium screen (usually tablet-sized screens) and 25% on a large screen (usually desktop-sized screens or larger):
<Music class="col-s-12 col-m-6 col-l-3" />
- You can also specify custom classes on a widget definition or custom a custom CSS style through the
classandstyleattributes.
Once configured, you can access your dashboard on http://host:8008/dashboard/main - assuming that the template you
just created was stored in a file named main.xml:
Creating custom widgets
In some cases you may want to have a UI that shows specific information from plugins (for example, sensor data, or toggles/sliders for some specific devices or services), but that information isn't provided by the default widgets that come with Platypush. Alternatively, the application's main web panel exposes lots of information and features from plugins, but it requires some clicking around to get it, while you may want a simple dashboard that shows all the information you need on a single view.
Platypush provides a way for you to define custom widgets through the <Component> widget. You can use <Component> to
define reactive widgets with custom HTML and JavaScript and using a few base ingredients to build complex interfaces.
The following elements can be used inside of a <Component> widget:
-
<Run>: a basic element that shows some text and an optional icon and performs one or more specified actions when clicked. -
<Switch>: an element used to interact with devices or services with an on/off binary state and toggle their state upon user interaction. -
<Slider>: an element used to interact with devices or services with a numeric value included in a specified range. -
<Sensor>: an element used to display read-only values from custom devices, services or endpoints.
Let's take an example where we want to build a widget to show and manage in one single component the devices and controls in a living room. These include:
-
A TV connected to a Tp-Link Wi-Fi smart switch.
-
A Zigbee temperature sensor.
-
A Z-Wave dimmer.
-
Music playback control.
A widget that displays and controls these features can be written as it follows:
<Dashboard>
<Row>
<Component>
<!-- You can insert custom HTML tags in a <Component> -->
<h1 style="font-size: 1.5em">Living Room</h1>
<!-- Element to play/pause the music playback -->
<Run name="Music pause" icon-class="fa fa-pause">
<actions>
<action name="music.mpd.pause" />
</actions>
</Run>
<!-- Element to control a Tp-Link smart plug -->
<Switch name="TV Switch" icon-class="fa fa-tv">
<actions>
<action name="switch.tplink.toggle">
<device>TV Switch</device>
</action>
<after>
self.refresh()
</after>
</actions>
<handlers>
<refresh interval="10">
self.value = Object.values(await self.request('switch.tplink.status'))
.filter((dev) => dev.name === 'TV Switch')[0].on
</refresh>
</handlers>
</Switch>
<!-- Element to control a Z-Wave dimmer -->
<Slider name="Lights dimmer" icon-class="fa fa-lightbulb">
<actions>
<action name="zwave.set_value">
<id_on_network>VALUE_ID_ON_NET</id_on_network>
<data>{{ self.value }}</data>
</action>
</actions>
<handlers>
<refresh interval="10">
self.value = await self.request('zwave.get_value',
{id_on_network: 'VALUE_ID_ON_NET'}).data
</refresh>
<event type="platypush.message.event.zwave.ZwaveValueChangedEvent">
if (event.value.id_on_network === 'VALUE_ID_ON_NET')
self.value = event.value.data
</event>
</handlers>
</Slider>
<!-- Element to display data from a Zigbee sensor -->
<Sensor name="Temperature" icon-class="fa fa-thermometer-half">
<handlers>
<refresh interval="10">
self.value = await self.request('zigbee.mqtt.device_get',
{'device': 'Temperature Sensor', 'property': 'temperature'}).temperature
</refresh>
<event type="platypush.message.event.zigbee.mqtt.ZigbeeMqttDevicePropertySetEvent">
if (event.device === 'Temperature Sensor' && event.properties.temperature != null)
self.value = event.properties.temperature
</event>
</handlers>
</Sensor>
</Component>
</Row>
</Dashboard>
A few words on what's happening here:
-
The
<Component>widget, under the hood, is a Vue template. This means that you can easily embed your custom HTML into it. -
Each element should have a
name(displayed on the UI) and can optionally have either anicon-classor anicon-url- the former would select a FontAwesome icon class for the element, the latter an icon URL. You can also useicon-colorwhen usingicon-classto change the icon's color. -
Elements usually have an
<actions>tag, which can contain one or more<action>tags representing the actions to execute upon user interaction. -
Each
<action>tag can also have one or more child tags, each representing an argument to be passed to the action. -
An
<actions>tag can optionally have a<before>or an<after>tag, containing a JavaScript routine to be executed respectively before or after the actions are run. In the example above,<after>runsself.refresh()on the<Switch>tag so that the value is updated after user interaction. -
You can access the reference to the element in your JavaScript code through the
selfobject. Each element usually has avalueproperty (binary state in the case of a switch, numeric value in the case of a slider or sensor, etc.) that can be read and modified by your snippets. -
You can also embed the current
valueproperty (or any other variable or property) in an action argument through the following syntax:<arg>{{ self.value }}</arg>. -
The
selfobject also has a.request()method that runs an action throughbackend.http. It takes two arguments: the action name and an optional object with its arguments. -
All the custom JS snippets are automatically wrapped inside of an
asyncfunction, so you can useawaitinside of them. -
An element can also have one or more
<handlers>defined as JavaScript snippets to run when a particular event occurs. Available handler tags:-
<refresh>: Handler to be called when the element is mounted and at regular intervals, specified by theintervalparameter (in seconds). This handler can also be programmatically called from other snippets throughself.refresh(). -
<mounted>: Handler called when the element is first mounted. -
<event>: Handler called when a specific platform event is received - the type of the event can be specified with thetypeparameter. In the example above, we have defined an event handler onZwaveValueChangedEventevents, so that the element will be updated when the Z-Wave dimmer value gets updated, and one onZigbeeMqttDevicePropertySetEventevents to update the widget when a new temperature value is received.
-
-
An
eventobject is passed to the event handlers and it can be accessed from your snippets.
If everything is set up properly you should see a widget like this:
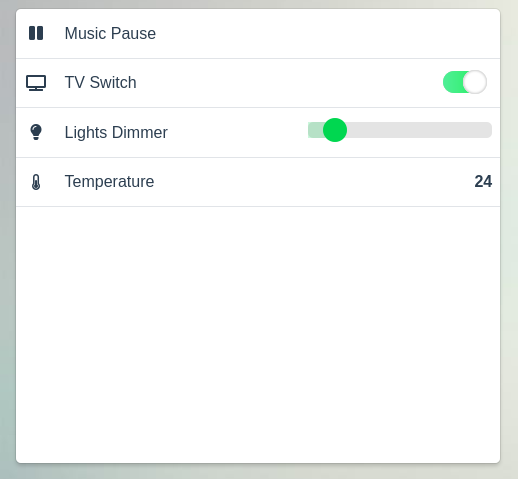
This is all you need to know to create your custom dashboards - feel free to look in the documented properties of the widgets for more advanced use cases.
RSS feeds backend
Platypush comes with an http.poll backend that allows you to poll web resources (JSON endpoints, RSS feeds etc.) for new items.
Support for new items poll on JSON endpoints is still experimental, as I haven't yet figured out a general-purpose elegant way to do it. But you can use the backend for polling RSS feeds as well. The backend will poll the selected RSS sources for new items and store them on a local database. You can then build few things on top of that:
- Show the news on your dashboard news carousel widget
- Ask the assistant to read you the latest news
- Get a notification whenever some magazine publishes a new article
- Build a weekly PDF digest of a certain source
- ...and so on
Sample configuration:
backend.http.poll:
    requests:
        -
            type: platypush.backend.http.request.rss.RssUpdates
            url: http://www.theguardian.com/rss/world
            title: The Guardian - World News
            poll_seconds: 120   # Seconds between two requests
            max_entries: 10     # Maximum number of entries to parse on each scan
        -
            type: platypush.backend.http.request.rss.RssUpdates
            url: http://www.physorg.com/rss-feed
            title: Phys.org
            poll_seconds: 120
            max_entries: 10
        -
            type: platypush.backend.http.request.rss.RssUpdates
            url: http://feeds.feedburner.com/Techcrunch
            title: Tech Crunch
            poll_seconds: 120
            max_entries: 10
        -
            type: platypush.backend.http.request.rss.RssUpdates
            url: http://www.nytimes.com/services/xml/rss/nyt/HomePage.xml
            title: The New York Times
            poll_seconds: 120
            max_entries: 10
You can also configure the backend to generate a digest of the new items it scans from each source - they will be saved under ~/.local/share/platypush/feeds/cache - and to extract the text out of the articles using the Mercury Reader API. After getting a Mercury API token, you can configure an RSS source to generate a feed containing the content of the new seen items like this:
        -
            type: platypush.backend.http.request.rss.RssUpdates
            url: http://feeds.feedburner.com/Techcrunch
            title: Tech Crunch
            mercury_api_key: YOUR_KEY
            digest_format: pdf  # or html
            poll_seconds: 120
            max_entries: 10
Assistant backend
The assistant backend allows you to interact with a built-in voice assistant. Only the Google Assistant is currently supported (sorry Amazon).
All you need to get a full-blown assistant with support for custom commands is any kind of computer with a microphone.
Follow the instructions on the Google Assistant SDK website to get started by enabling the Assistant API, get a credentials file and install the required dependencies.
Then enable the Assistant backend through a configuration like this:
backend.assistant.google:
    device_model_id: Platypush                                         # A unique device ID - default: Platypush
    credentials_file: ~/.config/google-oauthlib-tool/credentials.json  # Path to the JSON credentials file
Restart Platypush and test it out by saying Ok Google or Hey Google. Have fun.
You can also enable the Assistant plugin to programmatically start or stop the conversation without saying the hotword.
Assistant events
You can build event hooks on assistant events - on conversation start, end, timeout, on speech recognized, on response processed etc.
For example, to play some custom sound when the conversation starts or ends:
event.hook.AssistantConversationStarted:
    if:
        type: platypush.message.event.assistant.ConversationStartEvent
    then:
        action: shell.exec
        args:
            cmd: 'aplay /usr/share/sounds/conversation_start.wav'

event.hook.AssistantConversationEnded:
    if:
        type: platypush.message.event.assistant.ConversationEndEvent
    then:
        action: shell.exec
        args:
            cmd: 'aplay /usr/share/sounds/conversation_end.wav'
Or play the radio by just saying it using the Mopidy plugin + the TuneIn backend for Mopidy:
event.hook.PlayRadioAssistantCommand:
    if:
        type: platypush.message.event.assistant.SpeechRecognizedEvent
        phrase: "play (the)? radio"
    then:
        action: music.mpd.play
        args:
            resource: tunein:station:radio_id
Note the use of (the)? in the phrase filter. The phrase filter supports basic regular expressions, so the filter above would trigger the hook whether the assistant recognizes "play the radio" or "play radio" - and even if the phrase is recognized within the context of a larger sentence.
You can also extract named tokens out of the recognized phrase. Take a look at this example that enables you to search for a song or an album by saying the artist and the title and play the first matched result:
event.hook.SearchSongVoiceCommand:
    if:
        type: platypush.message.event.assistant.SpeechRecognizedEvent
        # Use the ${} notation to denote a portion of the recognized phrase to be extracted
        # until the next recognized token or the end of the string.
        phrase: "play ${title} by ${artist}"
    then:
        -
            action: procedure.search_and_play_song

procedure.sync.search_and_play_song:
    -
        # Clear the content of the current playlist
        action: music.mpd.clear
    -
        # Disable shuffle mode
        action: music.mpd.random
        args:
            value: 0
    -
        # Perform an mpd search. Note how we re-used the "title" and "artist"
        # context variables parsed from the voice assistant event
        action: music.mpd.search
        args:
            filter:
                - artist
                - ${artist}
                - any
                - ${title}
    -
        # Play the first of the search results above. Note how we re-used the
        # "output" context variable, that contains the output of the previous
        # action (an array in the case of `music.mpd.search`), to get the file id
        # of the first result and pass it to `music.mpd.play`
        action: music.mpd.play
        args:
            resource: ${output[0]['file']}
Or search and play YouTube videos:
event.hook.PlayYoutubeVideo:
    if:
        type: platypush.message.event.assistant.SpeechRecognizedEvent
        phrase: "play ${query} on youtube"
    then:
        action: video.omxplayer.search
        args:
            query: ${query}
            autoplay: True
            queue_results: True
            types:
                - youtube
Or a torrent (will first have to download it and then stream it):
event.hook.PlayTorrent:
    if:
        type: platypush.message.event.assistant.SpeechRecognizedEvent
        phrase: "play (the)? torrent ${query}"
    then:
        action: video.omxplayer.search
        args:
            query: ${query}
            autoplay: True
            queue_results: True
            types:
                - torrent
Or (of course) turn on the lights:
event.hook.LightsOnAssistantCommand:
    if:
        type: platypush.message.event.assistant.SpeechRecognizedEvent
        phrase: "turn on (the)? lights?"
    then:
        action: light.hue.on
Or start a light animation:
event.hook.LightsAnimationOnAssistantCommand:
    if:
        type: platypush.message.event.assistant.SpeechRecognizedEvent
        phrase: "start (the)? animation"
    then:
        action: procedure.LightsAnimationOnAssistantCommand

procedure.sync.LightsAnimationOnAssistantCommand:
    -
        action: light.hue.stop_animation
    -
        action: light.hue.animate
        args:
            animation: color_transition
            sat_range: [230,255]
            bri_range: [127,255]
            hue_range: [0,65535]
If you use the web panel or the dashboard you'll also notice that the assistant events (conversation start and end, speech recognized and processed response) will also be shown as pop-up notifications.
Redis backend
Redis is an in-memory data structure store. It can be used as an in-memory store, as a cache or as a message broker. Obviously, latter case is quite interesting when it comes to Platypush :)
Redis is also used heavily by some of our plugins and backends to communicate and synchronize properly, especially if the components live in different processes (for example, the web server) and need to exchange messages with the main process. Redis is a perfect candidate for the purpose. It has a low latency, and the server is lightweight enough to run even on a Raspberry Pi Zero without issues. It's therefore strongly recommended to enable both the Redis plugin and backend (and install a local Redis server) to take full advantage of Platypush features.
For instance, the web server backend leverages Redis to dispatch and receive inter-process messages over the websocket interface - used to deliver push notifications to the web clients.
After installing and starting a local Redis server, configure your backend:
backend.redis:
    queue: platypush_bus_mq  # Default queue where messages will be delivered
    redis_args:
        host: localhost      # Default
        port: 6379           # Default
Messages received over the configured queue (requests, responses or events) will be routed to the application bus. A typical use case is when you want to set up another script or application that runs its own logic and you want it to interact with some Platypush plugin - all you have to do is to push an action request in JSON format on the configured Redis queue.
MQTT backend
MQTT is a message-queue based protocol to exchange messages across devices. MQTT implementations like Paho MQTT, Mosquitto and Adafruit IO are quite popular for communication across IoT devices. You can interact with an MQTT service through this plugin to build any arbitrary complex message-based logic across your Platypush devices. The asynchronous nature of MQTT makes it a better candidate over the HTTP plugin to deliver messages to other devices if you don't mind much about the response.
The MQTT backend will listen on a specific message queue (or topic in MQTT terminology) and, just like the Redis plugin, it will post any recognized Platypush JSON message (request, response or event) to the main application.
Example configuration:
backend.mqtt:
    host: mqtt_server        # IP or hostname that hosts the MQTT server
    port: 1883               # MQTT port
    topic: platypush_bus_mq  # Queue to listen on. Note that the hostname will be appended,
                             # so that each each device can listen on its own queue. Therefore
                             # the actual topic name will be "platypush_bus_mq/hostname"
You can now start sending messages to your backend through the MQTT plugin or another app, also running on another machine.
Websocket backend
You can send messages to Platypush over a websocket connection. Example configuration:
backend.websocket:
    port: 8765               # Websocket port (default: 8765)
    bind_address: 0.0.0.0    # Bind address (default: 0.0.0.0, accept any connection)
    ssl_cert: ~/.ssl/certs/localhost.pem  # Path to the PEM certificate file if you want to enable SSL (default: None)
    client_timeout: 60       # Close an inactive websocket client connection after these many seconds.
                             # A zero-value will keep the connection alive until closure or client timeout
                             # (default: 60 seconds)
After enabling you can easily send messages to Platypush through your JavaScript code, for example:
var socket = new WebSocket('ws://hostname:8765');
socket.onmessage = (msg) => {
    console.log(msg);
};

var msg = {"type":"request", "action":"plugin.action"};
socket.send(JSON.stringify(msg));
Or through command-line tools like wscat:
wscat -w 0 -c 'ws://turing:8765' -x '{"type":"request", "action":"light.batsignal.on"}'
TCP backend
Platypush comes with a simple TCP socket-backend that will simply read JSON messages from a specified port, forward them to the bus and process the responses back on the client socket. Example configuration:
backend.tcp:
    port: 5555               # Listen port
    bind_address: 0.0.0.0    # Bind address (default: 0.0.0.0, accept any connection)
    listen_queue: 5          # Size of the TCP connections pool (default: 5)
After enabling and restarting Platypush you can easily test this backend with tools like telnet or netcat:
echo -n '{"type":"request", "action":"plugin.action"}' | nc hostname 5555
Pushbullet backend
Pushbullet is a quite cool piece of software to keep your devices in sync, exchange messages, synchronize clipboards and sms across devices, access remote files, and so on. You can install it as an Android or iPhone app, as a browser extension, or use it from your browser directly. It can be quite powerful if paired with Platypush - and it has the first backend I have developed as well. You can use the plugin in pair with the backend to do things like:
- Send URLs, text and Platypush messages to your Android devices
- Trigger Platypush actions through your Android device, wherever you are
- Synchronize the clipboards
- Synchronize your phone notifications to your Raspberry Pi
- Send and receive pictures
- ...and so on
To integrate your Pushbullet events with Platypush:
-
Sign up or login to Pushbullet
-
Create an API token
-
Register the device you want to synchronize with Platypush - download the Pushbullet app on your Android or iOS device, or install the browser extension
-
Enable the extra features you wish to have on your Pushbullet account - e.g. universal copy&paste to keep the clipboards in sync also with your Platypush devices, remote file access etc.
-
Configure your Pushbullet backend on Platypush:
backend.pushbullet:
    token: YOUR_PUSHBULLET_TOKEN
    device: platypush   # Name of your Platypush virtual device on Pushbullet
Restart Platypush and perform some events that generate Pushbullet messages - try to send a note or a picture to your virtual Platypush device, get a notification on your Android phone or dismiss a notification, copy some text or URL if you enabled the universal copy&paste feature. You should be able to see the received event messages in the application logs (by default under ~/.local/log/platypush/platypush.log).
Example message trace when you copy some text on a device connected to your Pushbullet account:
{
   "type":"event",
   "target":"hostname",
   "origin":"hostname",
   "id":"123abc",
   "args":{
      "type":"platypush.message.event.pushbullet.PushbulletEvent",
      "source_user_iden":"USER_ID",
      "source_device_iden":"DEVICE_ID",
      "body":"Check out this link copied from my phone: https://www.google.com",
      "push_type":"clip"
   }
}
Message in case you send a Pushbullet text note to your Platypush device:
{
   "type":"event",
   "target":"hostname",
   "origin":"hostname",
   "id":"123abc",
   "args":{
      "type":"platypush.message.event.pushbullet.PushbulletEvent",
      "active":true,
      "iden":"NOTIFICATION_ID",
      "created":1532382991.8475788,
      "modified":1532382991.851993,
      "dismissed":false,
      "guid":"unique client notification id",
      "direction":"self",
      "sender_iden":"SENDER_ID",
      "sender_email":"myself@gmail.com",
      "sender_email_normalized":"myself@gmail.com",
      "sender_name":"My Name",
      "receiver_iden":"RECEIVED_ID",
      "receiver_email":"myself@gmail.com",
      "receiver_email_normalized":"myself@gmail.com",
      "target_device_iden":"TARGET_DEVICE_ID",
      "source_device_iden":"SOURCE_DEVICE_ID",
      "awake_app_guids":[
         "extension-25qrgzolngx"
      ],
      "body":"Take a look at this note!",
      "push_type":"note"
   }
}
Message in case you receive a push notification on one of your connected Android devices (in this case an Android message):
{
   "type":"platypush.message.event.pushbullet.PushbulletEvent",
   "source_device_iden":"SOURCE_DEVICE_ID",
   "source_user_iden":"SOURCE_USER_ID",
   "client_version":289,
   "dismissible":true,
   "icon":"base64 encoded jpeg icon",
   "title":"Facebook Friend sent a message",
   "body":"How are your plans for tonight?",
   "application_name":"Messenger",
   "package_name":"com.facebook.orca",
   "notification_id":"10000",
   "notification_tag":"NOTIFICATION_TAG",
   "conversation_iden":"{\"package_name\":\"com.facebook.orca\",\"tag\":\"NOTIFICATION_TAG\",\"id\":10000}",
   "push_type":"mirror"
}
Message processed when you send a file to your Platypush virtual device over Pushbullet:
{
   "active":true,
   "iden":"PUSH_ID",
   "created":1532383937.424952,
   "modified":1532383937.437808,
   "dismissed":false,
   "guid":"unique client notification id",
   "direction":"self",
   "sender_iden":"SENDER_ID",
   "sender_email":"myself@gmail.com",
   "sender_email_normalized":"myself@gmail.com",
   "sender_name":"My Name",
   "receiver_iden":"RECEIVED_ID",
   "receiver_email":"myself@gmail.com",
   "receiver_email_normalized":"myself@gmail.com",
   "target_device_iden":"TARGET_DEVICE_ID",
   "source_device_iden":"SOURCE_DEVICE_ID",
   "file_name":"My Picture 123.jpg",
   "file_type":"image/jpeg",
   "file_url":"https://dl2.pushbulletusercontent.com/My-Picture-123.jpg",
   "image_width":814,
   "image_height":726,
   "image_url":"https://lh3.googleusercontent.com/IMAGE_ID",
   "push_type":"file"
}
Also, if you enabled notification mirroring on your Pushbullet devices, then any new push notification will be shown on the Platypush web panel and dashboard as well.
Now you can start building your rules on Pushbullet events. A full example:
event.hook.OnPushbulletEvent:
    if:
        type: platypush.message.event.pushbullet.PushbulletEvent
    then:
        action: procedure.OnPushbulletEvent


procedure.sync.OnPushbulletEvent:
    # If it's a clipboard message coming from a device with universal copy&paste enabled,
    # then synchronize the text body to the system clipboard of the device where Platypush runs.
    # It basically extends the universal copy&paste also to your Platypush devices even if
    # they don't have the Pushbullet browser extension or app installed.
    - if ${context['event'].args['push_type'] == 'clip'}:
        -
            action: clipboard.copy
            args:
                text: ${context['event'].args['body']}

    # If it's a picture being sent over Pushbullet, then copy it on my USB hard drive
    - if ${context['event'].args['push_type'] == 'file' and context['event'].args['file_type'].startswith('image/')}:
        -
            action: shell.exec
            args:
                cmd: "wget -O \"/mnt/hd/images/${context['event'].args['file_name']}\" \"${context['event'].args['file_url']}\""

    # Back up to a local folder the text notes being sent to Platypush over Pushbullet
    - if ${context['event'].args['push_type'] == 'note'}:
        -
            action: shell.exec
            args:
                cmd: "cat <<EOF > \"/home/user/notes/${context['event'].args['iden']}\"\n${context['event'].args['body']}\nEOF"
You can also send raw Platypush messages (requests, responses and events) over Pushbullet as raw JSON. If Platypush can interpret a Pushbullet push as a valid JSON message, then it will route it to the main application bus.
Such feature is quite useful for example to execute plugin actions or deliver events to your Platypush devices through your Android device, using Tasker with the Pushbullet plugin. For instance, you can create a rule that sends a specific text to your Platypush device or a JSON request with a properly formatted request whenever your phone enters your home area, for example to turn on the lights or the heating.
You can also communicate the other way around: you can programmatically send pushes to Pushbullet from Platypush using the plugin and you can build rules in Tasker on your mobile device to execute specific actions depending on the received message - for example start ringing if you say "find my phone" to the assistant, play a song by URI on the Spotify app, open Google Maps with the directions from your home to a specific place, and so on.
You can also connect IFTTT to Platypush actions by leveraging Pushbullet. For example, you can create an applet triggered on sunset (date/time channel) to turn on the lights by sending a push like this to your Platypush device:
{"type":"request", "action":"light.hue.on"}
Kafka backend
Apache Kafka is a distributed streaming platform that allows you to build flexible message-based interfaces across your devices.
You can connect Platypush to a Kafka broker server through this backend and configure it to listen for messages on a specific topic (default topic name: platypush.<device_id>).
Messages received over the topic will:
- Be processed as Platypush messages (requests, responses or messages) if they are valid JSON-formatted messages
- Trigger a
KafkaMessageEventthat you can build event hooks on otherwise
The configuration is quite straightforward:
backend.kafka:
    server: host:9092  # Kafka broker server and port to connect to
    topic: platypush   # Default topic prefix to listen on. The actual topic name will be <topic>.<device_id>
MPD/Mopidy backend
You can use this backend to get events from your MPD/Mopidy music server, for instance when a new track is being played, when the playback is paused/resumed or when the current playlist changes.
Configuration:
backend.music.mpd:
    server: localhost  # MPD/Mopidy server
    port: 6600         # Server port (default: 6600)
    poll_seconds: 3    # How often you want to poll the server for updates (default: 3 seconds)
An example that sends a scrobble request to Last.FM when a new track is played:
event.hook.ScrobbleNewTrack:
    if:
        type: platypush.message.event.music.NewPlayingTrackEvent
    then:
        -
            action: lastfm.scrobble
            args:
                artist: ${track['artist']}
                title: ${track['title']}
        -
            action: lastfm.update_now_playing
            args:
                artist: ${track['artist']}
                title: ${track['title']}
MIDI backend
You can listen for events on a MIDI port. You can use to do things like connecting a MIDI keyboard or drumkit. You can set up cool things like controlling your house with your MIDI piano - with 88 keys you've got plenty of configuration choices :)
Backend configuration:
backend.midi:
    device_name: MIDI_device_name   # MIDI device name to listen for events
    midi_throttle_time: 0.5         # Set this (in seconds) if you want to throttle your MIDI messages.
                                    # Useful in case you want to connect MIDI events to some plugin
                                    # with a lower throughput and prevent flooding it.
Example that allows you to control the brightness of your Philips Hue lights using the slider on a connected MIDI controller:
event.hook.OnMidiEvent:
    if:
        type: platypush.message.event.midi.MidiMessageEvent
    then:
        action: procedure.OnMidiEvent

procedure.sync.OnMidiEvent:
    # In this case the slider we want to listen to for MIDI events is on Channel 1 (MIDI 0xba)
    # if they are related to main volume changes (MIDI message 2nd value: 7)
    - if ${context['event'].args['message'][0] == 0xb0 and context['event'].args['message'][1] == 7}:
        -
            action: light.hue.bri
            args:
                # MIDI values are between 0 and 127, Hue brightness is between 0 and 255.
                # Multiply the MIDI value by 2 to map it into the brightness space.
                value: ${message[2] * 2}
                groups:
                    - Living Room
Flic buttons backend
Flic buttons are clever smart buttons controlled over bluetooth. You can get the app and configure it to run anything on a button press - running Tasker actions, playing some media, make a phone call etc. - or you can get the Flic backend configured on Platypush to use the buttons to control actions on your computer or Raspberry instead of your phone.
The backend requires the available Flic SDK to be installed and the flicd daemon to be running. Then you'll have to pair your buttons with the Platypush device. Afterwards, you're ready to configure the backend and start creating some rules:
backend.button.flic:
    server: localhost   # Server where the flicd daemon runs
Some examples:
event.hook.MusicPauseFlicButton:
    if:
        type: platypush.message.event.button.flic.FlicButtonEvent
        btn_addr: 00:11:22:33:44:55   # Address of the button that will trigger this event
        sequence:                     # Sequence press
            - ShortPressEvent
    then:
        -
            action: music.mpd.pause   # Toggle playback play/pause
Note the use of the sequence filter on the event. The default Flic app supports by default three types of presses - short, long and double press - that means maximum three possible actions per button.
This backend gives you more freedom instead, you can configure your own custom sequences of short/long press actions (a long press is a press that lasts longer than 0.3 seconds), and even build your own "Morse code" to trigger actions - as long as it's practical and you can remember which sequence is for what of course :)
Another example that starts an assistant conversation when the button is pressed three times (short press):
event.hook.FlicButtonStartConversation:
    if:
        type: platypush.message.event.button.flic.FlicButtonEvent
        btn_addr: 00:11:22:33:44:55
        sequence:
            - ShortPressEvent
            - ShortPressEvent
            - ShortPressEvent
    then:
        action: assistant.google.start_conversation
Camera backend
Raspberry Pi camera backend
Control your RaspberryPi camera, take pictures or record either to file or to a network stream through this backend.
You can programmatically control this backend (start and stop recording or take pictures) through the Pi Camera plugin.
Sample configuration:
backend.camera.pi:
    listen_port: 2222    # TCP camera listen port
    start_recording_on_startup: true  # If set (default) then the camera will start recording at startup. Otherwise,
                                      # you can start recording with a call to the `camera.pi.start_recording` action
See the online reference for all the supported camera options.
Once restarted Platypush you can connect to your Pi camera through a remote client using for instance vlc or mplayer:
# VLC
vlc tcp/h264://hostname:2222

# MPlayer
mplayer -fps 200 -demuxer h264es ffmpeg://tcp://hostname:2222
If you want to take a picture through the cURL interface:
curl -XPOST -H 'Content-Type: application/json' \
    -H "Authorization: Bearer $TOKEN" -d '{
      "type":"request",
      "action":"camera.pi.take_picture",
      "args": {
        "image_file":"/tmp/my_picture.jpg"
      }
    }' http://hostname:8008/execute
Sensor backends
Platypush comes with a wide selection of backends to interact with sensors of various types. And you can easily create your own backend to interact with a new class of sensors by extending the base sensor backend and implement the get_measurement method to get the values. Any sensor backend gets a configuration interface that allows you to specify the poll interval and the thresholds:
backend.sensor.sensor_name:
    poll_seconds: 2   # How often get_measurement will be called to check for new data
    thresholds:       # Map of thresholds for your sensors. It assumes that get_measurement returns
                      # a dictionary like {"sensor_1":0.1, "sensor_2":0.2, ...}.
                      # If the values go above or below one of the configured thresholds,
                      # then either a SensorDataAboveThresholdEvent or SensorDataBelowThresholdEvent
                      # will be triggered.
        temperature: 25.0
        humidity: 60.0
        luminosity: 10.0
A sensor backend will trigger three types of events:
SensorDataChangeEventwhen the value read from a sensor changesSensorDataAboveThresholdEventwhen a sensor value goes above a configured thresholdSensorDataBelowThresholdEventwhen a sensor value goes below a configured threshold
Infrared sensors
ZeroBorg backend
The ZeroBorg is a nice piece of circuitry that pairs quite well with any Raspberry and allows you to easily control motors. It also comes with a built-in infrared sensor. If this backend is enabled, it will listen for infrared events (e.g. from one of your remotes) that you can map to run any custom action.
Configuration to enable the backend:
backend.sensor.ir.zeroborg:
    disabled: False
Then restart Platypush and check the application logs while you generate infrared events through e.g. a tv or stereo remote. You'll see the mapped infrared message in the logs as a hexadecimal string:
Received event: {"id": "...", "args": {"message": "FFFF805151445445154455145444", "type": "platypush.message.event.sensor.ir.IrKeyDownEvent"}, "origin": "hostname", "target": "hostname", "type": "event"}
Received event: {"id": "...", "args": {"message": "FFFF", "type": "platypush.message.event.sensor.ir.IrKeyUpEvent"}, "origin": "hostname", "target": "hostname", "type": "event"}
You can then build event hooks when a specific key is pressed:
event.hook.OnRemoteBlueLightPress:
    if:
        type: platypush.message.event.sensor.ir.IrKeyDownEvent
        message: FFFF805151445445154455145444
    then:
        action: light.hue.on
MCP3008
The MCP3008 is a very useful ADC converter that you can use to read data from multiple analog sources and transmit them to a digital device that doesn't support direct GPIO analog input (like the Raspberry Pi). You can use it instead of an Arduino or serial device if you want lower latency, or a more compact or cheaper solution.
Sample configuration:
backend.sensor.mcp3008:
    poll_seconds: 2
Note that this backend requires the MCP3008 plugin to be configured as well.
You can now configure event hooks based on the events you get:
# Save new sensor measurements to a database table
event.hook.OnSensorData:
    if:
        type: platypush.message.event.sensor.SensorDataChangeEvent
    then:
        action: db.insert
        engine: sqlite:////home/user/sensors.db
        table: measurements
        records:
            - temperature: ${data['temperature']}

# Or deliver it to an Adafruit IO feed
event.hook.OnSensorData_2:
    if:
        type: platypush.message.event.sensor.SensorDataChangeEvent
    then:
        action: adafruit.io.send
        args:
            feed: house-temperature
            value: ${data['temperature']}

# Turn on a fan connected to a smart switch if the temperature goes above threshold
event.hook.OnSensorAboveThreshold:
    if:
        type: platypush.message.event.sensor.SensorDataAboveThresholdEvent
    then:
        action: switch.tplink.on
        args:
            device: fan
Arduino and serial backend
It's possible to poll for sensor events on a serial interface as well, e.g. through an Arduino or compatible device. The only advice is to program your microcontroller so that it returns sensors data as a JSON string over the serial interface, e.g.
{"temperature":22.5, "humidity":45, "luminosity":35.0}
Then all you have to do is to configure the serial plugin to point to your serial device and enable the serial backend like you would do with any other sensors backend:
backend.sensor.sensor_name:
    poll_seconds: 2   # How often get_measurement will be called to check for new data
    thresholds:       # Map of thresholds for your sensors. It assumes that get_measurement returns
                      # a dictionary like {"sensor_1":0.1, "sensor_2":0.2, ...}.
                      # If the values go above or below one of the configured thresholds,
                      # then either a SensorDataAboveThresholdEvent or SensorDataBelowThresholdEvent
                      # will be triggered.
        temperature: 25.0
        humidity: 60.0
        luminosity: 10.0
You can now configure your event hooks on SensorDataChangeEvent, SensorDataAboveThresholdEvent and SensorDataBelowThresholdEvent events.
inotify backend
inotify is a Linux kernel subsystem that allows you to monitor events on your filesystem (file opened, changed, created etc.).
Platypush provides an inotify backend that can trigger events whenever a monitored filesystem resource (file or directory) is opened, changed, created, removed etc.
Example configuration:
backend.inotify:
    watch_paths:    # Paths (files or directories) to be watched for events
        - /home/user/my_dir
        - /etc/passwd
        - /mnt/hd/media
You can now create event hooks whenever a file is changed, opened etc.:
# Send me an email whenever /etc/passwd is changed
event.hook.OnFileChanged:
    if:
        type: platypush.message.event.path.PathModifyEvent
        path: /etc/passwd
    then:
        action: google.mail.compose
        args:
            sender: me@gmail.com
            to: me@gmail.com
            subject: /etc/passwd file changed
            body: The /etc/passwd file has been changed
            files:
                - /etc/passwd
Smart cards backend
You can use the smart card backend to read smart card (NFC) events through a USB or compatible NFC card reader.
Configuration:
backend.scard:
    atr:    # List of ATRs (Answer To Reset, a standard answer provided by smart cards
            # conforming to the ISO/IEC 7816 standard that identifies the card's
            # producer, model and state) tha to react on. If not specified (default),
            # then Platypush will react on events from any card, otherwise only
            # for these selected ATRs
        - ATR1
        - ATR2
        - ATR3
Remember that if you want to enable a backend with no configuration all you have to do is configure it with the disabled: false line.
So far this backend will trigger events only upon detected/removed card, adding the detected ATR to the event context.
You can get the ATR of a smart card with an NFC utils app, or you can approach the card to the reader while Platypush is running and then get the ATR from the triggered event.
You can then build event hooks like these, that emulate the "hotel room" lights behaviour through a smart card:
# Turn on the lights when the reader detects a smart card with a specific ATR
event.hook.OnSmartCardDetected:
    if:
        type: platypush.message.event.scard.SmartCardDetectedEvent
        atr: ATR1
    then:
        action: light.hue.on

# Turn off the lights when the card is removed from the reader
event.hook.OnSmartCardRemoved:
    if:
        type: platypush.message.event.scard.SmartCardRemovedEvent
        atr: ATR1
    then:
        action: light.hue.off
You cannot however, as of now, use the backend to parse the content of the smart card and build action based on the content. The reason is that such features are hard to achieve through the pyscard library alone, while it's relatively easy through the nfc library. However the nfc library does not work with Python 3 yet. As soon as the compatibility is fixed though it's very likely that more granular events based on the card content will be available.
For now, you can for instance put your own custom Platypush commands on a smart card (e.g. to control lights, music or automate anything you want) through this procedure:
- Use an app like NFC Tools Pro to write your NFC tags. Write text records containing valid Platypush commands as JSON
- Use this script (run it with Python 2) that will listen for NFC events, parse the records on the card and dispatch them to Platypush if they are recognized