1268 lines
44 KiB
Markdown
1268 lines
44 KiB
Markdown

|
||
|
||
[](https://ci-cd.platypush.tech/platypush/platypush)
|
||
[](https://git.platypush.tech/platypush/platypush/issues)
|
||
[](https://github.com/blacklight/platypush)
|
||
[](https://github.com/blacklight/platypush)
|
||
[](https://git.platypush.tech/platypush/platypush/commits/branch/master)
|
||
[](https://lemmy.platypush.tech/c/platypush)
|
||
[](https://matrix.to/#/#platypush:matrix.platypush.tech)
|
||
|
||
[](https://pypi.python.org/pypi/platypush/)
|
||
[](https://git.platypush.tech/platypush/platypush/src/branch/master/CONTRIBUTING.md)
|
||
[](https://git.platypush.tech/platypush/platypush/src/branch/master/LICENSE.txt)
|
||
[](https://github.com/sponsors/blacklight)
|
||
[](https://blog.platypush.tech)
|
||
[](https://docs.platypush.tech)
|
||
[](https://git.platypush.tech/platypush/platypush/wiki)
|
||
[](irc://platypush@irc.platypush.tech:6697)
|
||
[](https://paypal.me/fabiomanganiello)
|
||
|
||
<!-- toc -->
|
||
|
||
- [Introduction](#introduction)
|
||
* [What it can do](#what-it-can-do)
|
||
- [Core concepts](#core-concepts)
|
||
- [A few examples](#a-few-examples)
|
||
* [Turn on the lights when I say so](#turn-on-the-lights-when-i-say-so)
|
||
* [Play the music when I say so](#play-the-music-when-i-say-so)
|
||
* [Turn on the lights when the sun goes down](#turn-on-the-lights-when-the-sun-goes-down)
|
||
* [Event matching and token extraction through hook templates](#event-matching-and-token-extraction-through-hook-templates)
|
||
* [Complex hook conditions](#complex-hook-conditions)
|
||
* [Turn off the lights at 1 AM](#turn-off-the-lights-at-1-am)
|
||
* [Greet me with lights and music when I come home](#greet-me-with-lights-and-music-when-i-come-home)
|
||
- [HTTP API](#http-api)
|
||
* [The _Execute_ tab](#the-_execute_-tab)
|
||
- [Websocket API](#websocket-api)
|
||
* [Events](#events)
|
||
* [Actions](#actions)
|
||
- [Web hooks](#web-hooks)
|
||
- [Entities](#entities)
|
||
- [Core Installation](#core-installation)
|
||
* [System package manager installation](#system-package-manager-installation)
|
||
+ [Arch Linux](#arch-linux)
|
||
+ [Debian/Ubuntu](#debianubuntu)
|
||
+ [Fedora](#fedora)
|
||
* [`pip`](#pip)
|
||
* [Docker](#docker)
|
||
* [Manual installation](#manual-installation)
|
||
- [Plugins installation](#plugins-installation)
|
||
* [`pip`](#pip-1)
|
||
* [Web interface](#web-interface)
|
||
* [Docker](#docker-1)
|
||
* [Virtual environment](#virtual-environment)
|
||
* [Manual installation](#manual-installation-1)
|
||
- [Configuration](#configuration)
|
||
* [Configuration file](#configuration-file)
|
||
+ [Scripts directory](#scripts-directory)
|
||
+ [Splitting configuration on multiple files](#splitting-configuration-on-multiple-files)
|
||
* [Working directory](#working-directory)
|
||
* [Database](#database)
|
||
* [Device ID](#device-id)
|
||
* [systemd service](#systemd-service)
|
||
* [Redis](#redis)
|
||
* [nginx](#nginx)
|
||
- [The Web interface](#the-web-interface)
|
||
* [Other Web panels](#other-web-panels)
|
||
* [Dashboards](#dashboards)
|
||
* [PWA support](#pwa-support)
|
||
- [Mobile app](#mobile-app)
|
||
- [Browser extension](#browser-extension)
|
||
- [Tests](#tests)
|
||
|
||
<!-- tocstop -->
|
||
|
||
## Introduction
|
||
|
||
Platypush is a general-purpose and extensible platform for automation across
|
||
multiple services and devices with [hundreds of supported
|
||
integrations](https://docs.platypush.tech/plugins.html).
|
||
|
||
It enables users to create their own self-hosted pieces of automation based on
|
||
events (*if this happens then do that*)
|
||
and it provides a comprehensive and customizable user interface that collects
|
||
everything you need to visualize and control under one roof.
|
||
|
||
It borrows concepts from [IFTTT](https://ifttt.com),
|
||
[Tasker](https://tasker.joaoapps.com/) and [Home
|
||
Assistant](https://www.home-assistant.io/) to provide an environment where the
|
||
user can easily connect things together. It focuses on an automation-as-code
|
||
and API-first approach, offering power users great flexibility in customizing
|
||
their routines.
|
||
|
||
It's built with compatibility and flexibility in mind, and it can easily run on
|
||
any device that can run a Python interpreter - from a Raspberry Pi, to an old
|
||
smartphone, to a beefy server.
|
||
|
||
### What it can do
|
||
|
||
You can use Platypush to do things like:
|
||
|
||
- [Control your smart
|
||
lights](https://blog.platypush.tech/article/Ultimate-self-hosted-automation-with-Platypush)
|
||
- [Control your music across multiple
|
||
devices](https://blog.platypush.tech/article/Build-your-open-source-multi-room-and-multi-provider-sound-server-with-Platypush-Mopidy-and-Snapcast)
|
||
- [Create custom and privacy-secure voice assistants that run custom hooks on
|
||
your
|
||
phrases](https://blog.platypush.tech/article/Build-custom-voice-assistants)
|
||
- Build integrations between sensors,
|
||
[cameras](https://docs.platypush.tech/platypush/plugins/camera.pi.html),
|
||
[microphones](https://docs.platypush.tech/platypush/plugins/sound.html)
|
||
and [machine learning
|
||
models](https://docs.platypush.tech/platypush/plugins/tensorflow.html)
|
||
to create smart pieces of automation for e.g. [people
|
||
detection](https://blog.platypush.tech/article/Detect-people-with-a-RaspberryPi-a-thermal-camera-Platypush-and-a-pinch-of-machine-learning)
|
||
or [sound
|
||
detection](https://blog.platypush.tech/article/Create-your-smart-baby-monitor-with-Platypush-and-Tensorflow)
|
||
- [Display events from your calendars and build automation on
|
||
them](https://docs.platypush.tech/platypush/plugins/calendar.html)
|
||
- [Build automation routines and visualizations from your sensors
|
||
data](https://blog.platypush.tech/article/How-to-build-your-personal-infrastructure-for-data-collection-and-visualization)
|
||
- [Control and automate a self-built
|
||
robot](https://docs.platypush.tech/platypush/plugins/gpio.zeroborg.html)
|
||
- [Deliver automated newsletters from custom RSS
|
||
digests](https://blog.platypush.tech/article/Deliver-customized-newsletters-from-RSS-feeds-with-Platypush)
|
||
- [Synchronize the clipboards on your
|
||
devices](https://docs.platypush.tech/platypush/plugins/clipboard.html)
|
||
- [Implement custom text-to-speech
|
||
logic](https://docs.platypush.tech/platypush/plugins/tts.html)
|
||
- [Build any kind of automation routines with your Android device using
|
||
Tasker](https://blog.platypush.tech/article/How-to-build-your-personal-infrastructure-for-data-collection-and-visualization)
|
||
- Play local
|
||
videos,
|
||
YouTube videos and torrent media from any device and service, to any device, with support for [Kodi](https://docs.platypush.tech/platypush/plugins/media.kodi.html), [Chromecast](https://docs.platypush.tech/platypush/plugins/media.chromecast.html), [VLC](https://docs.platypush.tech/platypush/plugins/media.vlc.html), [Jellyfin](https://docs.platypush.tech/platypush/plugins/media.jellyfin.html), [Plex](https://docs.platypush.tech/platypush/plugins/media.plex.html) and more
|
||
- [Get weather forecast events for your location and build automation routines on them](https://docs.platypush.tech/platypush/plugins/weather.darksky.html)
|
||
- [Create a custom single hub for Zigbee and Z-Wave smart devices](https://blog.platypush.tech/article/Transform-a-RaspberryPi-into-a-universal-Zigbee-and-Z-Wave-bridge)
|
||
- Build your own web dashboard with calendar, weather, news and music controls
|
||
(basically, anything that has a Platypush web widget)
|
||
- ...and much more (basically, anything that comes with a [Platypush plugin](https://docs.platypush.tech)).
|
||
|
||
The full list of available integrations is available at
|
||
[docs.platypush.tech](https://docs.platypush.tech), which also contains a more
|
||
in-depth wiki on the features supported by the platform.
|
||
|
||
The wiki is also mirrored on
|
||
[git.platypush.tech](https://git.platypush.tech/platypush/platypush/wiki).
|
||
|
||
[The blog](https://blog.platypush.tech) regularly publishes content with
|
||
step-by-step tutorials and recipes.
|
||
|
||
## Core concepts
|
||
|
||
The foundations of Platypush rest on a few simple building blocks that offer
|
||
great versatility to build arbitrarily complex automation routines:
|
||
|
||
- 🧩 **Plugins**. Plugins are the bread-and-butter of the platform. Each plugin
|
||
exposes an API to interact with an integration - there are plugins for media
|
||
players and devices, calendars, sensors, voice assistants, smart devices,
|
||
cloud services, and so on.
|
||
|
||
- ⏻ **Actions**. These are the methods of a plugin transparently exposed to the
|
||
user over a simple JSON RPC API, and they are always expressed in the
|
||
format `<plugin_name>.<action_name>`. For instance,
|
||
[`light.hue.on`](https://docs.platypush.tech/platypush/plugins/light.hue.html#platypush.plugins.light.hue.LightHuePlugin.on)
|
||
can be used to turn on Philips Hue-compatible lights,
|
||
[`media.vlc.play`](https://docs.platypush.tech/platypush/plugins/media.vlc.html#platypush.plugins.media.vlc.MediaVlcPlugin.play)
|
||
to play some media on a VLC player, etc.
|
||
|
||
- ⚙️ **Backends**. These are special integrations whose main purpose is to
|
||
deliver messages to the main application. The principal one is the
|
||
[`http` backend](https://docs.platypush.tech/platypush/backend/http.html),
|
||
which exposes the HTTP and WebSocket APIs, serves the main UI and is used
|
||
by several integrations to provide additional services. A [`nodered`
|
||
backend](https://docs.platypush.tech/platypush/backend/nodered.html) is
|
||
also available to expose a Platypush action component to a Node-RED
|
||
instance, as well as an internal [`redis`
|
||
backend](https://docs.platypush.tech/platypush/backend/redis.html) and an
|
||
(insecure) [`tcp`
|
||
backend](https://docs.platypush.tech/platypush/backend/tcp.html) to receive
|
||
raw messages.
|
||
|
||
- 📧 **Events**. Plugins emit _events_ whenever some particular conditions happen
|
||
for example, a [new media track is
|
||
played](https://docs.platypush.tech/platypush/events/media.html#platypush.message.event.media.MediaPlayEvent),
|
||
a [voice assistant conversation has
|
||
started](https://docs.platypush.tech/platypush/events/assistant.html#platypush.message.event.assistant.ConversationStartEvent),
|
||
and so on.
|
||
|
||
- 🪝 **Hooks**. Users can define custom callbacks on events in the form of
|
||
*hooks*. Hooks can contain lists of actions to execute when a certain event
|
||
matches the hook *condition*, or any kind of custom logic - for example,
|
||
*send a notification on my phone when the presence sensor in my garage goes
|
||
on*, or *use a TTS plugin to process the digest of the latest RSS feeds if
|
||
I tell the voice assistant "play the news"*. Event hooks can be expressed
|
||
either in YAML format or as Python runtime scripts.
|
||
|
||
- 📜 **Procedures**. Procedures are custom snippets of logic that can be invoked
|
||
using the Platypush API. For example, you can define an `at_home` procedure
|
||
that will be executed when you arrive home, which turns on the lights, plays
|
||
the music, sets the thermostat temperature etc., and then call it using the
|
||
Platypush API from any device. Like event hooks, procedures can be defined
|
||
both in YAML format (good if you just want to execute lists of actions
|
||
without much added logic), or as Python scripts.
|
||
|
||
- 🕗 **Cronjobs**. Cronjobs are special procedures that can be executed either
|
||
at regular intervals (the [UNIX cron
|
||
syntax](https://linuxhandbook.com/crontab/) is supported), or at a specific
|
||
time (one-shot). Just like procedures, they can be defined either in YAML or
|
||
as Python scripts.
|
||
|
||
- 💡 **Entities**. Some plugins expose generic _entities_ - such a lights,
|
||
sensors, media players, switches, voice assistants etc. These entities can be
|
||
controlled through [the same generic
|
||
APIs](https://docs.platypush.tech/platypush/plugins/entities.html), emit [the
|
||
same types of
|
||
events](https://docs.platypush.tech/platypush/events/entities.html), can
|
||
be controlled from the same Web view or dashboard, and their state is
|
||
persisted across runs.
|
||
|
||
## A few examples
|
||
|
||
The bulk of the configuration of Platypush lives under the `config.yaml` file.
|
||
An extensive [`config.yaml`
|
||
example](https://git.platypush.tech/platypush/platypush/src/branch/master/platypush/config/config.yaml)
|
||
is provided in the repo. All the sections are optional - the only one enabled by
|
||
default is the HTTP server, `backend.http`, but that is optional too.
|
||
|
||
Let's take an example where we want to control the following entities:
|
||
|
||
- A Philips Hue bridge and its connected smart lights.
|
||
|
||
- An on-device voice assistant (we'll consider the Google Assistant in this
|
||
example as it's the easiest to configure, although Google deprecated the
|
||
Assistant libraries long ago).
|
||
|
||
- A compatible music player - we'll consider MPD/Mopidy in this example as they
|
||
are the ones best supported in Platypush, and Mopidy also offers plugins with
|
||
basically any audio backend out there.
|
||
|
||
We'll need the following plugins enabled in the `config.yaml`:
|
||
|
||
- [`light.hue`](https://docs.platypush.tech/platypush/plugins/light.hue.html)
|
||
- [`assistant.google`](https://docs.platypush.tech/platypush/plugins/assistant.google.html)
|
||
- [`music.mopidy`](https://docs.platypush.tech/platypush/plugins/music.mopidy.html)
|
||
or
|
||
[`music.mpd`](https://docs.platypush.tech/platypush/plugins/music.mpd.html)
|
||
(they expose the same API)
|
||
|
||
The documentation pages of these plugins already provide some comprehensive
|
||
configuration snippets that you can use.
|
||
|
||
The most basic configuration would be something like this:
|
||
|
||
```yaml
|
||
# Enable it if you want the enable the HTTP API and the Web interface
|
||
backend.http:
|
||
|
||
light.hue:
|
||
# IP/hostname of the Hue bridge
|
||
bridge: 192.168.1.10
|
||
# Default groups that should be targeted by actions if none is specified
|
||
# (default: all lights/groups)
|
||
groups:
|
||
- Living Room
|
||
|
||
# Check the plugin documentation on how to get the credentials
|
||
assistant.google:
|
||
|
||
music.mopidy: # Or music.mpd
|
||
# IP/hostname of the MPD/Mopidy server
|
||
host: 192.168.1.2
|
||
```
|
||
|
||
Now that we have our integrations configured, let's build some automation routines.
|
||
|
||
### Turn on the lights when I say so
|
||
|
||
In this case we will have to create a hook that listens to a
|
||
[`SpeechRecognizedEvent`](https://docs.platypush.tech/platypush/events/assistant.html#platypush.message.event.assistant.SpeechRecognizedEvent)
|
||
triggered by the assistant - for example, when we say "_OK, Google_" followed
|
||
by "_turn on the lights_".
|
||
|
||
We can declare the hook in YAML format directly in the `config.yaml`, or in one
|
||
of the files included in it through the `include:` directive:
|
||
|
||
```yaml
|
||
event.hook.turn_lights_on_voice_command:
|
||
if:
|
||
type: platypush.message.event.assistant.SpeechRecognizedEvent
|
||
# Note that a minimal regex-like syntax is supported here.
|
||
# This condition matches both a phrase that contains
|
||
# "turn on the lights" and one that contains "turn on lights"
|
||
phrase: "turn on (the)? lights"
|
||
then:
|
||
- action: light.hue.on
|
||
args:
|
||
groups:
|
||
- Living Room
|
||
```
|
||
|
||
Or we can declare the hook in a Python script - you just have to create a `.py`
|
||
file (e.g. `lights.py`) under a `scripts` directory located under the same
|
||
folder as your `config.yaml`:
|
||
|
||
```python
|
||
from platypush import run, when
|
||
from platypush.events.assistant import SpeechRecognizedEvent
|
||
|
||
@when(SpeechRecognizedEvent, phrase="turn on (the)? lights")
|
||
def lights_on_voice_command(): # Also accepts an optional `event` argument
|
||
run('light.hue.on', groups=['Living Room'])
|
||
```
|
||
|
||
Or, using the `get_plugin` API:
|
||
|
||
```python
|
||
from platypush import get_plugin, when
|
||
from platypush.events.assistant import SpeechRecognizedEvent
|
||
|
||
@when(SpeechRecognizedEvent, phrase="turn on (the)? lights")
|
||
def lights_on_voice_command():
|
||
get_plugin('light.hue').on(groups=['Living Room'])
|
||
```
|
||
|
||
### Play the music when I say so
|
||
|
||
The approach is similar for a "_play the music_" voice command. YAML:
|
||
|
||
```yaml
|
||
event.hook.play_music_voice_command:
|
||
if:
|
||
type: platypush.message.event.assistant.SpeechRecognizedEvent
|
||
phrase: "play (the)? music"
|
||
then:
|
||
- action: music.mopidy.play
|
||
```
|
||
|
||
Python:
|
||
|
||
```python
|
||
from platypush import run, when
|
||
from platypush.events.assistant import SpeechRecognizedEvent
|
||
|
||
@when(SpeechRecognizedEvent, phrase="play (the)? music")
|
||
def lights_on_voice_command():
|
||
run('music.mopidy.play')
|
||
```
|
||
|
||
### Turn on the lights when the sun goes down
|
||
|
||
This example requires the [`sun`
|
||
plugin](https://docs.platypush.tech/platypush/plugins/sun.html) configured:
|
||
|
||
```yaml
|
||
sun:
|
||
latitude: LAT
|
||
longitude: LONG
|
||
```
|
||
|
||
You can then simply subscribe to
|
||
[`SunsetEvent`](https://docs.platypush.tech/platypush/events/sun.html#platypush.message.event.sun.SunsetEvent).
|
||
YAML:
|
||
|
||
```yaml
|
||
event.hook.sunset_lights_on:
|
||
if:
|
||
type: platypush.message.event.sun.SunsetEvent
|
||
then:
|
||
- action: light.hue.on
|
||
```
|
||
|
||
Python:
|
||
|
||
```python
|
||
from platypush import run, when
|
||
from platypush.events.sun import SunsetEvent
|
||
|
||
@when(SunsetEvent)
|
||
def sunset_lights_on():
|
||
run('light.hue.on')
|
||
```
|
||
|
||
### Event matching and token extraction through hook templates
|
||
|
||
You can also operate token extraction from event arguments if the values are
|
||
strings.
|
||
|
||
For example, you can use advanced pattern matching and token extraction to
|
||
create voice assistant hooks that will match a template with parametrized field
|
||
which will be passed as arguments to your event hook:
|
||
|
||
```python
|
||
from platypush import run, when
|
||
from platypush.events.assistant import SpeechRecognizedEvent
|
||
|
||
@when(SpeechRecognizedEvent, phrase='play ${title} by ${artist}')
|
||
def on_music_play_command(event, title, artist):
|
||
results = run(
|
||
'music.mpd.search',
|
||
filter={
|
||
'artist': artist,
|
||
'title': title,
|
||
}
|
||
)
|
||
|
||
if results:
|
||
run('music.mpd.play', results[0]['file'])
|
||
```
|
||
|
||
### Complex hook conditions
|
||
|
||
Your event hooks can include more complex filters too. Structured filters
|
||
against partial event arguments are also possible, and relational operators are
|
||
supported as well. For example:
|
||
|
||
```python
|
||
from platypush import when
|
||
from platypush.events.sensor import SensorDataChangeEvent
|
||
|
||
@when(SensorDataChangeEvent, data=1):
|
||
def hook_1(event):
|
||
"""
|
||
Triggered when event.data == 1
|
||
"""
|
||
|
||
@when(SensorDataChangeEvent, data={'state': 1}):
|
||
def hook_2(event):
|
||
"""
|
||
Triggered when event.data['state'] == 1
|
||
"""
|
||
|
||
@when(SensorDataChangeEvent, data={
|
||
'temperature': {'$gt': 25},
|
||
'humidity': {'$le': 15}
|
||
}):
|
||
def hook_3(event):
|
||
"""
|
||
Triggered when event.data['temperature'] > 25 and
|
||
event.data['humidity'] <= 15.
|
||
"""
|
||
```
|
||
|
||
The supported relational fields are the same supported by ElasticSearch - `$gt`
|
||
for greater than, `$lt` for lesser than, `$ge` for greater or equal, `$ne` for
|
||
not equal, etc.
|
||
|
||
### Turn off the lights at 1 AM
|
||
|
||
We can use a `cron` for this case. YAML:
|
||
|
||
```yaml
|
||
cron.lights_off_night:
|
||
# Run this every day at 1 AM
|
||
cron_expression: '0 1 * * *'
|
||
actions:
|
||
- action: light.hue.off
|
||
```
|
||
|
||
Python:
|
||
|
||
```python
|
||
from platypush import cron, run
|
||
|
||
@cron('0 1 * * *')
|
||
def lights_off_night():
|
||
run('light.hue.off')
|
||
```
|
||
|
||
### Greet me with lights and music when I come home
|
||
|
||
Let's create an `at_home` procedure for this purpose. We can also use a
|
||
text-to-speech plugin like the [`tts`
|
||
plugin](https://docs.platypush.tech/platypush/plugins/tts.html) (it requires no
|
||
configuration as it relies on the Google Translate frontend API, but other,
|
||
more sophisticated plugins are also available) to have a warm voice to welcome
|
||
us home. YAML:
|
||
|
||
```yaml
|
||
# Make sure that the sound plugin is also enabled, for audio processing
|
||
sound:
|
||
|
||
procedure.at_home:
|
||
- action: tts.say
|
||
args:
|
||
text: "Welcome home!"
|
||
|
||
# Get luminosity data from a sensor - e.g. LTR559
|
||
- action: gpio.sensor.ltr559.get_data
|
||
|
||
# If it's lower than a certain threshold, turn on the lights.
|
||
# Note that we can directly access attributes returned by the
|
||
# previous request(s) as local context variables within the
|
||
# procedure/hook/cron. In this case, `light` is an attribute returned
|
||
# on the response of the previous command.
|
||
|
||
# Otherwise, you can also use the special `output` variable to get only
|
||
# the response of the latest action, e.g. `output['light']`
|
||
|
||
# Also note the use of the special `if ${}` construct. It accepts
|
||
# a snippet of Python code and it can access variables within the
|
||
# current context.
|
||
- if ${light is not None and light < 110}:
|
||
- action: light.hue.on
|
||
|
||
- action: music.mopidy.play
|
||
args:
|
||
resource: "uri:to:my:favourite:playlist"
|
||
```
|
||
|
||
Python:
|
||
|
||
```python
|
||
from platypush import procedure, run
|
||
|
||
@procedure("at_home")
|
||
def at_home_proc():
|
||
run('tts.say', text='Welcome home!')
|
||
|
||
luminosity = run('gpio.sensor.ltr559.get_data').get('light', 0)
|
||
if luminosity < 110:
|
||
run('light.hue.on')
|
||
|
||
run('music.mopidy.play', resource='uri:to:my:favourite:playlist')
|
||
```
|
||
|
||
You can then call the procedure from a hook or another script:
|
||
|
||
```python
|
||
from platypush import run
|
||
|
||
run('procedure.at_home')
|
||
```
|
||
|
||
Or, from YAML:
|
||
|
||
```yaml
|
||
procedure.some_other_procedure:
|
||
- action: procedure.at_home
|
||
```
|
||
|
||
Or using the API (see next section).
|
||
|
||
## HTTP API
|
||
|
||
Actions and procedures can also be called using the JSON-RPC API exposed by
|
||
Platypush.
|
||
|
||
Your configuration requires the [`backend.http`
|
||
section](https://docs.platypush.tech/platypush/backend/http.html) enabled if
|
||
you want to use the HTTP API - default listen port: `8008`.
|
||
|
||
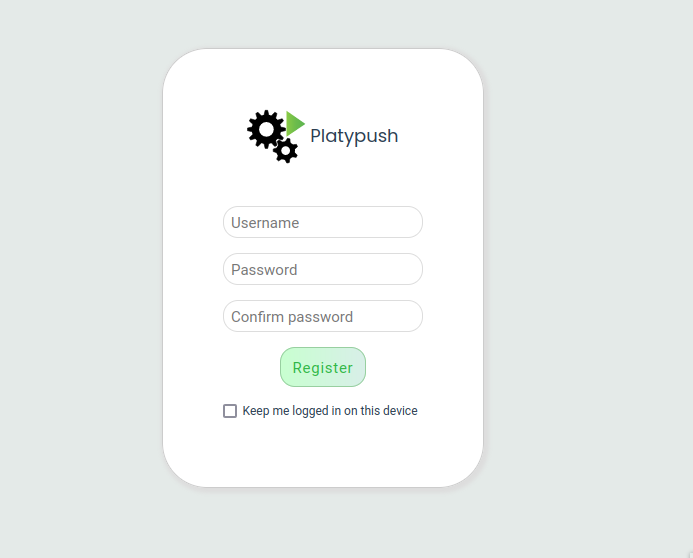
After ensuring that the HTTP backend is enabled, head to
|
||
`http://localhost:8008` and register a new user.
|
||
|
||
|
||
|
||
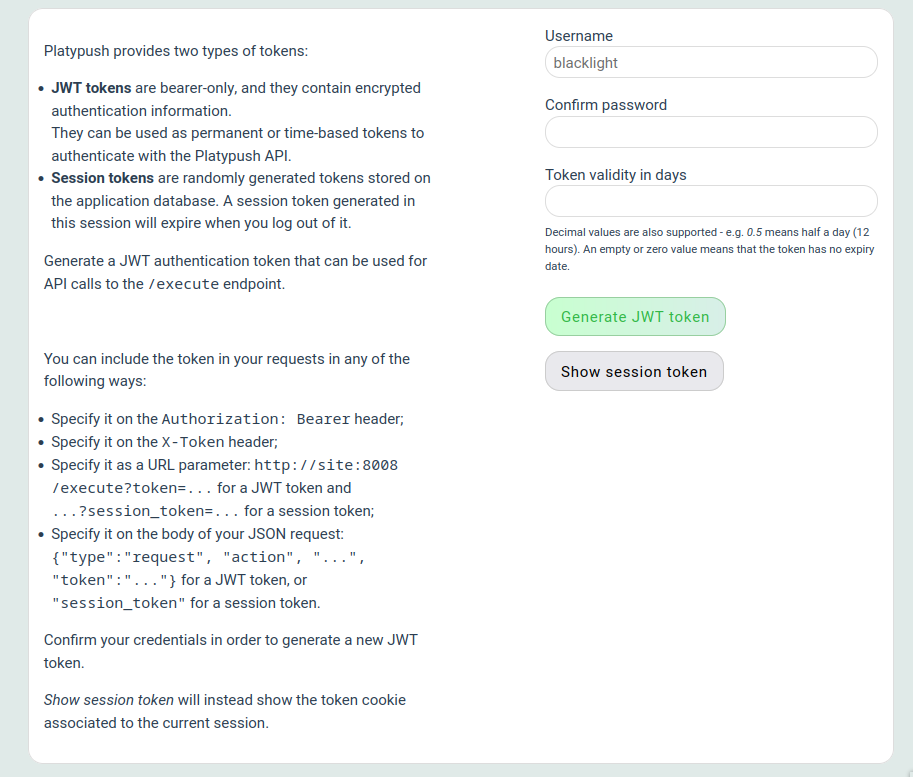
From the Web UI, head to _Settings_ → _Tokens_, insert your password again and
|
||
click _Generate JWT token_.
|
||
|
||
|
||
|
||
Alternatively, you can retrieve a token via HTTP request:
|
||
|
||
```shell
|
||
❯ curl -XPOST -H 'Content-Type: application/json' -d '
|
||
{
|
||
"username": "$YOUR_USER",
|
||
"password": "$YOUR_PASSWORD"
|
||
}' http://localhost:8008/auth
|
||
```
|
||
|
||
You can then send requests to Platypush using a simple RPC API:
|
||
|
||
```bash
|
||
❯ curl -XPOST \
|
||
-d '{"type":"request", "action":"procedure.at_home"}' \
|
||
-H "Authorization: Bearer $YOUR_TOKEN" \
|
||
-H "Content-Type: application/json" \
|
||
http://localhost:8008/execute
|
||
❮
|
||
{
|
||
"id": "724754df98968247a284557ce32f74bb",
|
||
"type": "response",
|
||
"target": "http",
|
||
"origin": "myhost",
|
||
"_timestamp": 1716575901.046127,
|
||
"response": {
|
||
"output": {
|
||
"success": true
|
||
},
|
||
"errors": []
|
||
}
|
||
}
|
||
```
|
||
|
||
If your procedure returned something, then that will be returned on the API
|
||
response too, so downstream consumers can use it.
|
||
|
||
The `POST /execute` endpoint accepts a payload in the format:
|
||
|
||
```javascript
|
||
{
|
||
"type": "request", // Constant
|
||
"action": "<plugin-name>.<action-name>", // Or procedure.<name>
|
||
"args": {
|
||
"arg1": "arg2",
|
||
// ...
|
||
}
|
||
}
|
||
```
|
||
|
||
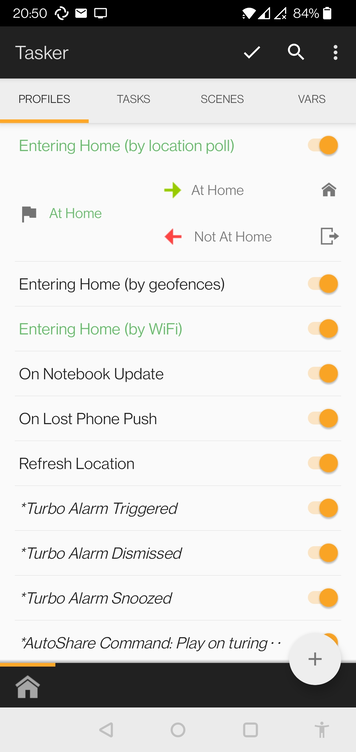
In our `procedure.at_home` example, you can for instance create an automation
|
||
snippet paired with your phone that runs the routine whenever you arrive home
|
||
(or your phone does):
|
||
|
||
1. Install an app like [Tasker](https://tasker.joaoapps.com/) to create
|
||
automation tasks on your Android device.
|
||
|
||
2. Install a plugin like [AutoLocation](https://joaoapps.com/autolocation/) to
|
||
create automation tasks based on your phone's location.
|
||
|
||
3. Create a profile that triggers whenever you enter your home location (and/or
|
||
exit it).
|
||
|
||
|
||
|
||
4. Leverage the [HTTP
|
||
Request](https://tasker.joaoapps.com/userguide/en/help/ah_http_request.html)
|
||
Tasker action to send a request to your Platypush API to trigger the routine.
|
||
|
||
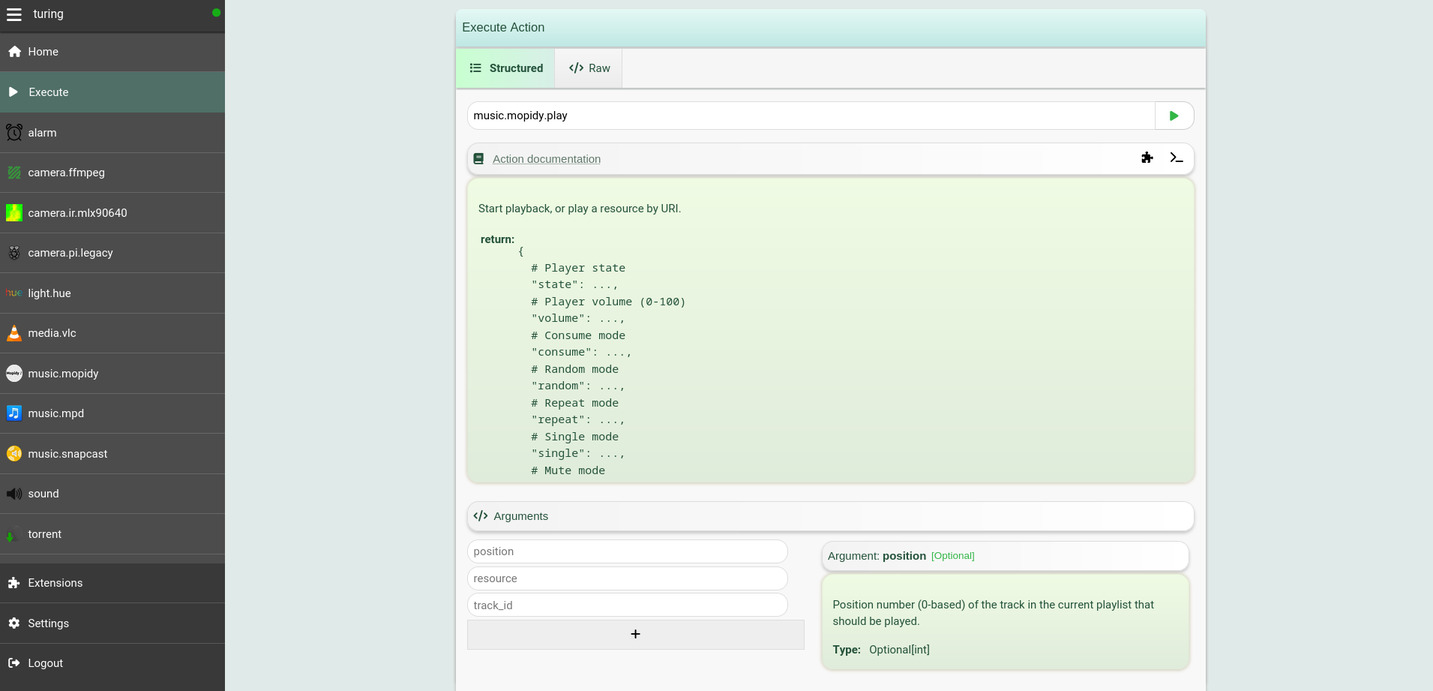
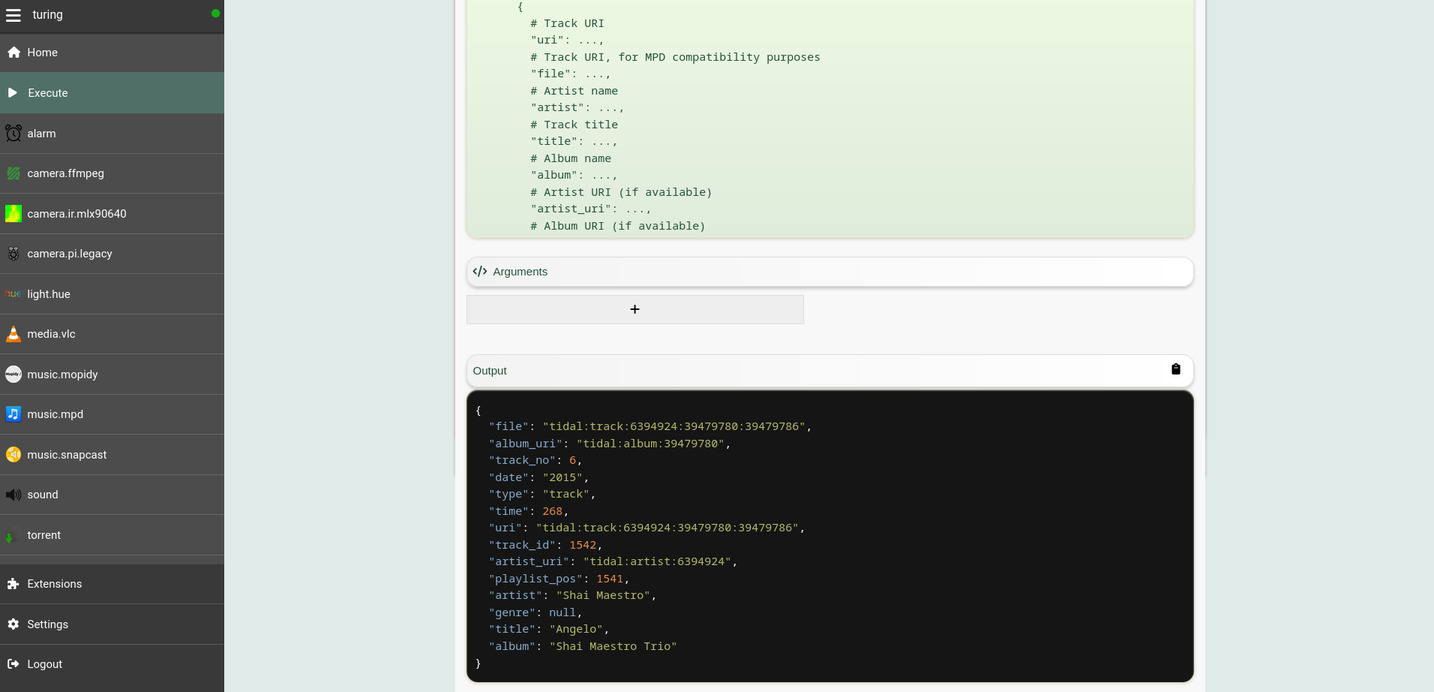
### The _Execute_ tab
|
||
|
||
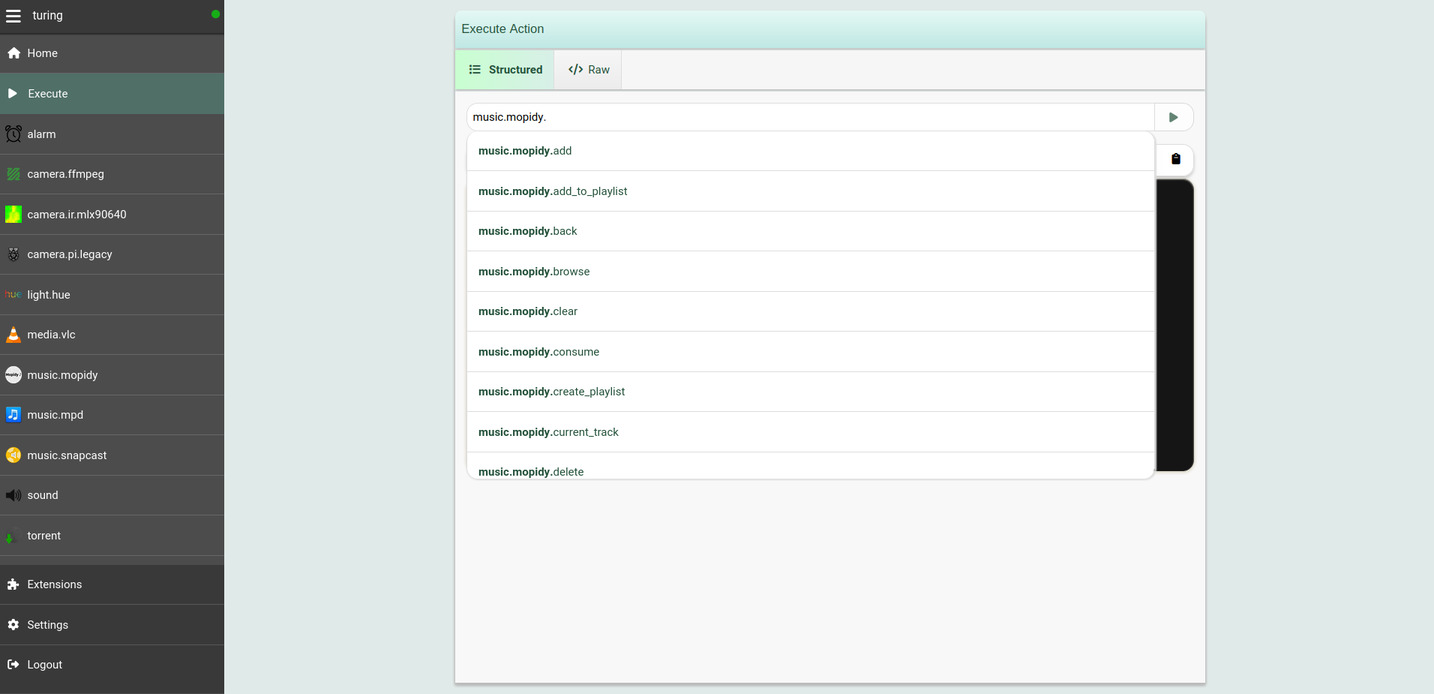
The Web interface also provides an _Execute_ tab under the menu sidebar. You
|
||
can use this tab to dynamically discover the actions exposed by various plugins
|
||
(and also your own procedures):
|
||
|
||
|
||
|
||
|
||
|
||
|
||
|
||
## Websocket API
|
||
|
||
### Events
|
||
|
||
You can subscribe to events generated by the application over the `/ws/events`
|
||
Websocket endpoint, and send events to this endpoint too.
|
||
|
||
This is useful if you want to synchronize Platypush events with another client,
|
||
or send custom events outside of those native to the application and build
|
||
custom automation hooks on them.
|
||
|
||
Sending events:
|
||
|
||
```bash
|
||
❯ wscat -H "Authorization: Bearer $YOUR_TOKEN" \
|
||
-c "ws://localhost:8008/ws/events" \
|
||
-w 1 \
|
||
-x '
|
||
{
|
||
"type": "event",
|
||
"args": {
|
||
"type": "platypush.message.event.custom.CustomEvent",
|
||
"subtype": "foo",
|
||
"args": {
|
||
"bar": "baz"
|
||
}
|
||
}
|
||
}'
|
||
```
|
||
|
||
Receiving events:
|
||
|
||
```bash
|
||
❯ wscat -H "Authorization: Bearer $YOUR_TOKEN" -c "ws://localhost:8008/ws/events"
|
||
```
|
||
|
||
### Actions
|
||
|
||
You can also send requests to the `/ws/requests` Websocket endpoint, and get
|
||
responses asynchronously on the same channel:
|
||
|
||
```bash
|
||
❯ wscat -H "Authorization: Bearer $YOUR_TOKEN" \
|
||
-c "ws://localhost:8008/ws/requests" \
|
||
-w 1 \
|
||
-x '{"type": "requests", "action": "procedure.foo.bar"}'
|
||
```
|
||
|
||
## Web hooks
|
||
|
||
You can use Platypush to expose your custom routines as dynamic Web hooks that
|
||
can be called by any client.
|
||
|
||
All you need is to register a listener for a
|
||
[`WebhookEvent`](https://docs.platypush.tech/platypush/events/http.hook.html#platypush.message.event.http.hook.WebhookEvent)
|
||
|
||
```python
|
||
from platypush import run, when
|
||
from platypush.events.http.hook import WebhookEvent
|
||
|
||
hook_token = "abcdefabcdef"
|
||
|
||
# Expose the hook under the /hook/at_home endpoint
|
||
@when(WebhookEvent, hook="at_home")
|
||
def at_home_webhook(event: WebhookEvent):
|
||
# Unlike the calls to /execute, custom web hooks are unauthenticated.
|
||
# If you want authentication, you'll need to implement your custom logic by
|
||
# parsing the event headers
|
||
if event.headers.get("X-Token") != hook_token:
|
||
# Tuple with <response, http-code, [response-headers]>
|
||
event.send_response(("Unauthorized", 401))
|
||
return
|
||
|
||
run('procedure.at_home')
|
||
|
||
# Return anything back to the client
|
||
return {'status': 'ok'}
|
||
```
|
||
|
||
Then you can invoke your custom logic over HTTP:
|
||
|
||
```bash
|
||
❯ curl -H 'X-Token: abcdefabcdef' 'http://localhost:8008/hook/at_home'
|
||
```
|
||
|
||
## Entities
|
||
|
||
Entities are another building block of Platypush. Many integrations will store
|
||
their state or connected devices in the form of entities - e.g. the sensors
|
||
detected by the Z-Wave/Zigbee/Bluetooth integration, or the lights connected to
|
||
a Hue bridge, or your cloud nodes, or your custom Arduino/ESP machinery, and so
|
||
on.
|
||
|
||
Entities provide a consistent interface to interact with your integrations
|
||
regardless of their type and the plugin that handles them. For instance, all
|
||
temperature sensors will expose the same interface, regardless if they are
|
||
Bluetooth or Zigbee sensors, and all the media plugins will expose the same
|
||
interface, regardless if they manage Chromecasts, Kodi, Plex, Jellyfin or a
|
||
local VLC player.
|
||
|
||
Once you enable the HTTP backend and a few integrations that export entities
|
||
and register a user, you can query the detected entities via:
|
||
|
||
```shell
|
||
curl -XPOST -H 'Content-Type: application/json' \
|
||
-H "Authorization: Bearer $YOUR_TOKEN" \
|
||
-d '{"type":"request", "action":"entities.get"}' \
|
||
http://localhost:8008/execute
|
||
```
|
||
|
||
All the entities expose the same interface and can be manipulated through the
|
||
same API. Also, when an entity is updated it always emits an
|
||
[`EntityUpdateEvent`](https://docs.platypush.tech/platypush/events/entities.html#platypush.message.event.entities.EntityUpdateEvent),
|
||
so you can easily create hooks that react to these events and act on multiple
|
||
types of entities.
|
||
|
||
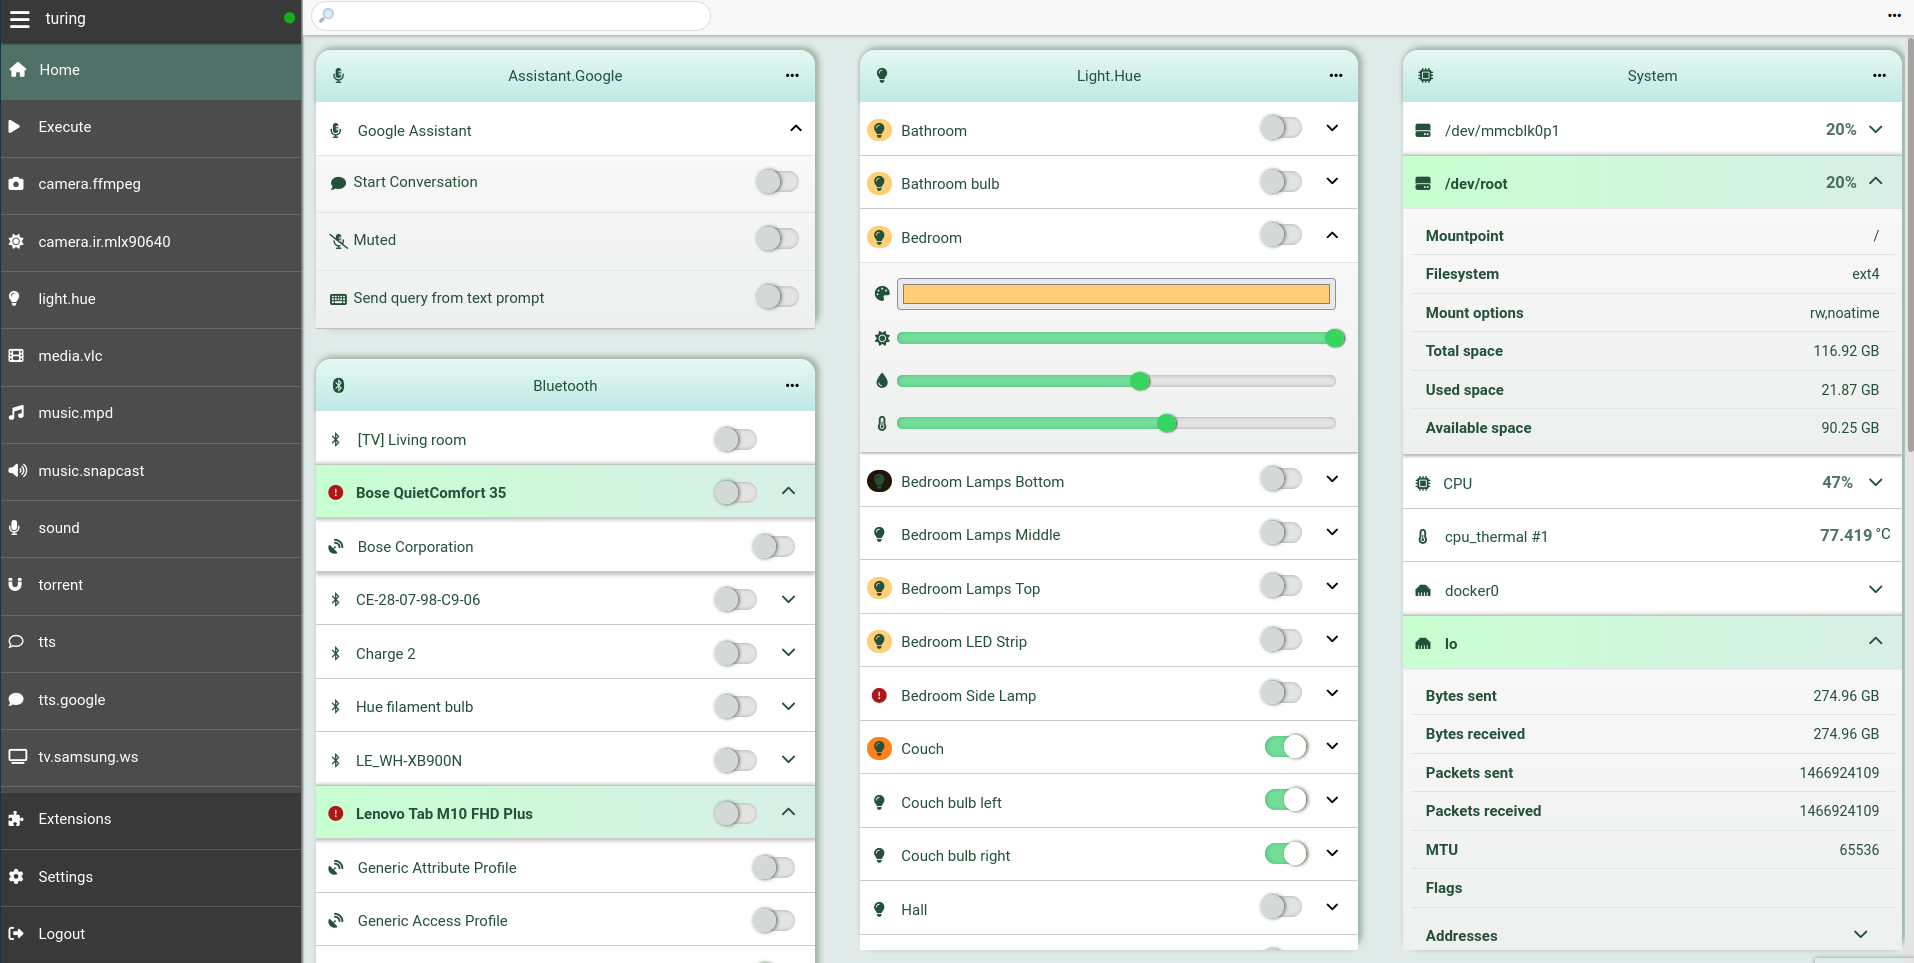
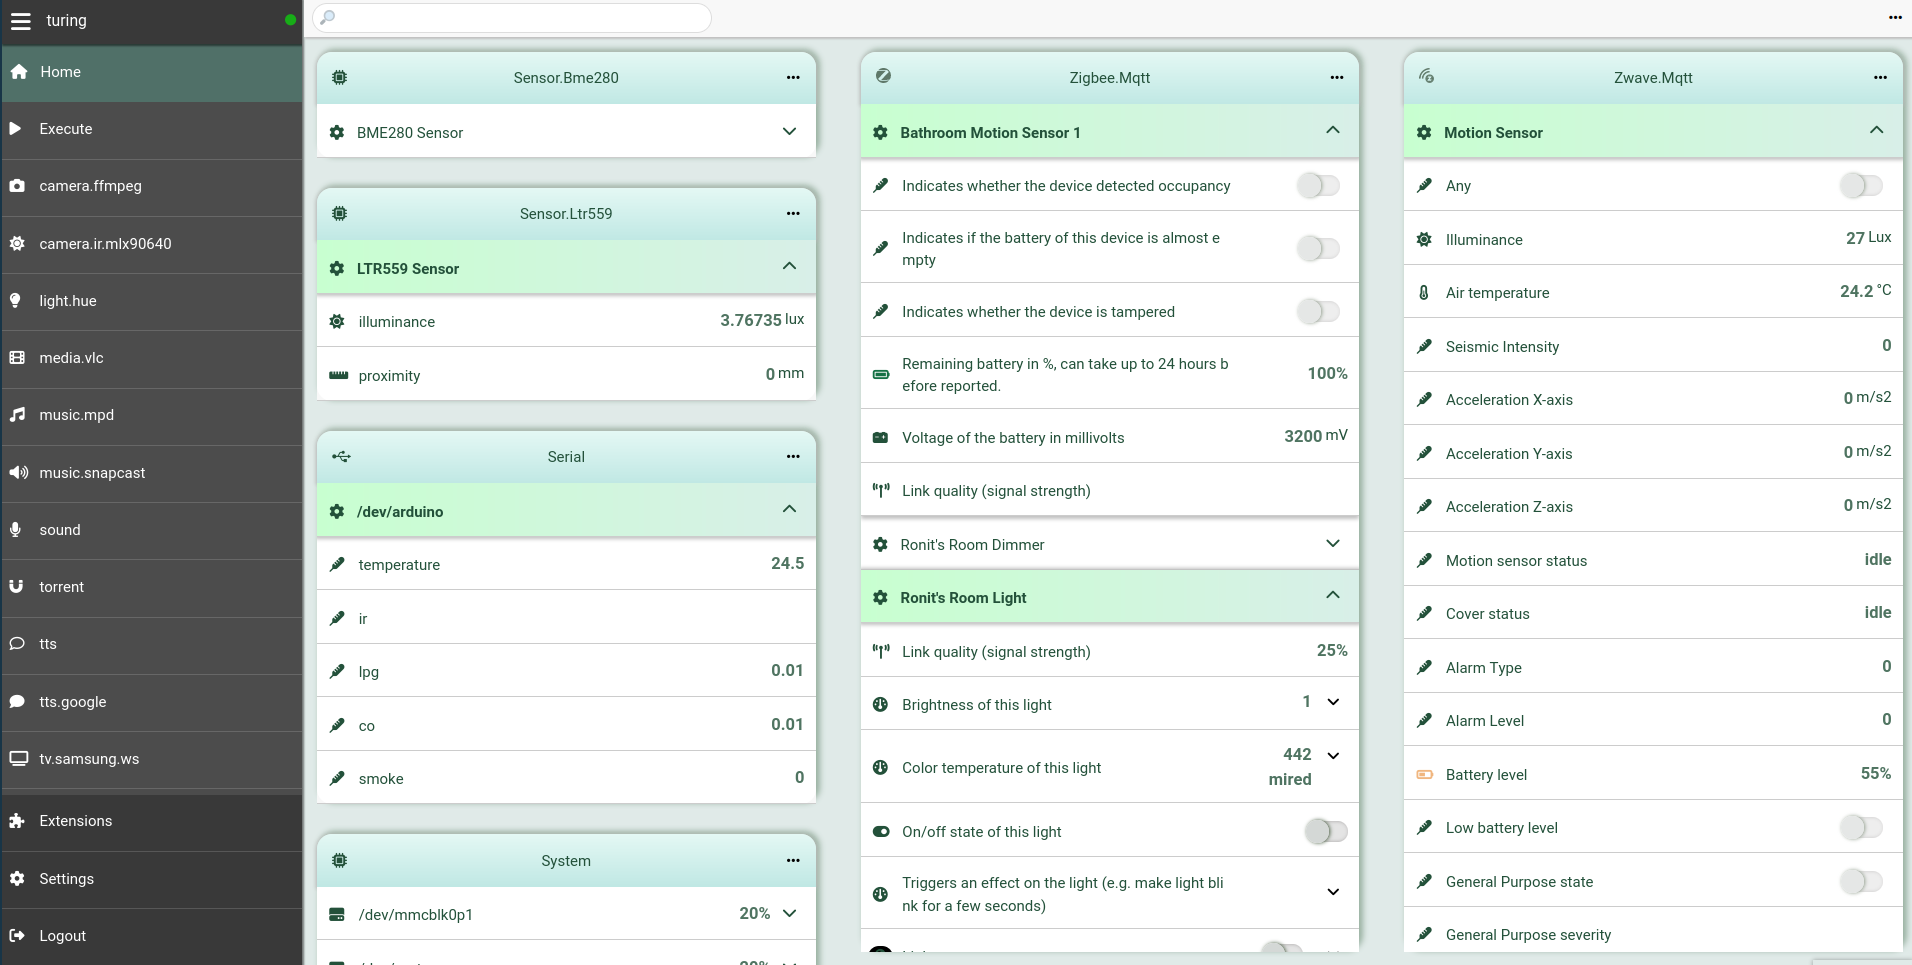
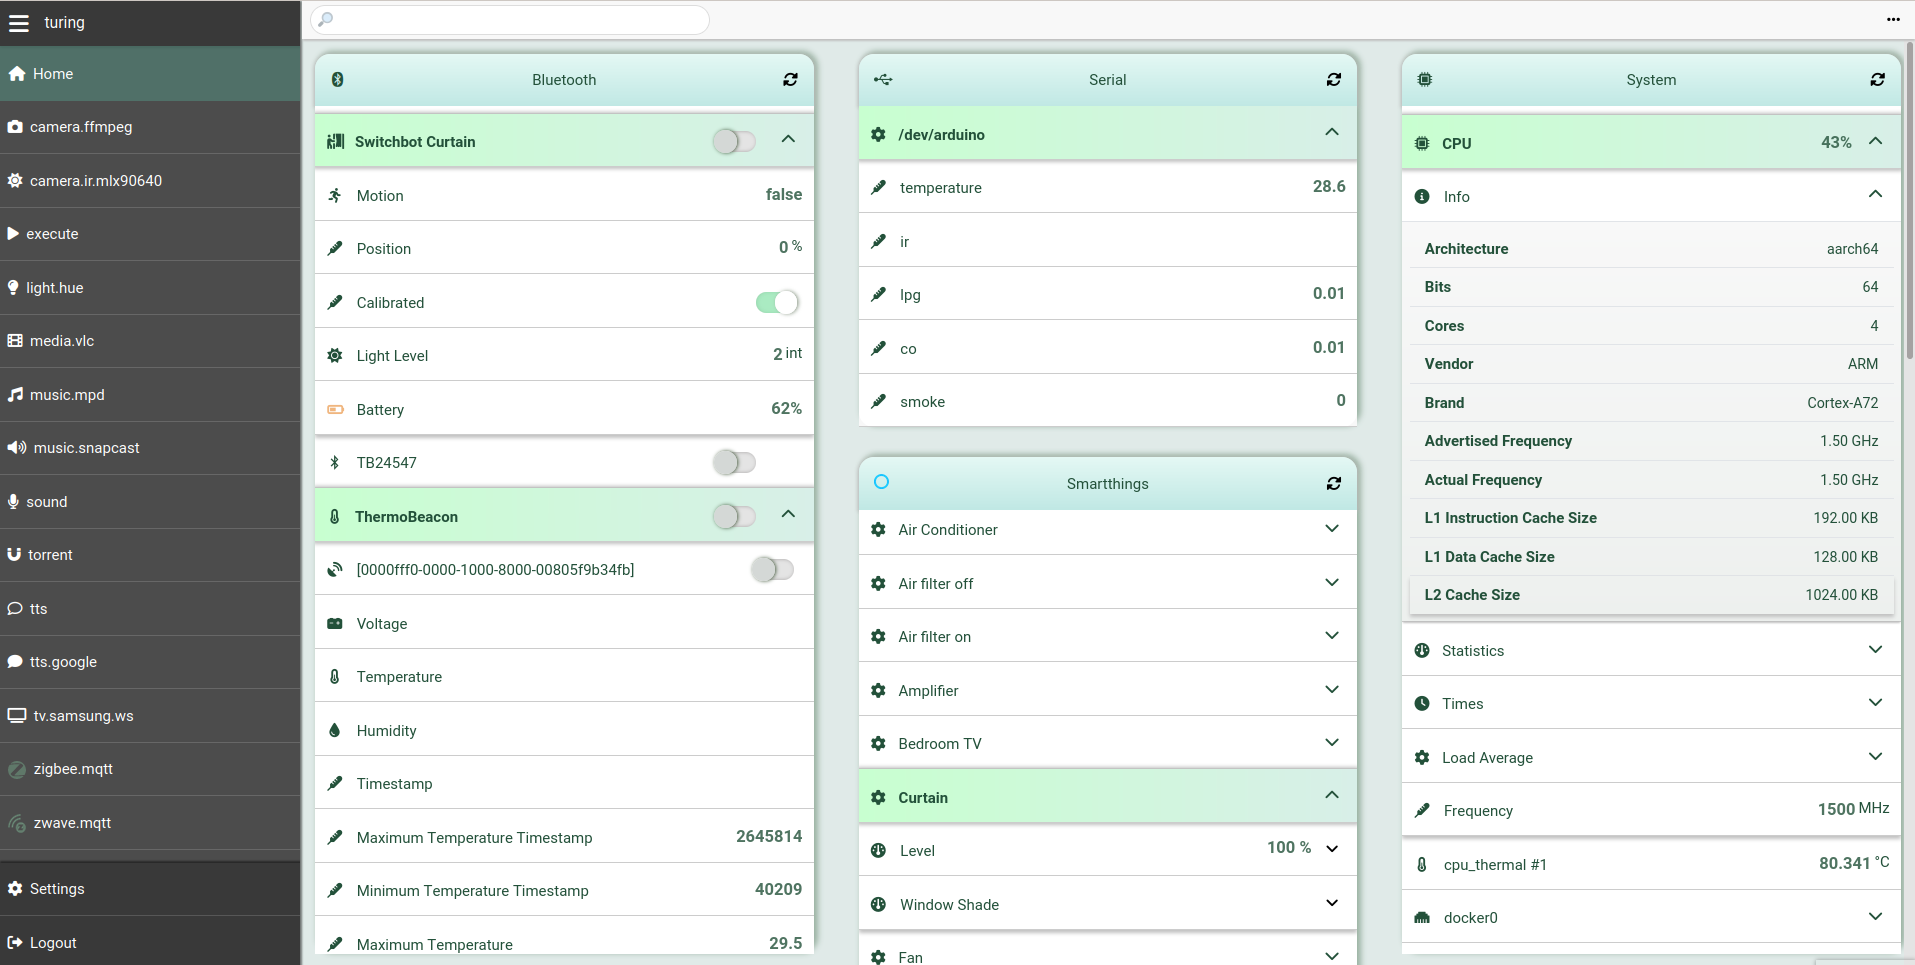
If you enabled the HTTP backend, then you can also access all the entities from
|
||
the home panel of the Web UI.
|
||
|
||
|
||
|
||
|
||
|
||
|
||
|
||
## Core Installation
|
||
|
||
### System package manager installation
|
||
|
||
#### Arch Linux
|
||
|
||
You can either install the
|
||
[`platypush`](https://aur.archlinux.org/packages/platypush) package (for the
|
||
latest stable version) or the
|
||
[`platypush-git`](https://aur.archlinux.org/packages/platypush-git) package
|
||
(for the latest git version) through your favourite AUR package manager. For
|
||
example, using `yay`:
|
||
|
||
```bash
|
||
$ yay platypush
|
||
# Or
|
||
$ yay platypush-git
|
||
```
|
||
|
||
The Arch Linux packages on AUR are automatically updated upon new git commits
|
||
or tags.
|
||
|
||
#### Debian/Ubuntu
|
||
|
||
Currently the following releases are supported:
|
||
|
||
1. The current Debian `stable`
|
||
2. Debian `oldstable`
|
||
|
||
Ubuntu supported [to be added
|
||
soon](https://git.platypush.tech/platypush/platypush/issues/368).
|
||
|
||
- Add the Platypush APT key to your trusted keyring:
|
||
|
||
```
|
||
# wget -q -O \
|
||
/etc/apt/trusted.gpg.d/platypush.asc \
|
||
https://apt.platypush.tech/pubkey.txt
|
||
```
|
||
|
||
- Add the Platypush repository to your APT sources:
|
||
|
||
```
|
||
# wget -q -O \
|
||
/etc/apt/sources.list.d/platypush.list \
|
||
https://apt.platypush.tech/lists/platypush-<deb_version>-<branch>.list
|
||
```
|
||
|
||
Where:
|
||
|
||
- `deb_version` can be either *stable* (for the current Debian stable version) or
|
||
*oldstable* (for the previous Debian stable version)
|
||
- `branch` can be either *main* (for the latest releases) or *dev* (for a package
|
||
that is always in sync with the git version)
|
||
|
||
For example, to install the latest stable tags on Debian stable:
|
||
|
||
```
|
||
# wget -q -O \
|
||
/etc/apt/sources.list.d/platypush.list \
|
||
https://apt.platypush.tech/lists/platypush-stable-main.list
|
||
```
|
||
|
||
- Update your repos and install Platypush:
|
||
|
||
```
|
||
# apt update
|
||
# apt install platypush
|
||
```
|
||
|
||
#### Fedora
|
||
|
||
RPM builds targeting the latest Fedora release are automatically built on every
|
||
push pipeline.
|
||
|
||
To install Platypush via RPM on Fedora:
|
||
|
||
- Add the Platypush RPM repository configuration to the package manager:
|
||
|
||
```
|
||
# yum config-manager --add-repo https://rpm.platypush.tech/platypush.repo
|
||
```
|
||
|
||
- Install Platypush, either the latest stable release or the rolling release
|
||
updated on every commit to the main branch:
|
||
|
||
```
|
||
# yum install platypush
|
||
# Or
|
||
# yum install platypush-git
|
||
```
|
||
|
||
### `pip`
|
||
|
||
```bash
|
||
$ pip install platypush
|
||
```
|
||
|
||
Or, for the latest git version:
|
||
|
||
```bash
|
||
# Official repo
|
||
$ pip install git+https://git.platypush.tech/platypush/platypush
|
||
# Github mirror
|
||
$ pip install git+https://github.com/blacklight/platypush
|
||
```
|
||
|
||
### Docker
|
||
|
||
```bash
|
||
$ git clone https://git.platypush.tech/platypush/platypush.git
|
||
$ cd platypush
|
||
# Copy .env.example to .env and edit docker-compose.yml if required.
|
||
# In particular, you may want /etc/platypush and /var/lib/platypush
|
||
# to point to directories on your hosts
|
||
$ docker compose up
|
||
```
|
||
|
||
Note that the default `Dockerfile` uses Alpine, but in `docker-compose.yml` you
|
||
can also specify an alternative `Dockerfile` - Debian, Ubuntu and Fedora are
|
||
supported.
|
||
|
||
### Manual installation
|
||
|
||
```shell
|
||
$ git clone https://git.platypush.tech/platypush/platypush.git
|
||
$ cd platypush
|
||
$ pip install .
|
||
```
|
||
|
||
## Plugins installation
|
||
|
||
All the plugins included in the main repo will be available once you have
|
||
installed the core platform.
|
||
|
||
However, some plugins may require extra (optional) dependencies. You have
|
||
several ways of installing those dependencies:
|
||
|
||
### `pip`
|
||
|
||
You can install extra dependencies via pip extras:
|
||
|
||
```shell
|
||
pip install 'platypush[plugin1,plugin2,...]'
|
||
```
|
||
|
||
For example:
|
||
|
||
```shell
|
||
pip install 'platypush[light.hue,music.mpd,rss]'
|
||
```
|
||
|
||
Will install Platypush with the dependencies for the `light.hue`, `music.mpd`
|
||
and `rss` plugins.
|
||
|
||
### Web interface
|
||
|
||
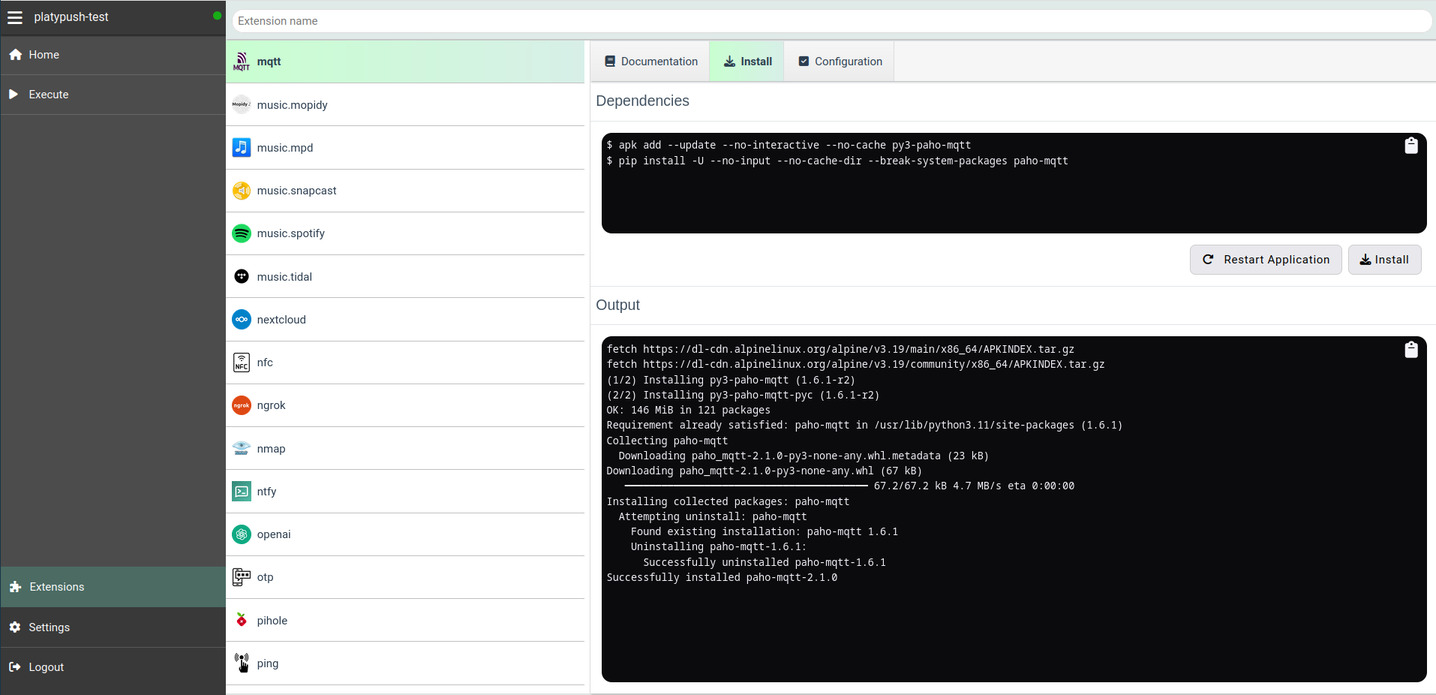
Plugins can be installed from the Web interface too. Navigate to the
|
||
_Extensions_ entry in the sidebar, select the extension that you want to install,
|
||
select the _Install_ tab and click _Install_.
|
||
|
||
|
||
|
||
This section also includes the _Configuration_ tab, with a ready-to-paste
|
||
configuration snippet template for that plugin, as well as a documentation page
|
||
that includes all the actions supported by a given plugin and the events it
|
||
triggers.
|
||
|
||
### Docker
|
||
|
||
If you already have the base installation of Platypush on your machine, and you
|
||
have a configuration file with a custom set of integrations, then you may opt
|
||
to generate a custom Docker image from your configuration file, with all the
|
||
extra dependencies configured, using the `platydock` command.
|
||
|
||
The following command:
|
||
|
||
```shell
|
||
❯ platydock -c /path/to/your/config.yaml -d platypush-test
|
||
```
|
||
|
||
Will create a Platypush Docker image for a device with ID `platypush-test`,
|
||
with all the requirements for the additional integrations listed in
|
||
`config.yaml`.
|
||
|
||
You can pass the `--print` option if you just want to print the content of the
|
||
output `Dockerfile` instead of generating the image.
|
||
|
||
By default the image will use Alpine Linux as a base. You can use the
|
||
`-i`/`--image` to specify another supported base image - `ubuntu`, `debian` or
|
||
`fedora`.
|
||
|
||
### Virtual environment
|
||
|
||
If you already have the base installation of Platypush on your machine, and you
|
||
have a configuration file with a custom set of integrations, then you may opt
|
||
to generate a custom virtual environment from your configuration file, with all
|
||
the extra dependencies configured, using the `platyvenv` command.
|
||
|
||
The following command:
|
||
|
||
```bash
|
||
❯ platyvenv -c /path/to/your/config.yaml -o /path/to/your/venv
|
||
```
|
||
|
||
Will create a new virtual environment under `/path/to/your/venv` using the
|
||
specified `config.yaml` to determine which optional dependencies should be installed.
|
||
|
||
You can then run Platypush after activating your new environment:
|
||
|
||
```bash
|
||
❯ source /path/to/your/venv/bin/activate
|
||
❯ platypush -c /path/to/your/config.yaml
|
||
```
|
||
|
||
### Manual installation
|
||
|
||
The [plugin/backend documentation](https://docs.platypush.tech) reports all the
|
||
dependencies required by each plugin, as well as the commands to install them
|
||
on multiple platforms.
|
||
|
||
If you want to customize your installation, or if you need to install
|
||
dependencies for a plugin that requires some manual steps, you can check out
|
||
any plugin-specific installation steps from its documentation.
|
||
|
||
## Configuration
|
||
|
||
### Configuration file
|
||
|
||
You can use the [default
|
||
`config.yaml`](https://git.platypush.tech/platypush/platypush/src/branch/master/platypush/config/config.yaml)
|
||
as a template/reference.
|
||
|
||
The location of the `config.yaml` to be used by the application is determined
|
||
in the following way:
|
||
|
||
1. It can be passed through the command-line `-c`/`--config` argument.
|
||
2. If not specified via `-c`, it will be read from the `PLATYPUSH_CONFIG`
|
||
environment variable.
|
||
3. If not specified, use `./config.yaml` if available.
|
||
4. If not available, and you are running Platypush within a Docker container,
|
||
or as a privileged user (and usually you shouldn't), or as a systemd service
|
||
created by a supported package manager, then `/etc/platypush/config.yaml`
|
||
will be used if available.
|
||
5. Otherwise, if you are running Platypush as a non-privileged user or in a
|
||
virtual environment, `$XDG_CONFIG_HOME/platypush/config.yaml` will be used
|
||
(defaults to `~/.config/platypush/config.yaml`).
|
||
|
||
#### Scripts directory
|
||
|
||
By default, any custom Python scripts will be searched under
|
||
`<CONFDIR>/scripts`, where `<CONFDIR>` is the path to your `config.yaml`.
|
||
|
||
You can override it in your `config.yaml`:
|
||
|
||
```yaml
|
||
scripts_dir: /path/to/custom/scripts
|
||
```
|
||
|
||
Since everything under the scripts directory will be imported as a submodule,
|
||
you can create your own libraries of scripts that can import other scripts:
|
||
|
||
```python
|
||
# Content of scripts/music.py
|
||
|
||
from platypush import run
|
||
|
||
def music_play(plugin='music.mopidy', resource=None):
|
||
run(f'{plugin}.play', resource)
|
||
|
||
# Content of scripts/lights.py
|
||
|
||
from platypush import run
|
||
|
||
def lights_toggle(plugin='light.hue', groups=('Living Room',)):
|
||
run(f'{plugin}.toggle', groups=groups)
|
||
|
||
# Content of scripts/home.py
|
||
|
||
from platypush import procedure
|
||
|
||
from scripts.music import music_play
|
||
from scripts.lights import lights_toggle
|
||
|
||
@procedure
|
||
def at_home():
|
||
music_play()
|
||
lights_toggle()
|
||
```
|
||
|
||
#### Splitting configuration on multiple files
|
||
|
||
The `config.yaml` file can become very complex, especially if you embed many
|
||
hooks and procedures in it in YAML format.
|
||
|
||
To make the configuration more maintainable, and also to isolate modules that
|
||
you can reuse across multiple instances, you can leverage the `include`
|
||
directive:
|
||
|
||
```yaml
|
||
# All paths are relative to config.yaml, or to the location of the current file
|
||
include:
|
||
- assistant.yaml
|
||
- db.yaml
|
||
- media.yaml
|
||
- mqtt.yaml
|
||
- sensors.yaml
|
||
# ...
|
||
```
|
||
|
||
### Working directory
|
||
|
||
This is where the application will store its data and integration plugins will
|
||
store their data. The order of precedence is:
|
||
|
||
* `-w`/`--workdir` command line argument.
|
||
* The `PLATYPUSH_WORKDIR` environment variable.
|
||
* The `workdir` field in the configuration file.
|
||
* `$XDG_DATA_HOME/platypush` (default: `~/.local/share/platypush`) if launched
|
||
with a non-privileged user, `/var/lib/platypush` if launched as root or with
|
||
a system user.
|
||
|
||
### Database
|
||
|
||
The application stores entities, variables, users, integrations state and more
|
||
on a database. The engine configuration supports the [SQLAlchemy engine
|
||
syntax](https://docs.sqlalchemy.org/en/20/core/engines.html).
|
||
|
||
**Note**: The application uses a local SQLite database by default, which is
|
||
natively supported by SQLAlchemy. The application has also been tested against
|
||
MySQL/MariaDB and Postgres, and should work fine with any modern relational
|
||
database supported by SQLAlchemy. However, any backend other than SQLite may
|
||
require an additional Python dependency for the SQLAlchemy driver (for example
|
||
[`pg8000`](https://pypi.org/project/pg8000/) for PostgreSQL).
|
||
|
||
Order of precedence for the engine:
|
||
|
||
* `--main-db`/`--db` command line argument.
|
||
* The `PLATYPUSH_DB` environment variable.
|
||
* The `main.db` field in the configuration file.
|
||
* `sqlite:///<WORKDIR>/main.db`
|
||
|
||
### Device ID
|
||
|
||
The device ID is a unique identifier for a Platypush instance on a network and
|
||
is used to reliably dispatch messages when multiple instances use a shared
|
||
backend.
|
||
|
||
The order of precedence is:
|
||
|
||
* `--device-id` command line argument.
|
||
* The `PLATYPUSH_DEVICE_ID` environment variable.
|
||
* The `device_id` field in the configuration file.
|
||
* The hostname of the machine.
|
||
|
||
### systemd service
|
||
|
||
If you installed Platypush from a system package manager then you'll also have
|
||
a `systemd` service installed for it.
|
||
|
||
You can start/enable Platypush like any other `systemd` service:
|
||
|
||
```
|
||
# systemctl start platypush
|
||
# systemctl enable platypush
|
||
```
|
||
|
||
Or, if you want to run the Platypush service as a generic user:
|
||
|
||
```bash
|
||
❯ systemctl --user start platypush
|
||
❯ systemctl --user enable platypush
|
||
```
|
||
|
||
Otherwise, you can create your own `systemd` service copying the [provided
|
||
`.service`
|
||
file](https://git.platypush.tech/platypush/platypush/src/branch/master/examples/systemd/platypush.service)
|
||
to e.g. `~/.config/systemd/user` or `/etc/systemd/system`.
|
||
|
||
### Redis
|
||
|
||
Platypush uses Redis as a in-memory queue to deliver messages and as a pub/sub
|
||
bus for inter-process communication.
|
||
|
||
If you installed Platypush through a package manager, then the Redis service
|
||
will automatically be installed and started if you launch the Platypush service
|
||
as a privileged user.
|
||
|
||
If you run Platypush in a container then by default it'll start its own Redis
|
||
instance through the `--start-redis` command-line option.
|
||
|
||
You can customize the Redis configuration through the:
|
||
|
||
1. `--redis-host`, `--redis-port` and `--redis-queue` command-line options.
|
||
2. `PLATYPUSH_REDIS_HOST`, `PLATYPUSH_REDIS_PORT` and `PLATYPUSH_REDIS_QUEUE`
|
||
environment variables.
|
||
3. Through your `config.yaml`:
|
||
|
||
```yaml
|
||
# See https://redis-py.readthedocs.io/en/latest/connections.html#redis.Redis
|
||
# for the full list of supported parameters
|
||
redis:
|
||
host: redis-host
|
||
port: 6379
|
||
username: redis-user
|
||
password: redis-pass
|
||
```
|
||
|
||
### nginx
|
||
|
||
If you want to access your Platypush web panel outside your home network, it may
|
||
be a good idea to use an nginx/Apache reverse proxy with a valid SSL certificate
|
||
(e.g. managed by certbot). A [sample an nginx
|
||
configuration](https://git.platypush.tech/platypush/platypush/src/branch/master/examples/nginx/nginx.sample.conf)
|
||
is provided in the repository.
|
||
|
||
## The Web interface
|
||
|
||
### Other Web panels
|
||
|
||
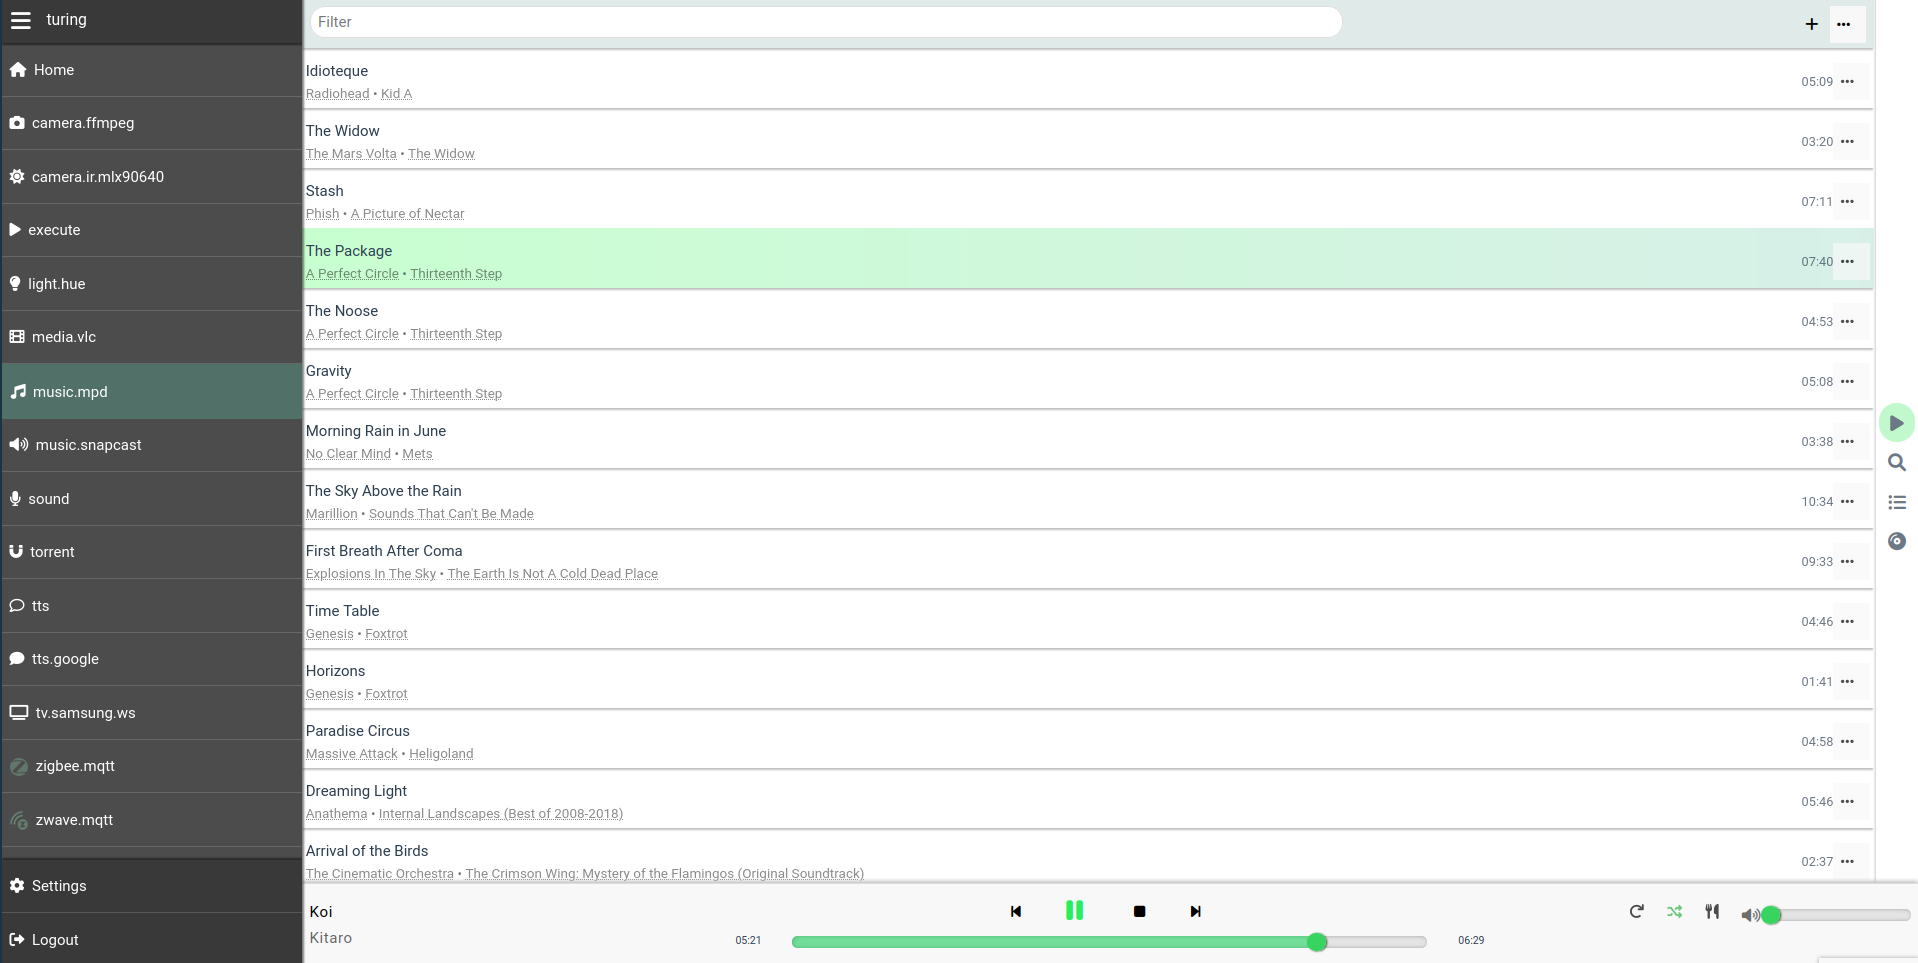
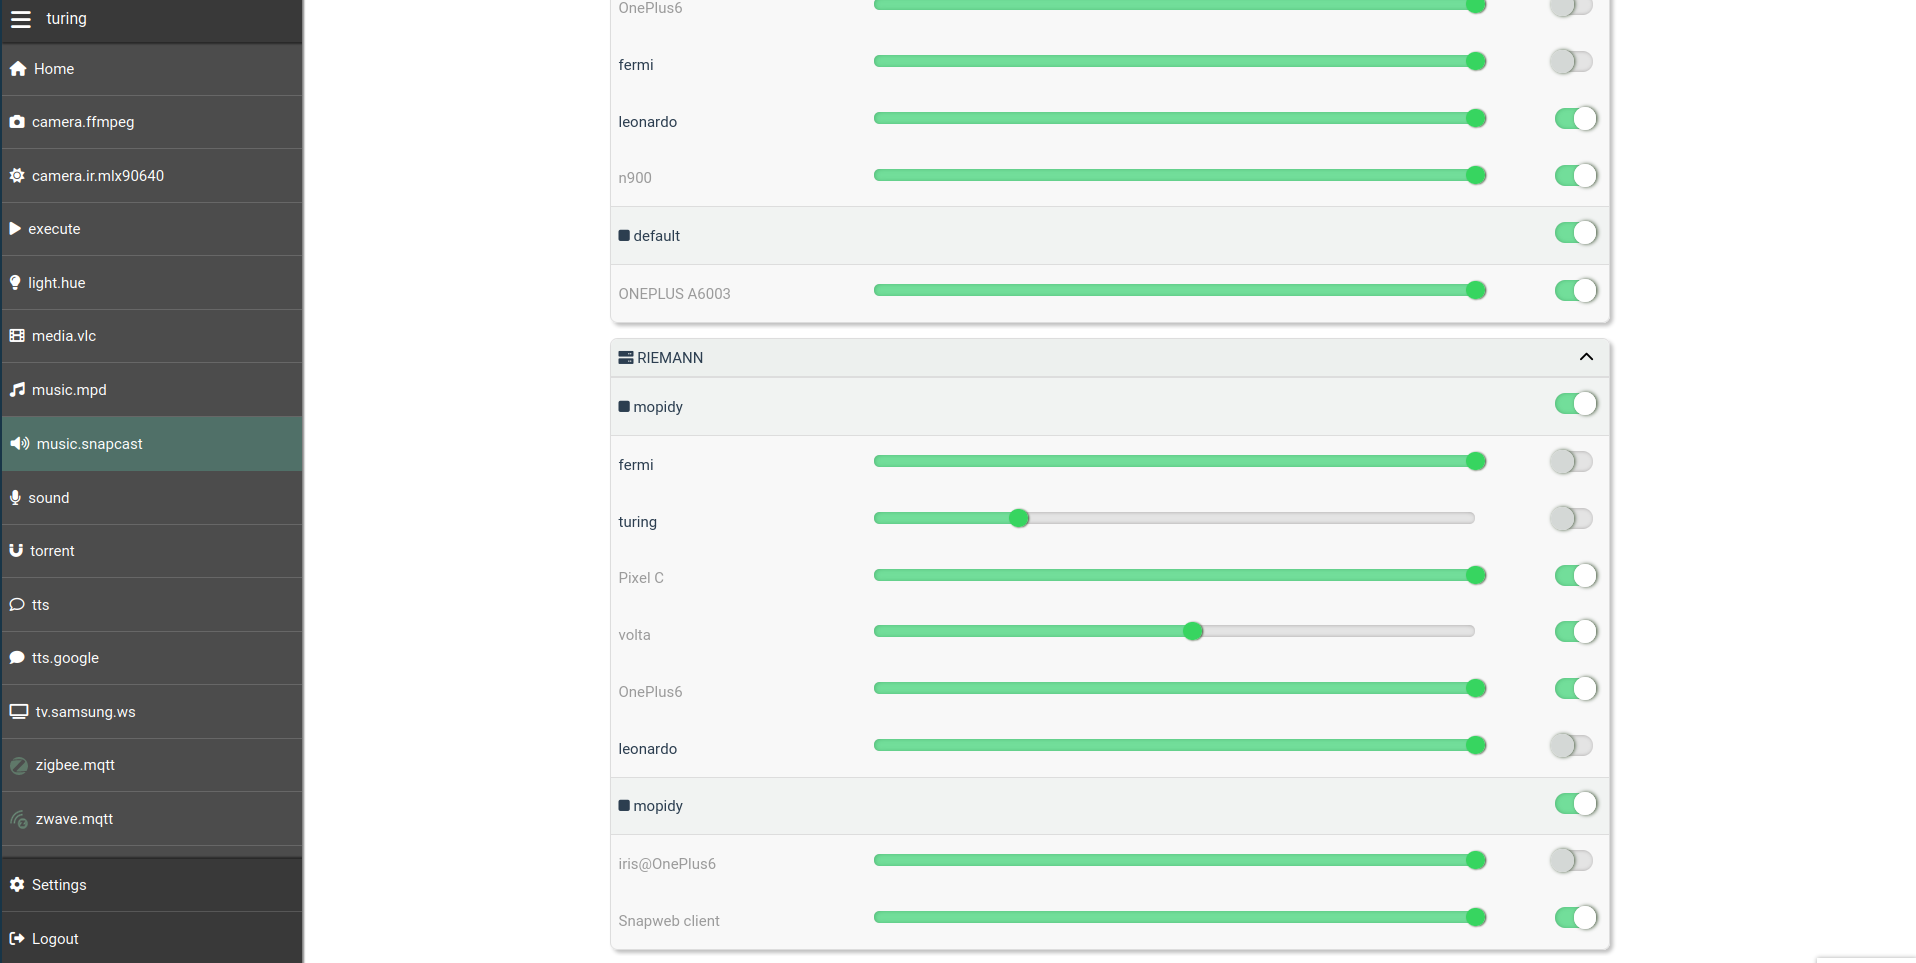
Besides the built-in panels that we've already seen in the other sections,
|
||
Several integrations add their own feature-rich panels to the Web view, turning
|
||
Platypush into a gateway to all of your services - from Zigbee sensors, to
|
||
media players and services, to your music cloud, and more.
|
||
|
||
For example, the music view is available to most of the `music` plugins.
|
||
|
||
|
||
|
||
|
||
|
||
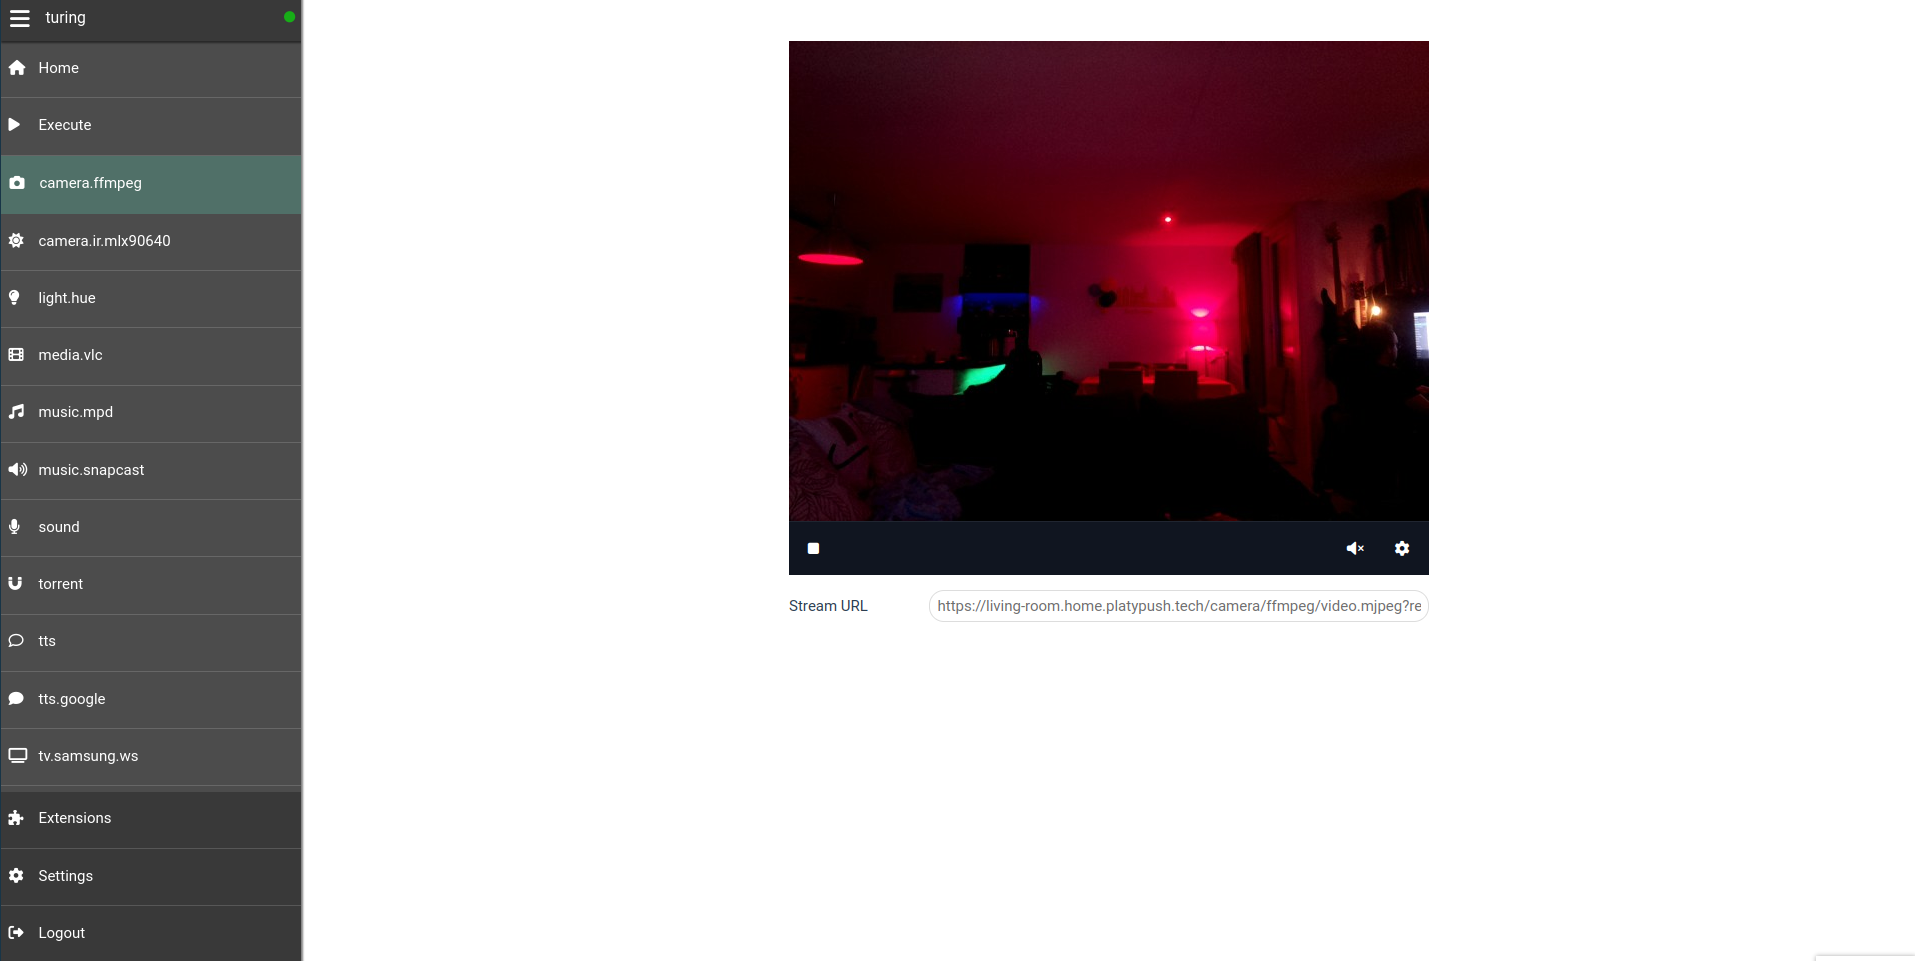
Another example is the camera panel, to monitor your cameras, get stand-alone
|
||
feed URLs, and take photos. This becomes available in the UI if you enable at
|
||
least a `camera` plugin.
|
||
|
||
|
||
|
||
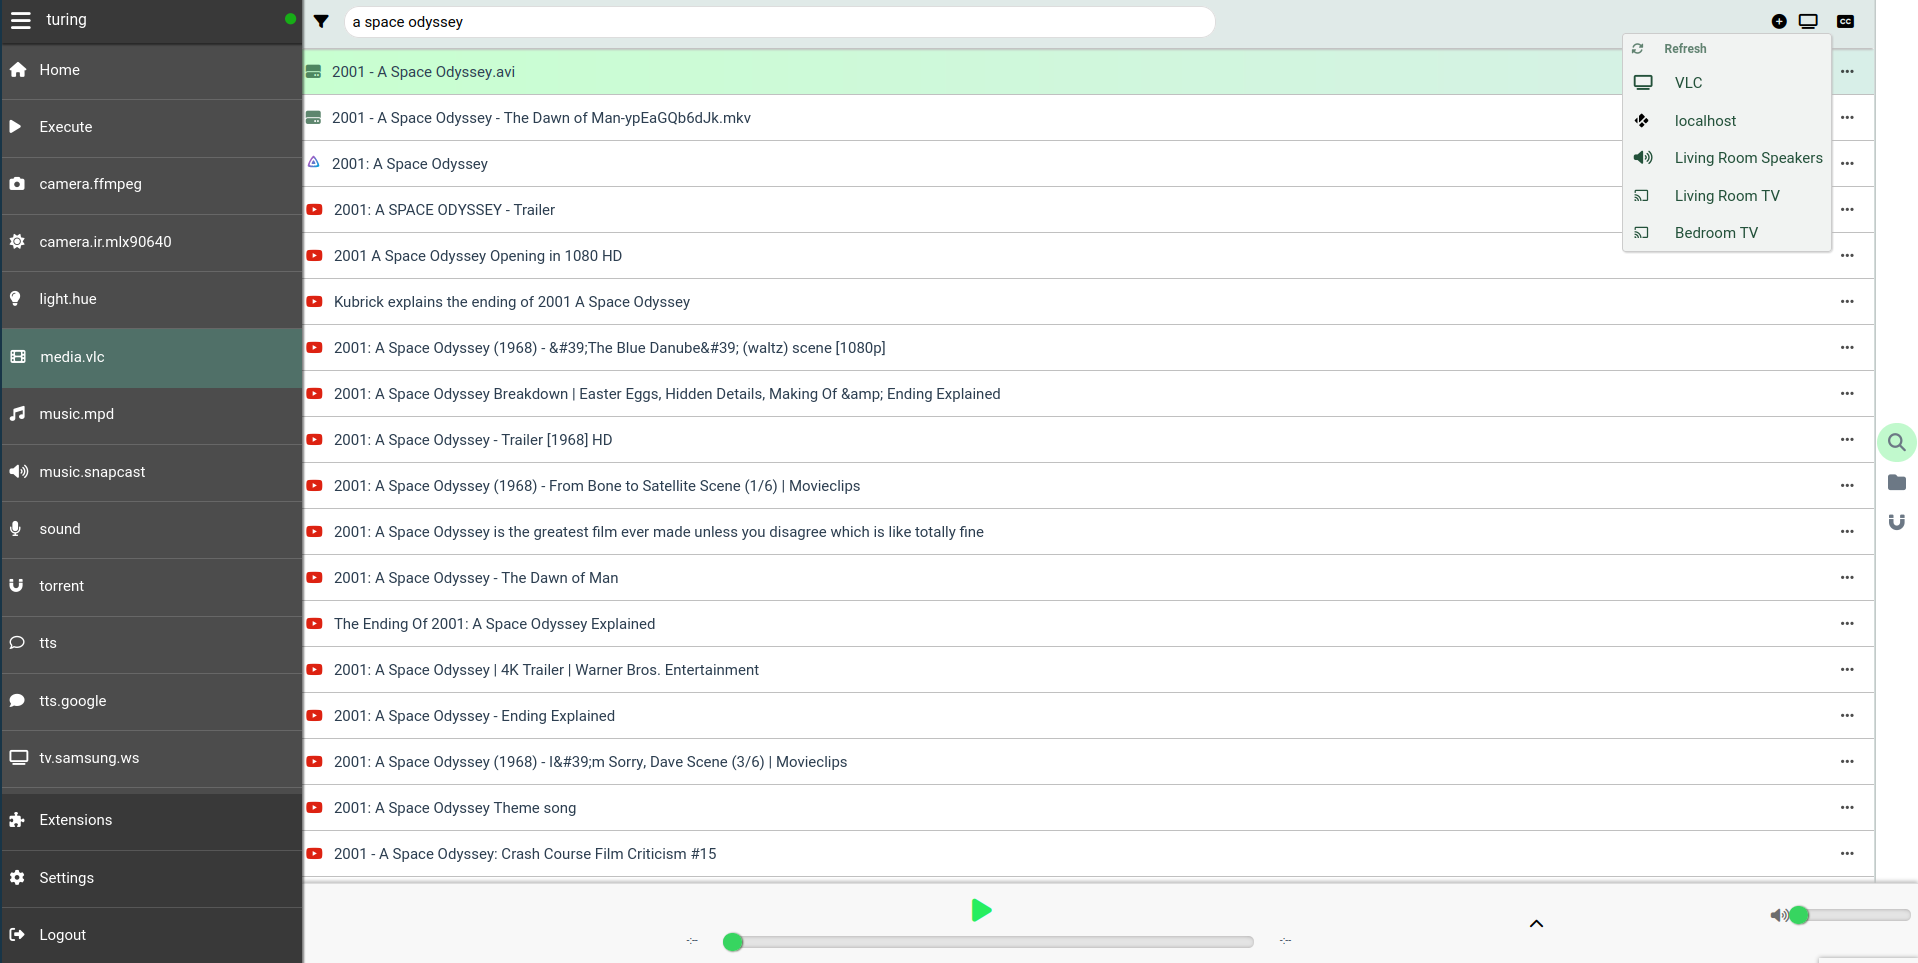
If you enabled at least one local `media` plugin (like `media.vlc`,
|
||
`media.mplayer` etc.) then you'll also unlock the media UI, which allows you to
|
||
index, search, view and cast media files under the configured `media_dirs`, and
|
||
it also integrates with other configured/supported backends such as YouTube,
|
||
Plex and Jellyfin.
|
||
|
||
|
||
|
||
### Dashboards
|
||
|
||
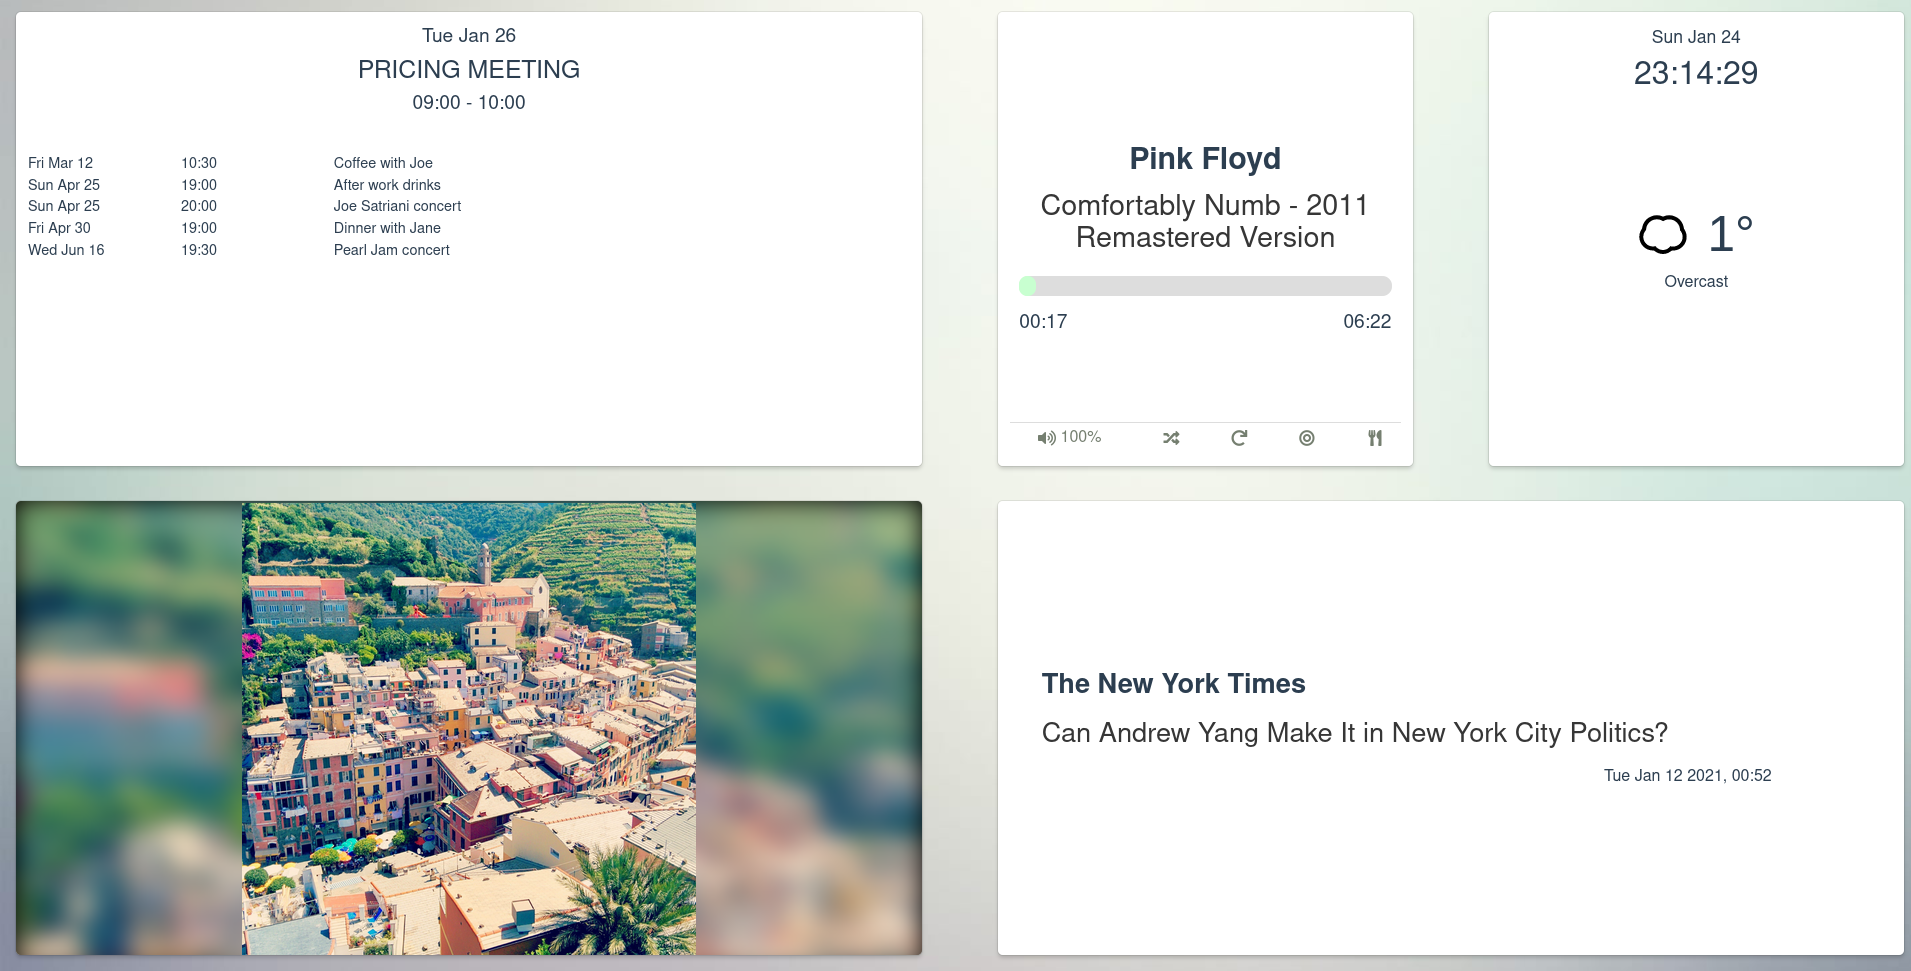
The web service also provides means for the user to create [custom
|
||
dashboards](https://git.platypush.tech/platypush/platypush/src/branch/master/examples/conf/dashboard.xml)
|
||
that can be used to show information from multiple sources on a large screen.
|
||
|
||
|
||
|
||
### PWA support
|
||
|
||
Note that having the web application served over SSL is a requirement for the
|
||
PWA (progressive web app) to work. The Platypush PWA allows you to install a
|
||
Platypush native-like client on your mobile devices if you don't want to use the
|
||
full Android app.
|
||
|
||
## Mobile app
|
||
|
||
An [official Android
|
||
app](https://f-droid.org/en/packages/tech.platypush.platypush/) is provided on
|
||
the F-Droid store. It allows to easily discover and manage multiple Platypush
|
||
services on a network through the web interface, and it easily brings the power
|
||
of Platypush to your fingertips.
|
||
|
||
## Browser extension
|
||
|
||
A [browser extension](https://git.platypush.tech/platypush/platypush-webext) is
|
||
available for [Chrome](https://git.platypush.tech/platypush/platypush-webext)
|
||
and [Firefox](https://addons.mozilla.org/en-US/firefox/addon/platypush/).
|
||
|
||
The browser extension allows you to run Platypush actions and procedures
|
||
directly from your browser, associate keybindings with them, so you can run
|
||
your favourite routines with a few keystrokes anywhere in your browser, and
|
||
provides an advanced API to interact with the Web pages you visit - for
|
||
example, you can build an action that gets the content of a page you're
|
||
visiting and uses Platypush to distill it in readable format, or send the URL
|
||
to another service.
|
||
|
||
## Tests
|
||
|
||
To run the tests simply run `pytest` either from the project root folder or the
|
||
`tests/` folder.
|