A full configuration example
Now that we have familiarized a bit with the building blocks of the platform, let's get the hands dirty with a real-world configuration to showcase how everything plays together.
We'll build a configuration that includes the following features:
-
It exposes the Web server to control devices and services via UI or API.
-
It includes a voice assistant - we'll use the
assistant.googleextension in this example because it's probably the quickest to get started, but Platypush provides other voice assistant integrations too if you want alternatives. Note: theassistant.googleintegration won't integrate with another Google Assistant device, but it'll run the assistant on your own device, provided that you have a microphone and a speaker. -
It integrates with a Philips Hue bridge through the
light.hueextension - but you can pick any other smart device integration of your liking, e.g. Zigbee, Z-Wave, Bluetooth, SmartThings etc. -
It integrates with a music server like mpd or Mopidy, a media service like Jellyfin and a local media player like vlc, but you can pick any other media integrations you like (Plex, Kodi, Chromecast...).
-
It integrates with an Arduino-compatible device over USB and reads some measurements from a temperature and a humidity sensor connected to it. The Arduino will also have an IR receiver in this example, so you can use a traditional infrared remote to control Platypush (for example, play/pause the music, mute the voice assistant, turn off/on the lights etc.).
-
It integrates with an MQTT broker, it subscribes to a topic where other devices may send their sensor measurements, and stores them to a database.
-
It listens to a custom MQTT topic where another device (for example your phone, through Tasker or through a Platypush service running on Android) sends updates when you enter/exit your home. When a message is received, it will perform a custom routine - for example, turn on the lights, say a welcome message and play the music when you arrive home, and turn off the lights and stop the music when you leave home.
-
It integrates with zigbee2mqtt to control the Zigbee devices connected to a bridge - usually in the form of a Zigbee USB adapter.
-
It integrates with a connected camera (like a USB camera, or a PiCamera if you're using a RaspberryPi-like device) and provides a way to access the stream over HTTP and programmatically control the capture process.
-
It implements simple voice commands to control the lights and the music playback.
-
It performs a periodic backup of the application's configuration and working directories, and uploads them to a remote server via scp.
Identifying the required integrations
The first step is to identify the required integrations from the documentation page. In the example above, we'll need:
-
backend.http: the default Web server, which exposes the RPC API, the UI, several Websocket routes, media and camera services, and more. -
db: used to perform custom operations with databases (enabled by default). -
mqtt: used to publish and subscribe to topics on an MQTT broker. -
assistant.google: the Google Assistant integration. -
light.hue: to integrate with a Philips Hue bridge. -
music.mpd: the integration with MPD/Mopidy. -
media.jellyfin: the integration with Jellyfin. -
media.vlc: the integration with VLC. -
serial: a plugin that allows you to easily interact with Arduino-compatible devices connected to a USB/serial interface. You can also choose thearduinoplugin if you don't want to write the code for the microprocessor yourself - the Arduino integration works with micro-controllers flashed with the Firmata firmware, or with a compatible firmware, but it offers slightly less flexibility than a firmware customized for your specific hardware. -
zigbee.mqtt: used to interact with Zigbee devices through a zigbee2mqtt bridge, which bridges raw Zigbee events to an MQTT broker. -
camera.ffmpeg: used to interact with a generic camera using directlyffmpeg. Note thatcamera.gstreameris also available if you want a GStreamer interface instead. -
tts, or a compatible text-to-speech plugin (other available options:tts.googleandtts.mimic3): to deliver our custom "welcome home" message through the speakers. -
ssh: used to expose SSH functionalities - including remote command execution and file copy.
Note: this is only a demo of what it is possible to do through this application, not an exhaustive list of features, nor a mandatory configuration - feel free to skip the sections that don't apply to your use-case.
Preparing the configuration
File locations
Configuration file
The configuration file will be in one the following locations:
$XDG_CONFIG_HOME/platypush/config.yamlifXDG_CONFIG_HOMEis set.~/.config/platypush/config.yamlotherwise, if you're running the application as a non-privileged user./etc/platypush/config.yamlif you're running the application as a privileged user, or you installed it through the system package manager, or through a Docker image generated viaplatydock.- A path specified through the
-c/--configstartup option.
Your configuration file can also include fragments from other configuration
files through the include directive, which is useful if you have particularly
large configuration files that you want to split onto multiple files, or
configuration folders shared among several installations of the service (like in
a shared dotfiles repo):
include:
  # Relative paths are relative to the `config.yaml` location, or relative to
  # the current configuration file if the `include` directive is used in a child
  # file
  - assistant.yaml
  - audio.yaml
  - db.yaml
  - lights.yaml
  - sensors.yaml
  - zigbee.yaml
  # ...
Note that, after the application is first started, a new scripts directory
will also be created under the configuration file's folder. This directory can
be used to store custom hooks and procedures in the form of small Python
snippets - we'll see them later.
Working directory
The working directory of the service will be one of the following:
$XDG_DATA_HOME/platypush, ifXDG_DATA_HOMEis set.~/.local/share/platypushotherwise, if you're running the application as a non-privileged user./var/lib/platypush, if you're running the application as a privileged user or within a Docker container generated viaplatydock.
This is where the main database file will be stored, and where the integrations will store their files.
backend.http
This is usually straightforward for basic use-cases:
backend.http:
  # port: 8008
Note that the HTTP backend is enabled by default if no configuration file is specified.
db
The db plugin is enabled by default, and it's used for general purpose
interactions with databases supported by SQLAlchemy.
If no database is specified in the API calls, nor is specified in the
configuration, then the default application SQLite database will be used -
stored under <WORKDIR>/main.db. In this example, we want to use Platypush as a
central node to store on an external database data points published over an MQTT
topic from other devices, so we may want to configure the db integration to
use a different default database for external database calls:
db:
  # SQLAlchemy connection string. In this case, we connect to a Postgres
  # database through the pg8000 driver
  engine: postgresql+pg8000://user:pass@host/dbname
Note that SQLite comes with built-in support in SQLAlchemy, but other databases
need external drivers. If, like in the case above, you opt to interact with a
Postgres database through the pg8000 driver, then you'll have to install the
driver on your host machine / virtual environment / Docker image as well - for
example, through pip install pg8000.
mqtt
The configuration of the MQTT plugin will look something like this:
mqtt:
    host: mqtt-host
    port: 1883
    username: user
    password: pass
    # Topics that the plugin should subscribe to when started
    topics:
        - sensors
assistant.google
A note before starting: the assistant.google integration is based on the
google-assistant-library,
which has been officially deprecated by Google.
Unfortunately, Google hasn't provided any alternatives to run their assistant on other devices, and even their assistant actions SDK has gradually lost features. However, the current version of the library still works fine on x86_64, armv7l and aarch64 architectures, but it requires a bit of tweaking of the dependencies on recent versions of Python, as it depends on some libraries that are by now deprecated. And it's not assured that it'll keep working forever either - Google may just introduced a breaking change on the API layer, and if a new architecture comes out the library most likely won't be built for it. However, given how many Assistant-compatible devices are out there (some of them even several years old), I feel that it's unlikely that Google will introduce breaking changes any time soon - the library has already been deprecated for several years, but it still works fine on all of my devices.
The first step is to create a new Google development project and follow these instructions on how to generate a credentials file.
Then download the credentials file - if the location isn't specified in the
configuration, the plugin will look for it either under
~/.config/google-oauthlib-tool/credentials.json or
<WORKDIR>/credentials/google/assistant.json.
Finally, add the configuration to Platypush:
assistant.google:
  # The device model ID. In theory it should be registered through the
  # developers console, but `Platypush` (default value) should work just fine.
  device_model_id: Platypush
  # The sound to play when a conversation starts.
  conversation_start_sound: /path/to/sound.mp3
  # Override the default credentials file locations
  credentials_file: /path/to/credentials.json
light.hue
The light.hue configuration would like this:
light.hue:
  bridge: bridge-ip-or-hostname
Note that, when the application is first started after enabling the light.hue
plugin, a pairing process with the bridge is required. This is usually done by
pressing the Pair button on the Hue bridge within 30-60 seconds after starting
the client. After pairing the first time, no further manual pairing should be
required.
music.mpd
Mopidy is the best supported music player for Platypush,
but the music.mpd integration should work also with a vanilla MPD
installation.
We love Mopidy because it comes with dozens of integrations (local files,
Spotify, Tidal, SoundCloud, TuneIn, Bandcamp, YouTube...) and it supports dozens
of clients as well - from command-line MPD clients like
mpc, to ncurses clients like
ncmpcpp, to full-featured Web interfaces
like Iris, to mobile apps like
M.A.L.P.,
and thanks to Platypush you can also build automation routines around your music
experience.
The main difference between MPD and Mopidy is that MPD is a music server thought to mainly expose local audio files, while Mopidy adds a whole system of extensions to that paradigm.
Note that, as of Mopidy 3.0, the MPD extensions has been decoupled from the core
installation, and you'll have to install the
mopidy-mpd package separately.
Once you have a running MPD/Mopidy installation, you can easily configure the Platypush plugin:
music.mpd:
    host: localhost  # MPD/Mopidy server
    port: 6600       # Listen port (default: 6600)
media.jellyfin
Jellyfin is a general-purpose media server that you can use to host your music, movies, videos etc., and consume/stream them on any client.
If you have a Jellyfin server to serve your media, then you can the Platypush integration to build automation routines around it, or programmatically play content on other device, or control playback:
media.jellyfin:
    # Jellyfin instance base URL
    server: https://media.example.com
    # You can get an API key from
    # https://media.example.com/web/index.html#!/apikeys.html
    api_key: secret
Note that integrations with Kodi and Plex are also available. However, since none of the Platypush developers currently uses Plex, the Plex integration hasn't been tested in a while.
There is also a Chromecast, integration that allows you to programmatically (or via UI) cast any content to a Chromecast-compatible device, but we won't cover it in this example (it should be quite straightforward to configure and enable though).
media.vlc
If you have VLC installed on your system, then you can enable the Platypush integration as well. The VLC integration (but the same interface is also exposed through MPlayer, MPV, omxplayer, barebone gstreamer etc.) allows you to turn your device into a general-purpose media player that can be controlled remotely.
Here's an example configuration of the media.vlc integration, but the same
interface also applies all the other provided media integrations (just replace
e.g. media.vlc with media.mpv, for example):
media.vlc:
    # Volume level, between 0 and 100
    volume: 50
    # Where to store downloaded files
    download_dir: ~/Downloads
    # Play videos in fullscreen by default
    fullscreen: True
    # If youtube-dl or any compatible application is installed, play requested
    # videos in this format by default. Default: `best`.
    # youtube_format: 'mp4[height<=?480]'
    # Extra arguments to pass to the executable. --play-and-exit may be a good
    # idea with VLC, so the player terminates upon stop instead of lingering in
    # the background.
    args:
        - --play-and-exit
    # List of directories to search for media files. The media files in these
    # folders can be searched through the `media.<player>.search` command, or
    # through the Web interface.
    media_dirs:
        - /mnt/hd/media/movies
        - /mnt/hd/media/series
        - /mnt/hd/media/videos
        - ~/Downloads
If you specify a list of media_dirs, then those directories will be scanned
for media files and stored in Platypush' database. That allows you to use
Platypush as its own media server with a built-in client - you can basically use
the Web interface to search your local collection, or results from
Jellyfin/Plex/YouTube/Kodi, and play it on your Platypush device or on any other
compatible player.
serial
This is where we can start to get our hands a bit dirty with some code.
The most versatile way that Platypush provides to interact with external
microcontrollers or programmable peripherals is through the
serial
integration.
serial reads data on the wire from a configured device and it expects to
receive data in JSON format like this:
{
  "temperature": 25.0,
  "humidity": 15.0,
  "ir": "0xffff"
}
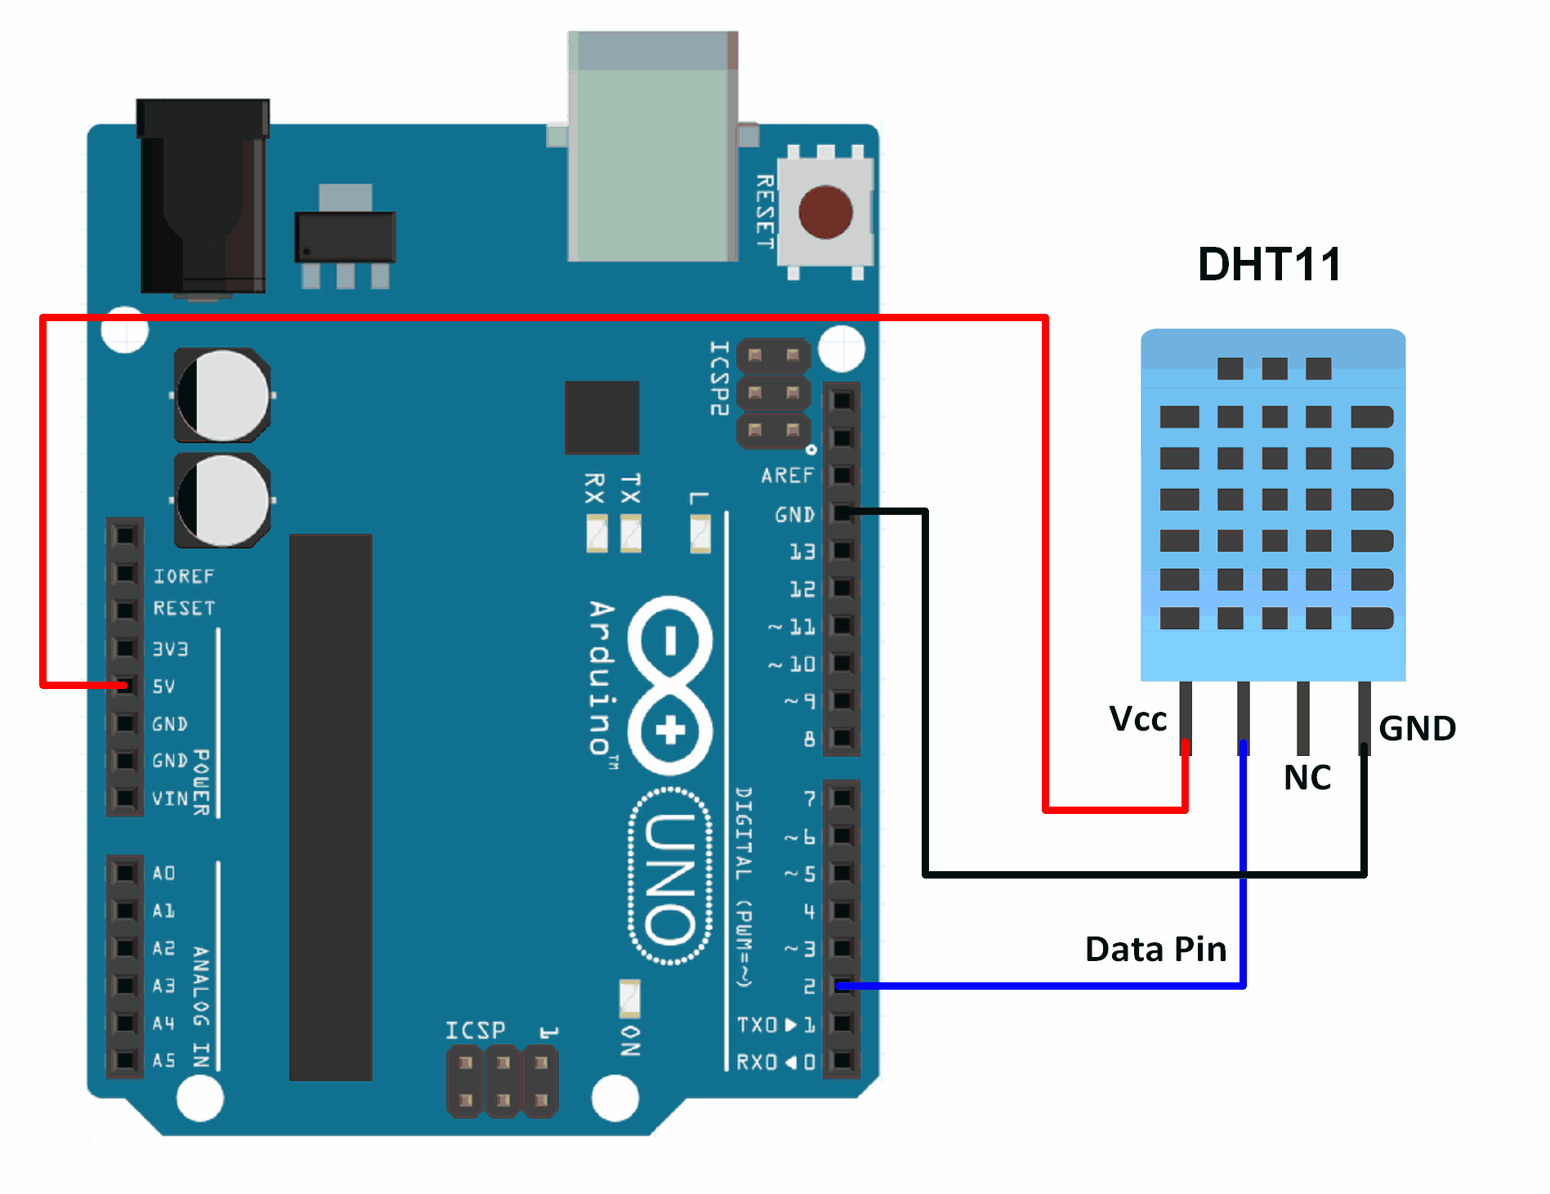
In the example above, we may have an Arduino-compatible or ESP-compatible device connected over USB, with a temperature/humidity sensor (like one from the DHT11/DHT22 line) and any infrared receiver connected to it.
Let's say that you have an Arduino with a DHT temperature+humidity sensor connected to the Arduino on the PIN number 2:
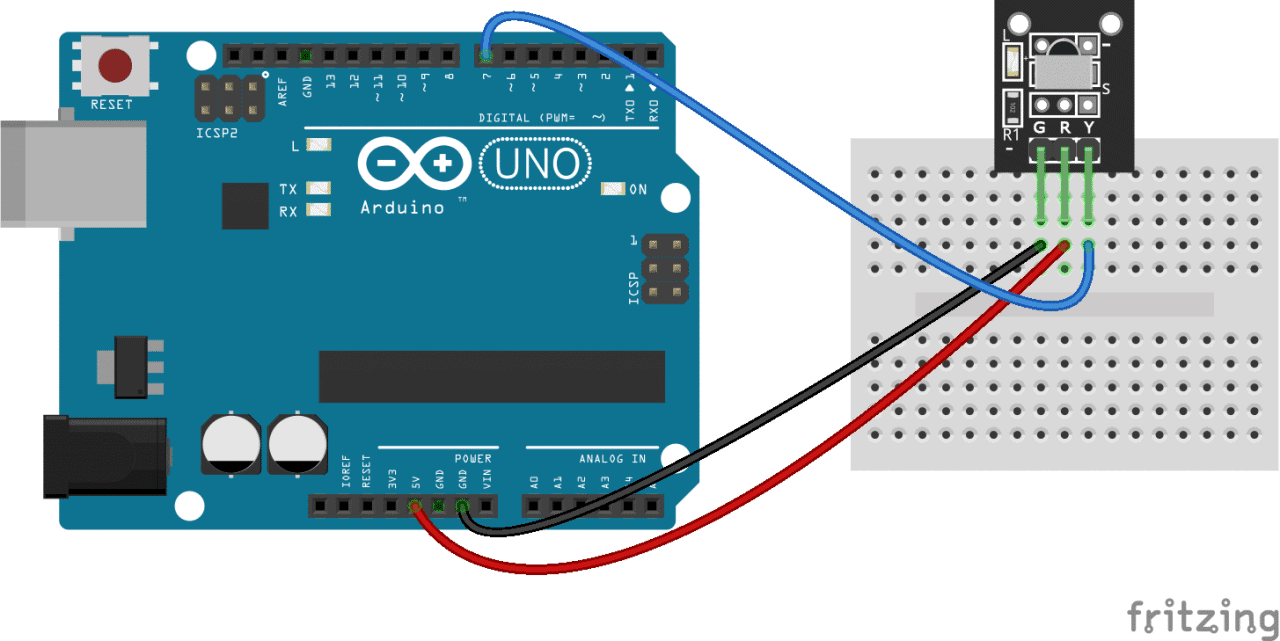
And you have a generic infrared receiver connected to the PIN number 7:
You can then write some microcontroller code like this to periodically check the sensor for new values and send them down the wire in JSON format:
#include <Arduino.h>
// Requires the ArduinoJson library: https://arduinojson.org/
#include <ArduinoJson.h>
// Requires the IRremote library for infrared decoding: https://www.arduino.cc/reference/en/libraries/irremote/
#include <IRremote.h>
#include <Time.h>
#include <Wire.h>
// Requires the dht-sensor-library: https://www.arduino.cc/reference/en/libraries/dht-sensor-library/
#include <dht.h>

// Custom values to tell when we haven't got any value
#define         NO_IR_VALUE                 0
#define         NO_SENSOR_VALUE             DHTLIB_INVALID_VALUE
// The PIN where the DHT sensor is connected
#define         DHT11_PIN                   (2)
// The PIN where the IR sensor is connected
#define         IR_PIN                      (7)

dht DHT;
IRrecv irRecv(IR_PIN);
decode_results ir_results;

float last_temp_value = NO_IR_VALUE;
float last_humidity_value = NO_SENSOR_VALUE;
unsigned long last_ir_value = NO_SENSOR_VALUE;

void setup() {
  // Change this line if you specified a different baud rate when flashing
  // your firmware
  Serial.begin(9600);
  // Wait for the Serial interface to be available
  while (!Serial) delay(10);
  // Prepares to receive data from the infrared receiver
  irRecv.enableIRIn();
}

void loop() {
  StaticJsonDocument<500> output;
  bool has_changes = false;

  // Read temperature/humidity data
  DHT.read11(DHT11_PIN);
  float temp = DHT.temperature;
  float humidity = DHT.humidity;

  if (temp != DHTLIB_INVALID_VALUE && temp != last_temp_value) {
    doc["temperature"] = temp;
    has_changes = true;
  }

  if (humidity != DHTLIB_INVALID_VALUE && humidity != last_humidity_value) {
    doc["humidity"] = temp;
    has_changes = true;
  }

  // Read IR data
  if (irRecv.decode(&ir_results)) {
    unsigned long value = ir_results.value;
    if (value != NO_IR_VALUE && value != last_ir_value) {
      doc["ir"] = String(value, HEX);
      has_changes = true;
    }

    last_ir_value = value;
    irRecv.resume();
  } else {
    if (last_ir_value != NO_IR_VALUE) {
      doc["ir"] = String(NO_IR_VALUE, HEX);
      has_changes = true;
    }

    last_ir_value = NO_IR_VALUE;
  }

  if (has_changes) {
    // If we have some new data, then push it down the wire
    serializeJson(doc, Serial);

    // If we have received an infrared event, then wait half a second before
    // resuming - that's because the infrared signal may be sent multiple times,
    // or spurious signals may be received in the transition between the remote
    // key up and key down
    if (last_ir_value != NO_IR_VALUE) {
      delay(500);
    }
  }

  delay(10);
}
Compile the project, flash it to your device from the Arduino IDE or command-line, connect it to your machine, and run a serial monitor to check that it works. For example:
picocom /dev/ttyUSB0 -b9600
Point a remote at it for example and press a button. You should receive a JSON message on the serial interface that the Platypush service can listen to, and where you can hook your custom logic.
Note that in this example we've taken into consideration a traditional Arduino device with a custom firmware written in C. This isn't the only available option that Platypush provides to interact with microcontrollers. You also have:
-
The
arduinospecific integration, which interacts with devices flashed with the Firmata firmware or compatible with its protocol. While it takes away most of the hassle of having to write custom code for your microcontroller, it provides a bit less flexibility - for example, it's hard to get it to run out of the box with devices that require specific libraries to work (likeIRremotein our case). -
The
espplugin, which specifically interacts with ESP-compatible devices over Wi-Fi. -
The
sensor.mcp3008, if you want to go more minimal and you only need an analog->digital converter for your sensors connected to e.g. your RaspberryPi.
Also, note that, while the serial plugin requires you to write your own code
for the microcontroller, it's also basically language-agnostic and
device-agnostic when it comes to the microcontroller on the other side. It can
be an Arduino with code written in C, an ESP microcontroller with a Node.js
interface, or a RaspberryPi Pico with MicroPython code. It doesn't really
matter: as long as it pushes JSON key-value dictionaries down the wire,
Platypush should be able to parse all of its messages and generate the
appropriate events that you can subscribe to.
Once your device is ready to produce JSON messages on the wire, you can configure the Platypush integration:
serial:
    # The path to the USB interface with e.g. an Arduino or ESP microcontroller
    # connected.
    # A way to get a deterministic path name on Linux, instead of
    # `/dev/ttyUSB<n>`, can be the following:
    #
    # - Get the vendor and product ID of your device via e.g. `lsusb`. For
    #   example, for an Arduino-compatible microcontroller:
    #
    #   Bus 001 Device 008: ID 1a86:7523 QinHeng Electronics CH340 serial converter
    #
    # - In the case above, `1a86` is the vendor ID and `7523` is the product
    #   ID. Create a new udev rule for it, so every time the device is
    #   connected it will also be symlinked to e.g. `/dev/arduino`:
    #
    #   echo 'SUBSYSTEM=="tty", ATTRS{idVendor}=="1a86", ATTRS{idProduct}=="7523", SYMLINK+="arduino"' | \
    #       sudo tee /etc/udev/rules.d/98-usb-serial.rules
    device: /dev/ttyUSB0
    # How often the interface should be polled for updates, in seconds
    poll_interval: 1
    # The tolerance argument can be used to tune when you want to be notified
    # of data changes through `SensorDataChangeEvent` events. In the case
    # below, if the microcontroller sends two consecutive temperature reads,
    # one for 22.0 and one for 22.2, then only one `SensorDataChangeEvent` will
    # be triggered (for the first read), since the absolute value of the
    # difference between the two events is less than the configured tolerance.
    # However, if the device sends two temperature reads, one for 22.0 and one
    # for 22.7, then two `SensorDataChangeEvent` events will be triggered.
    # The tolerance for all the metrics is set to a value close to zero by
    # default - i.e. any read, unless it's exactly the same as the previous
    # one, will trigger a new event.
    tolerance:
        temperature: 0.5
        humidity: 0.75
        luminosity: 5

    # If a threshold is defined for a sensor, and the value of that sensor goes
    # below/above that temperature between two reads, then a
    # `SensorDataBelowThresholdEvent` or a `SensorDataAboveThresholdEvent` will
    # be triggered respectively.
    thresholds:
        temperature: 25.0
Note that the same interface/configuration of the serial plugin applies to all
plugins that implement support for sensors.
zigbee.mqtt
zigbee2mqtt is a popular DIY framework for
running your own Zigbee bridge. You can connect any Hue-compatible light or
sensor to it, as well as most of the e.g. modern Ikea bulbs and any electronic
appliance that communicates over Zigbee.
You can flash a zigbee2mqtt-compatible firmware on a variety of USB dongles following the instructions on the project's website or on the plugin documentation page. Then you can pull a zigbee2mqtt image and configure it to connect to an MQTT broker.
The next step is to enable the zigbee.mqtt integration in your configuration:
zigbee.mqtt:
    # Host of the MQTT broker
    host: my-mqtt-broker
    # Listen port of the MQTT broker
    port: 1883
    # Base topic, as specified in `<zigbee2mqtt_dir>/data/configuration.yaml`
    topic_prefix: zigbee2mqtt
You should now be ready to pair and control Zigbee devices on your bridge through Platypush.
camera.ffmpeg
camera.ffmpeg
is the most extensively tested way of integrating with hardware cameras. It
supports basically any camera that speaks the v4l2 protocol and a variety of
other ffmpeg-supported protocols.
camera.gstreamer
is also available if you want to use a
GStreamer backend,
camera.cv if
you want to leverage the OpenCV framework (usually
because you want to run some computer vision transformation on your images or
feed), and a deprecated
camera.pi
integration for the (now deprecated) PiCamera backend (note that PiCameras
are now v4l2-compatible, so they should work fine also using the FFmpeg or
GStreamer integrations).
Regardless of which integration you pick, all camera plugins share the same configuration options/interface:
camera.ffmpeg:
  # Default video device to use
  device: /dev/video0
  # Default resolution
  resolution:
    - 640
    - 480
  # The directory that will be used to store captured frames/images
  frames_dir: ~/Camera/Photos
  # Default image scaling factors (default: 1, no scaling)
  scale_x: 1.5
  scale_y: 1.5
  # Default rotation of the image, in degrees (default: 0, no rotation)
  rotate: 90
  # Grayscale mode (default: False):
  grayscale: false
  # Default frames per second (default: 16)
  fps: 16
  # Whether to flip the image along the horizontal axis (default: False)
  horizontal_flip: false
  # Whether to flip the image along the horizontal axis (default: False)
  vertical_flip: false
tts
Platypush currently supports three text-to-speech integrations:
- tts: it's the
default TTS plugin. It leverages Google Translate's unofficial frontend API to
render text to speech. This means that it requires no authentication nor extra
configuration, but the quality of the rendered speech and the flexibility of
the API may be a bit inferior to that that you would get through the
tts.google,
which leverages Google's official text-to-speech API (the
ttsplugin should work just fine for simple interactions though). A full open-source alternative is tts.mimic3, which leverages the open-source Mimic 3 TTS engine, part of the (now defunct) Mycroft open voice suite.
All these plugins share the same base configuration, and some may have integration-specific extra options (like voice or gender):
tts:
  language: en-US
  volume: 100
Installing the configured service
Once we're happy with our configuration, we can proceed with installing the service with all of the extra dependencies required by the configured extensions.
You can consult the Installation and Installing extensions wiki pages for more details about the supported installation methods. This section assumes that you have already installed the core service with its base dependencies.
Let's recap some of the supported ways, now that we have a full configuration.
UI installation
This is a viable, user-friendly route if you have installed the base service
(via pip, package manager or vanilla Docker image) and you want to install
your dependencies in the same environment through the Web interface. Note that
this method requires the backend.http integration to be enabled (and by
default it is).
-
Start Platypush via
platypush [--start-redis] [...]. NOTE: do not start Platypush from your new configuration file yet. If some of the configured extensions have missing dependencies, the service may fail to start too. -
Head to the Web panel, by default at
http://ip:8008/, and register/login. -
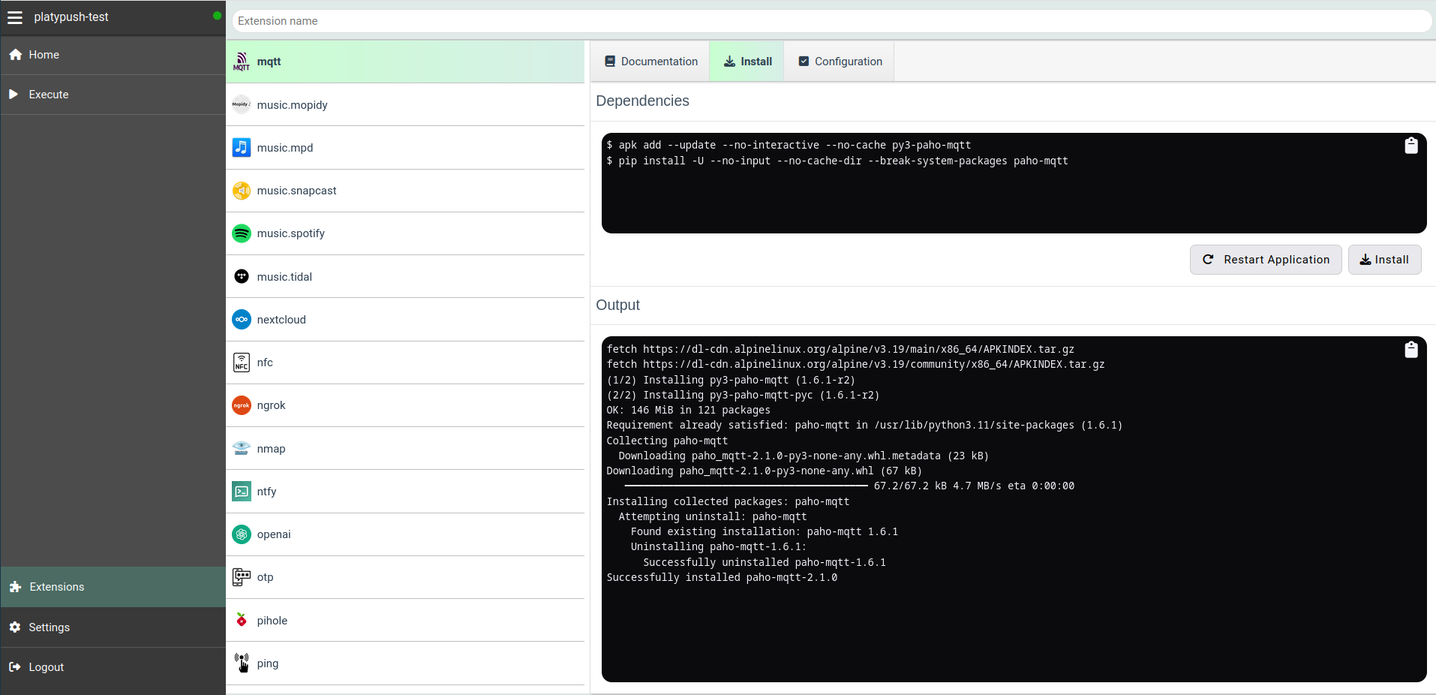
Click on Extensions at the bottom of the main menu. The page may take a while to load the first time or after an update, as it has to scan the source code for extensions metadata, but it's much faster once the extensions have been cached.
-
Select the extensions that you want to install, and install their dependencies through the Install tab.
When you are done installing all the extensions, you can proceed with restarting the application.
API installation
Alternatively, you can install the extra dependencies in your environment through the Web API.
Get an authentication token (from the UI, Settings ➡️ Tokens) and then use
the
application.install
API to install the extra dependencies:
# Repeat for all the desired integrations
curl -XPOST -H "Content-Type: application/json" \
  -H "Authorization: Bearer <TOKEN>" \
  -d '
  {
    "type": "request",
    "action": "application.install",
    "args": {
      "extension": "mqtt"
    }
  }' \
  'http://my-host:8008/execute'
You can also use the API through the Python REPL itself:
>>> from platypush import run
>>> run('application.install', 'mqtt')
platydock
It's quite easy to build a Platypush Docker image given a configuration file
through the platydock command:
# Available base images: -i {alpine,debian,fedora,ubuntu}
platydock -c /path/to/config.yaml -d device-name -t platypush
This command will build a Platypush base image, infer the extra dependencies from the extensions that you specified in your configuration file, and install everything that is required to start your service.
If instead of building the container you want to just generate a Dockerfile
for your installation, which you can customize to your liking, you can use the
--print option of platydock.
You can then start a container via:
docker run -it --rm
  --name platypush \
  -v /path/to/your/confdir:/etc/platypush \
  -v /path/to/your/workdir:/var/lib/platypush \
  -p 8008:8008 \
  platypush
Note that you may need to expose extra devices to the container via --device
option if you configured extensions that require that access. For instance, if
you enabled a camera plugin your container may need to be started with --device /dev/video0, or if you enabled a voice assistant, text-to-speech or
sound-dependent plugin then you may have to expose the sound devices to the
container via --device /dev/snd.
platyvenv
Another option is to create a virtual environment for Platypush, with all the required dependencies automatically installed.
If you already installed the base service, then you can leverage the platyvenv
utility for it, which supports the same base options as platydock:
platyvenv -c /path/to/config.yaml -d device-name -o venv-output-dir
This command will install a virtual environment under venv-output-dir with all
the dependencies required by your configured extensions.
You can then start it with:
source VENV_PATH/bin/activate
platypush -c /path/to/config.yaml [--start-redis] [...opts]
Manual installation
Finally, you have the manual way.
Check out the documentation page of each of your extensions on the main documentation, scroll to the dependencies section, and run the commands one by one.